Cylinder pixel map

function (pixelCount) {
  var map = [];
  var strands = 16;
  var pixPerRing = 14;
    for (strand = 0; strand < strands; strand++) {
      for (i = 0; i < pixPerRing; i++) {
        c = strand / strands * Math.PI * 2
        if (strand % 2) {
          map.push([Math.cos(c), Math.sin(c), i ])
        } else {
          map.push([Math.cos(c), Math.sin(c), pixPerRing -1 - i ])
        }
      }
    }
  return map
  
}

cylinder

let me know if I got the direction right… I think I goofed it.

1 Like

Hi @JerryB,
The first thing to know is that a pattern can have multiple render functions and has variants for 1D, 2D, and 3D.

You have the original render(index) for 1D strips, most patterns have this method.
If a 2D map is installed, it will also look for a render2D(index, x, y) exported function and use that instead.
Likewise, if a 3D map is installed, it will look for a render3D(index, x, y, z) exported function. This is probably what you want, though you could also treat it as a 2D shape (like a bit of paper wrapped around in a cylinder shape).

The pixel coordinates on the Mapper tab is fed to the pattern through those x, y, and z parameters. They are scaled to “world units” so that a pattern will scale to any map, so x will range between 0 and 1.0.

To test/verify 3D patterns, I’d load up Roger’s excellent RGB-XYZ sweep pattern:
RGB-XYZ 3D Sweep.epe (8.3 KB) - keep in mind though, this ONLY has a render3D so will not draw anything until you have a 3D map set up. You can load it in the editor while you adjust things on the mapper tab.

This is also available on the pattern sharing site, along with more awesome 3D capable patterns (look for 3D in the name, or a render3D function in the code).

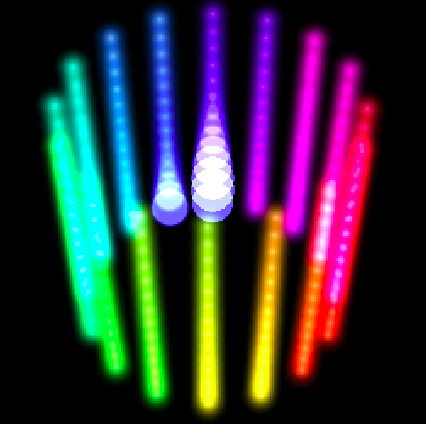
I’m going to assume you are going 3D, using @jeff’s map from the 2nd post in this topic.

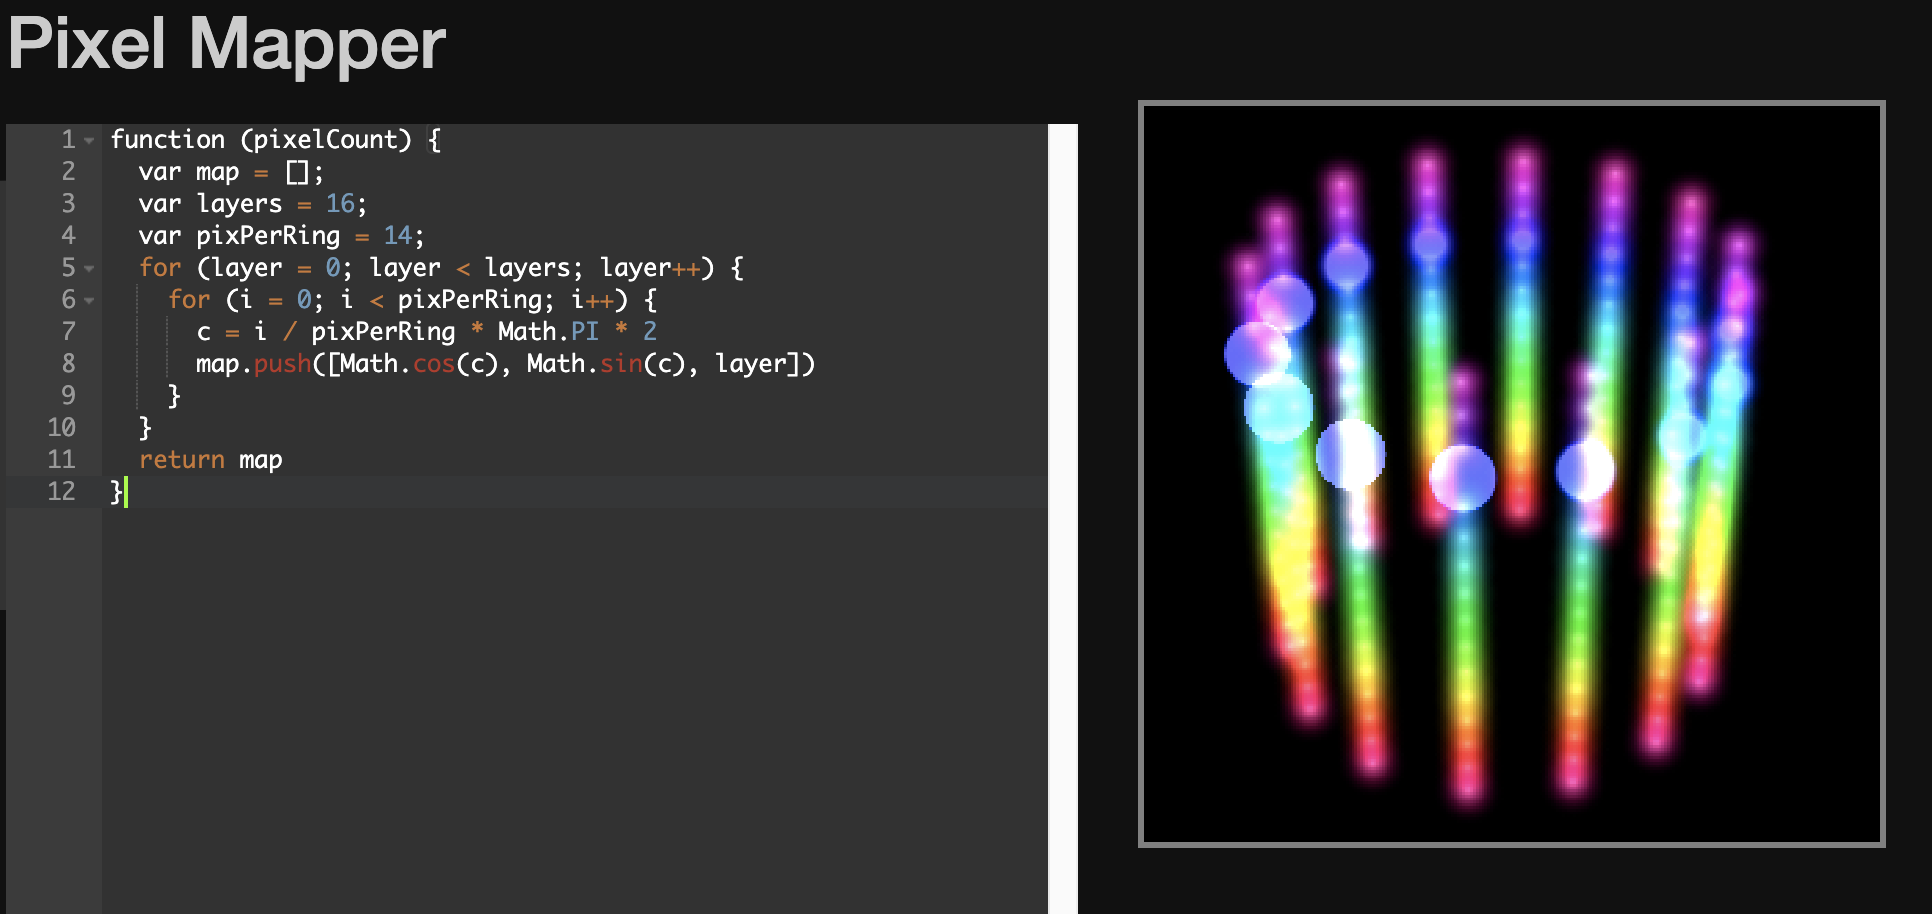
Adjust the layers and pixPerRing for your setup. Just like the pattern editor, the changes in the mapper are live. You should see a cylinder pop up in the preview.

You should get something like this:

If you are running the XYZ sweep pattern, you should see one color travel up the cylinder, another wash through it from the front to back, and other from left to right.

If you want something to travel around the outer circumference of each ring instead of through it, you can get the angle from the (x,y) and use that. Something like this, which will paint a gradient traveling clockwise, with a different color for each step up the cylinder:


function arctan2(y, x) {
  if (x > 0) return atan(y/x)
  if (y > 0) return PI / 2 - atan(x/y)
  if (y < 0) return -PI / 2 - atan(x/y)
  if (x < 0) return PI + atan(y/x)
  return 1.0
}

//return the angle in radians, can be negative
function getAngleInRads(x, y) {
  //center the coordinate, then get the angle
  return arctan2(x - .5, y - .5)
}

//return the angle as a value between 0 and 1.0
//most of Pixelblaze's animation language uses this range
//it also happens to rotate the angle so that 0 is north
function getUnitAngle(x, y) {
  return (PI + arctan2(x - .5, y - .5))/PI2 
}

export function beforeRender(delta) {
  t1 = time(.1)
}

export function render3D(index, x, y, z) {
  //get the angle of the pixel, and move it clockwize over time
  //pass that into triangle() to turn into a gradient
  v = triangle(getUnitAngle(x, y) + t1)
  v = v*v //square it up for contrast
  h = z //each step in height should get a different color
  s = 1
  hsv(h, s, v)
}

//for broad compatibility, support 2D maps as well
export function render2D(index, x, y) {
  render3D(index, x, y, 0)
}
1 Like

@wizard, did you notice the strips go up and down, not around? it’s not rings, it’s columns of leds.

All of the rest is true, but my mapping is up/down, not ring by ring.

Thanks Scruffy for calling that out…and yes @Wizard, I would like to go 3D. I presume my up/down strips negates my using @Jeff’s map?

Yes, Jeff’s map needed to be modified, which is what I did, it should work for you, and in 3d

@Scruffynerf,
Ah, missed that. Also I think I was writing as you replied and didn’t see it.

Still, once the map is in place, the pattern stuff in my previous post should be the same (one of the benefits of PB pixel maps!).

@JerryB, right, try @Scruffynerf’s map, not Jeff’s.

1 Like

I didn’t flesh out comments on changes, but basically instead of doing a ring at a time, it does a strand ( aka column ) at a time, positions it based on the strand # as an angle (instead of each pixel in the ring, and puts each pixel at the right height, using the odd/even number of the strand to decide whether to go up or down, which is the strand # mod 2 (either 0 or 1) to decide which (and either counts up or subtracts down).

Btw, excellent example of NOT needing to run power to the ends of your strips, and putting the V and G wires in a loop slightly lower/higher. The data wires are all in order but a much clearer layout as a result. (Only need 1 wire from each strand to the next!)

I’m really glad you posted a photo, we’d have not gotten it right otherwise.

1 Like

@Scruffynerf thanks as this is perfect and u got the clockwise direction correct (up/left/down/left/x14). Thanks so much as I can study this and learn more. Let me mess with this and patterns to better understand.

@Wizard - thanks again!!!

1 Like

Here a video of your great work!

6 Likes

Thanks and yes, it keep things nice and tidy and sure makes it easier to not jam a bunch a solder and wires into a tight space! I learn a ton with each project…but the programming!!! grrrrrr!!!

2 Likes

@JerryB,
That’s gorgeous! Thanks for posting the video.

A post was merged into an existing topic: New to pixel mapping - map a cylinder

Hi @Scruffynerf,

I’m also fairly new to PB and mapping, but I found your plan for a cylinder that works well, but doesn’t match my soldered layout for me.

In my case, I wanted to solder all the strips just at the bottom and let the count go up and then start again at the bottom with the next strip (it’s a cylinder 6 strips x 60LEDs).
I use the output expander for better routing - 8 channels is enough for me.

Could you give me some advice on how to map this as a function?
Until now I have helped myself with a 2D map of coordinates ([0,1][0,2]…), but that doesn’t feels right and didn’t work for 3D.

Thank you very much - also for the advice I have already read here so far!