Over the years i’ve been struggling about deploying easily a Pixelblaze for wearables or quick deployment.
At the moment I need to:
wire a push putton to turn on/off the PB + LED when not in use (since wearables are battery powered)
wire a USB-C port or a cable going to a powerbank or 18650 cells…
solder and fit womehow a bunch of buttons for pattern control (phone control is difficult in festival environnement for example, and I want to be able to adjust quickly color / luminosity / speed on top of the next/prev pattern.
build myself an enclosure with cut outs for the buttons…
all of this in the smallest form factor possible…
Let’s say for one or 2 wearables it’s fine, but I have a dozen to do for my burning man crew and it’s getting annoying + not super professionnal looking (glueing the buttons with superglue is the worse).
I’m about to commission a job on Fiver (being unable to design a PCB and enclosure myself) for a PCB + Enclosure.
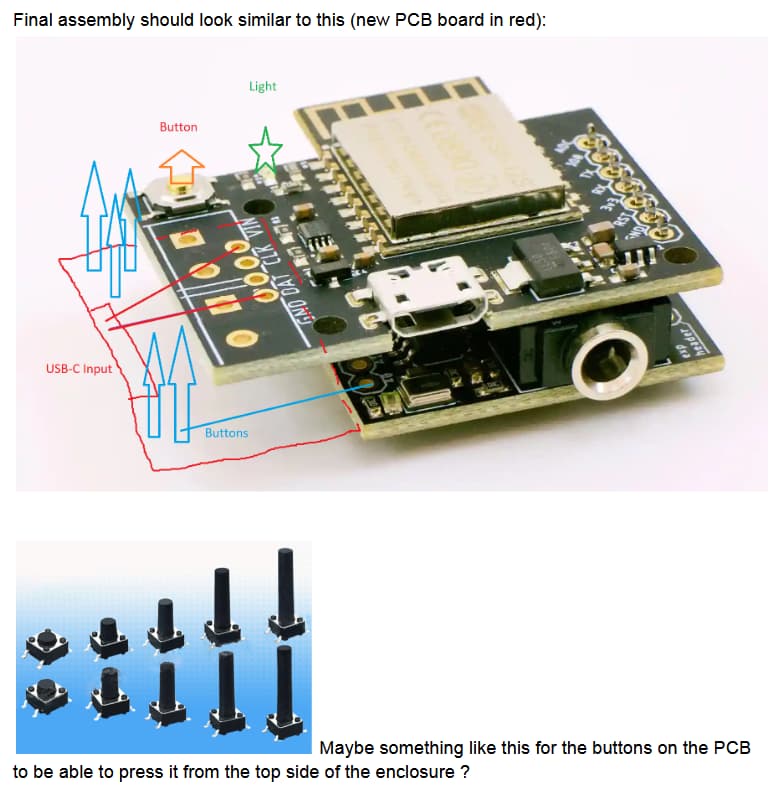
For my specific need, I try to stay as small as possible for wearables, which is already quite difficult considering the size of Pixelblaze + Sensor board (Pico does not have a sound sensor so deal breaker, and it’s breaking my heart). But i’m open to ideas to make it usable by others if possible.
Below are the features I’m looking to include:
Works for a combo PB V3 + Sensor Board underneath . I put the sensor board under to have access to the top button and leave the ESP32 more room to evacuate heat (it’s been a problem in the past).
USB In with Power Delivery if possible (minimum 3A, ideally 5A to cover pretty much any wearable project) powering directly the Pixelblaze. This power input can be switched with a button “ON/OFF”
No connector for LED: i will do the soldering because it depends of the direction I will send the cable to (also lacking space for a JST connector…
Buttons linked to the analog GPIO of the sensor board: WHY ? Because I can stream the status of these to other Pixelblazes synced to me. I’m thinking of putting 1 or 2 rotating knobs but it would increase the size and make it more difficult to put in a pocket for example.
Enclosure would allow access to these buttons, the power switch, and of course the Pixelblaze button and light indicator. I need to have the enclosure as flat as possible, same for the width (between line in and antenna). Length i’m a bit more flexible.
This PCB would be “easy to attach” with a header on the VCC / GND points for example
That would allow me to assemble a working Pixelblaze quickly.
Let me know what you think ?
Other ideas:
IR sensor to control it with an IR remote ? But no idea how to implement this
Fit somehow a JST connector ? But i really don’t know how to do this without increasing width or height.
Addtionnal question: would i be able to sell it for a small fee (to cover development cost) considering I’d be using the Electromage enclosure as base to design to my new enclosure. If I understand well it’s fine as long as it’s for a Pixelblaze (defintely the case here) and I reference the original source ?
Might be nice to have the USB-C come out the same side as the micro USB as it leaves more JST-XH output options. I do get how it affects the “hand and pocket feel” - all other comparable projects have chosen to go “long usb” like you illustrate. Right angle connector could work.
Would it be acceptable to you to have the sensor board input buttons on the side opposite of the normal button and light? For example, you might make the normal button a simple recessed flexible enclosure cutout actuation, and the other buttons come out the “bottom” of your diagram. The benefit is again more space and access to keep the small JST area an option. That connector is so important for modularity/swap-ability/reusability between projects. Ship your customer a replacement instead of having them send in the whole thing to be resoldered.
I’ve never understood the IR use case. If it’s a wearable or on a bike, my hands can reach it. If it’s mounted up high in my home or an installation, my phone can control it. The only case it seems to shine is no-internet, no AP mode, mounted awkwardly or far. And the user interface is comprehensive and cheap vs teaching a customer what not to do in the PB interface on a mobile device.
Fair for the IR remote, it’s not that useful, but it’s easier to operate in a festival environment than a phone, especially with difficult wifi. If it’s at the top of the totem it helps…
I need to go long USB for one of the items I’m working on, no choice for it but having the buttons on the other side could be manageable. I’ll think about it !
@ZacharyRD I’ll let you know once it’s completed.
Small update:
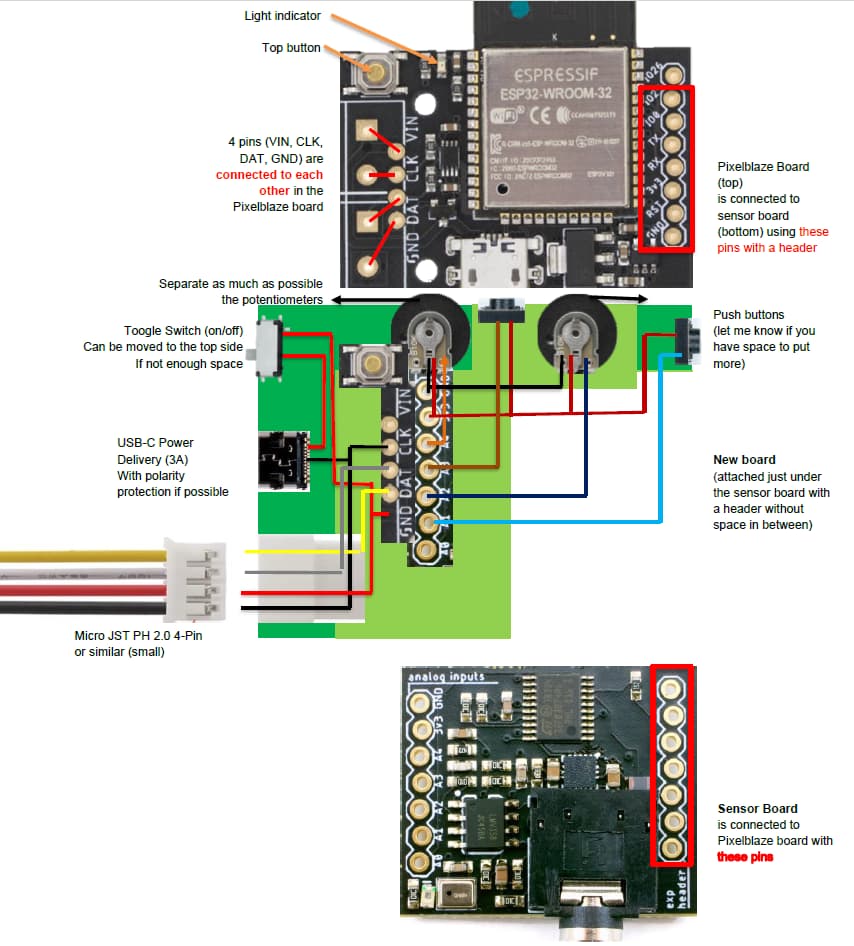
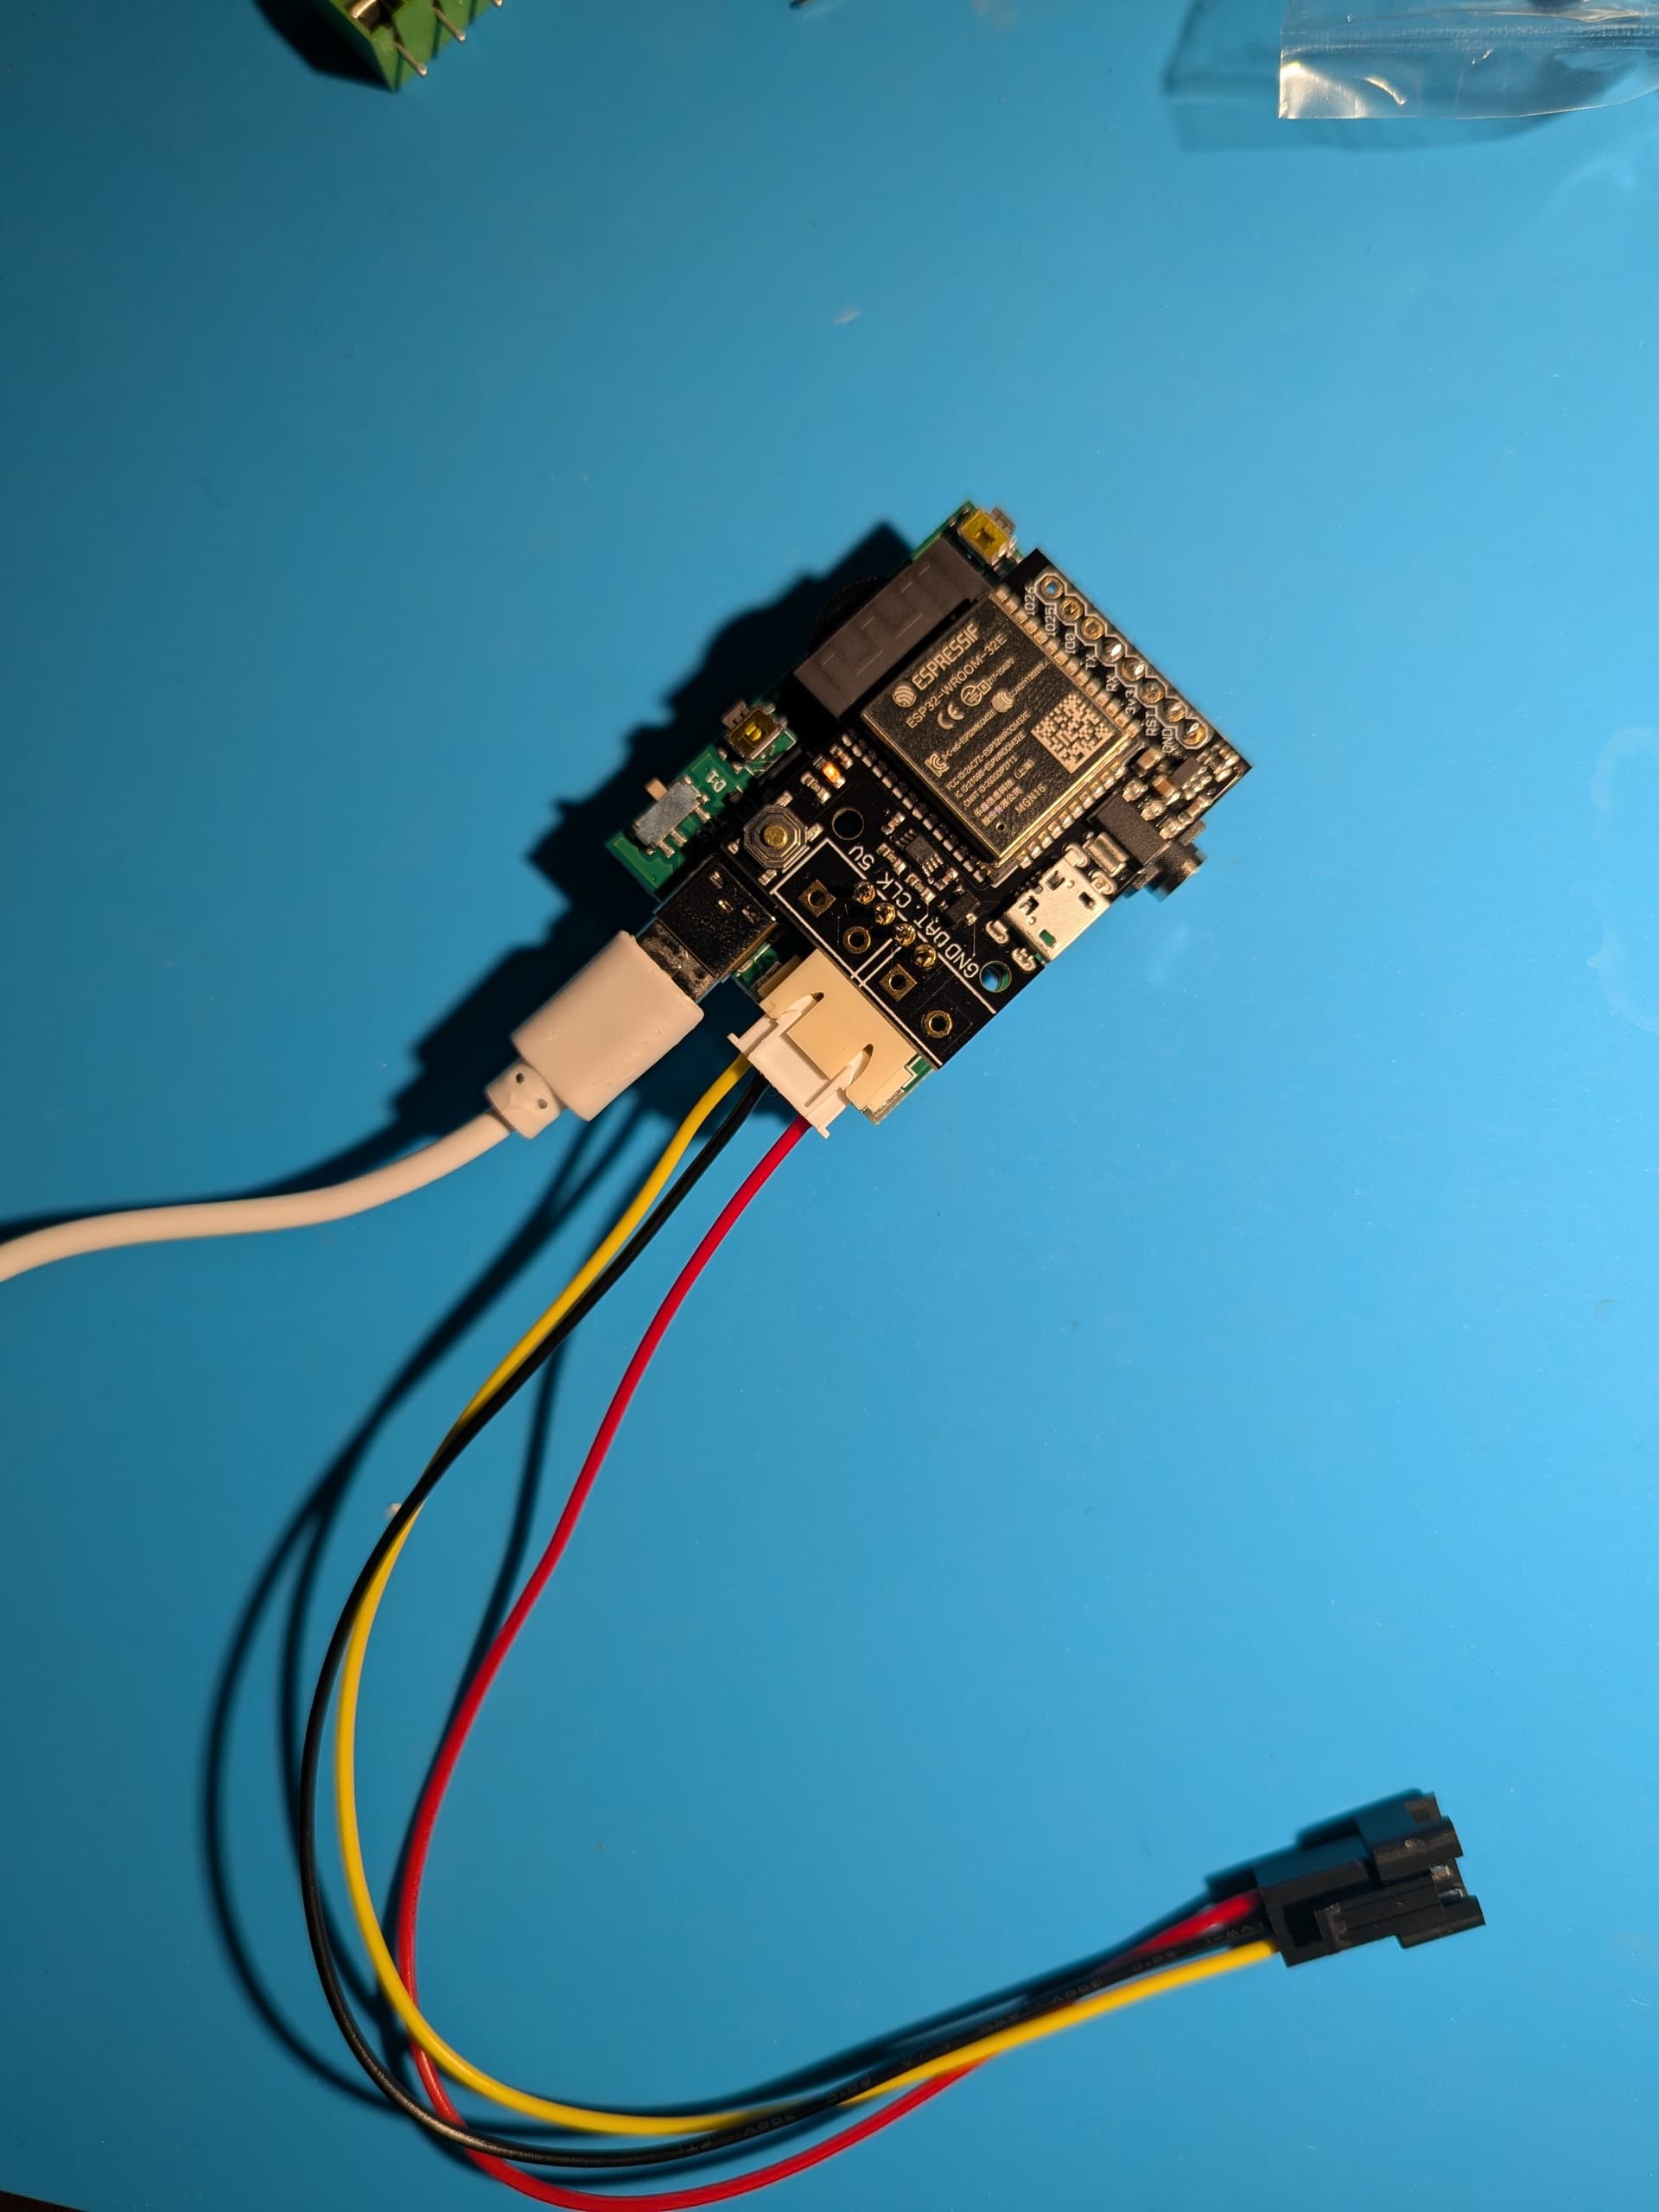
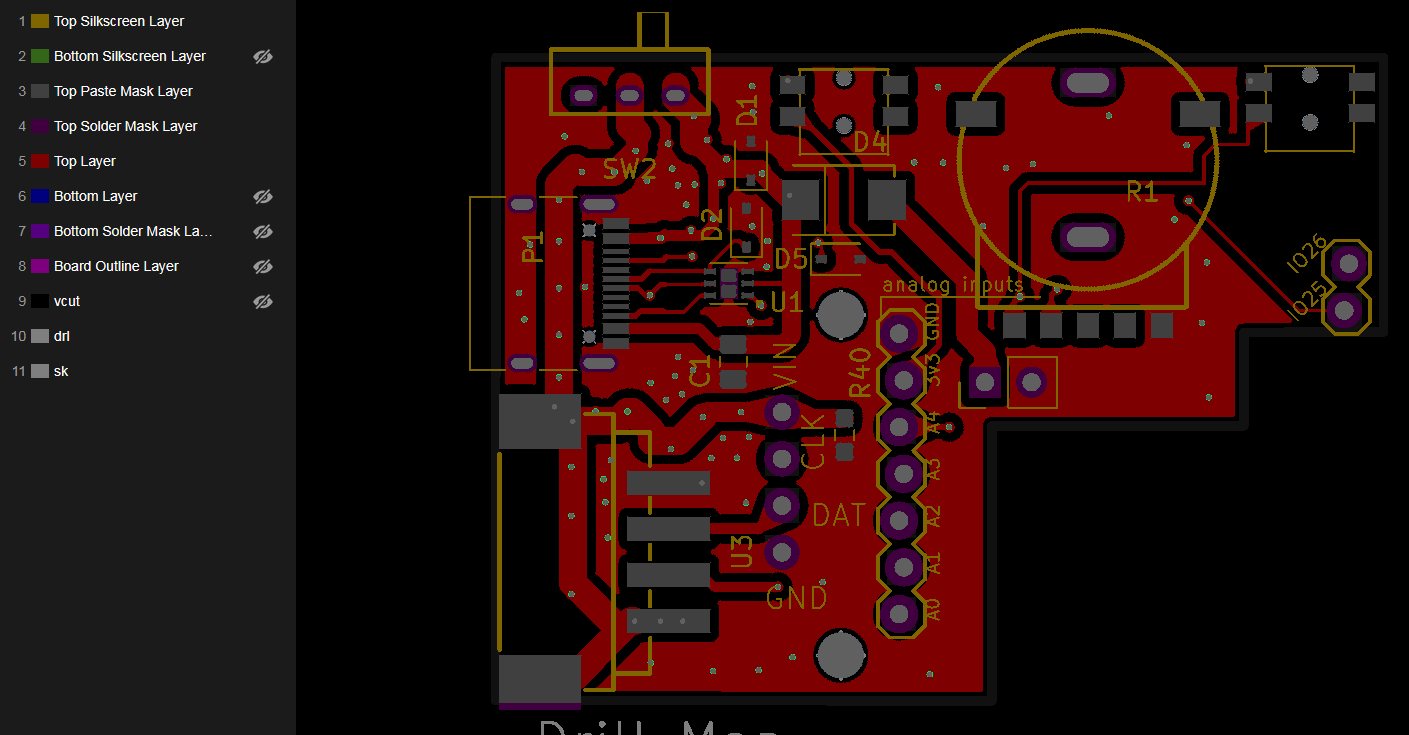
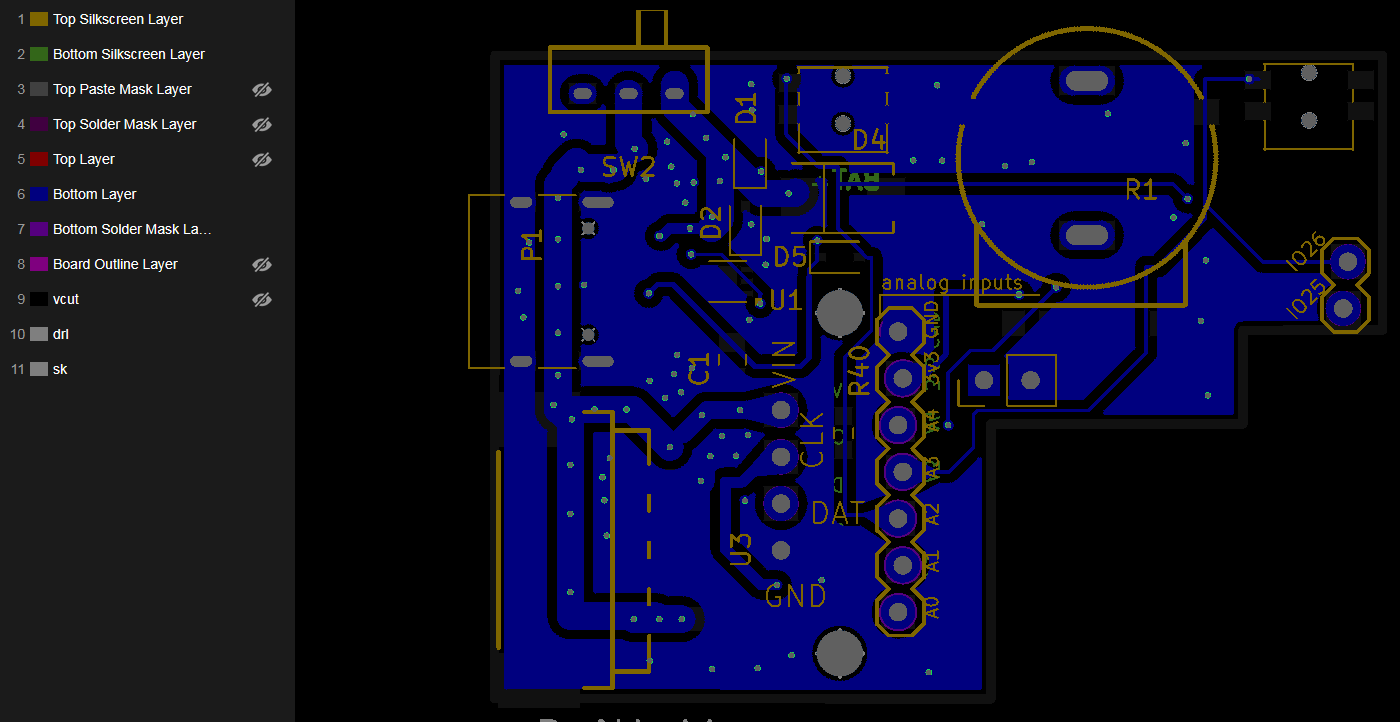
In order to minimize the size of the box (especially the thickness) without making the assembly too difficult, I realized the best way is to stick the new PCB just under the sensor board (without covering any exposed pads of course hence the wierd shape). Like this, I can connect sensor board and pixelblaze to the “new board” with just 2 headers without having to “jump” connections in the case of side by side boards. There is a minimal thickness increase but I can deal with it for the sake of a simple assembly.
In order to be be able to route power properly from USB, I moved the JST connector to my board (the one pre-connected to Pixelblaze on the shop does not allow to pass a header through).
Since the board is pretty low, having buttons directed at the top would be a waste of space: I decided to send them to the sides instead and use 1 or 2 potentiometers (if enough space) in the space between my board and the PB antenna basically. There is a space of about 10mm from the end of the sensor board to the top of the antenna I can use. The big advantage of potentiometers is that I can “save” settings between 2 different patterns (like luminosity and hue for example), contrary to the push buttons. Everything is connected to the sensor board to be able to sync these buttons to follower boards on the network. i will try to put as much space between the 2 wheels to avoid rotating one while rotating the other. One button is on a different side to allow user to press the button and rotate wheels with one hand.
Yes, USB and JST on same side are not ideal but this looks difficult to have the USB on the other side of the board without increasing the length significantly. It is actually convenient to have it like this for a wearable you wanna have access to regularly to adjust settings (the whole point of this case), as you can put it into a pocket. Note that I will add necessary components (if space allows it) to get USB-C PD (3A), and I will expose pads to solder if necessary a battery cable (for people doing their own Li-Ion batteries). No charging management: this should be handled by the battery.
Small update !
I have sent for production a first version of the PCB. I will test it once received to make sure it works and finalize the enclosure.
For space reasons and my own need, I had to reduce a bit the amount of controls and Power / Led output are on the same side.
Basically:
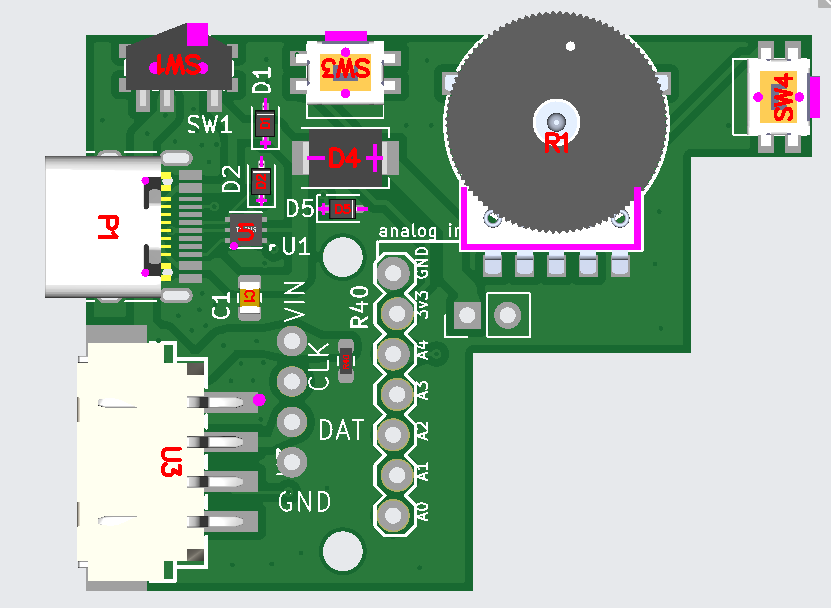
USB-C Power delivery (up to 3A) with a switch to fully turn on/off to avoid battery drain
JST-XH 4pin plug: can be used with the adapters sold by Electromage to connect 3 pin or 4 pin LED
1 thumbwheel potentiometer: this can allow to “keep” a setting (color or luminosity for me) between patterns or even after a reboot. This is the only way I’ve found to keep a setting for these cases as PB does not allow to save anything between patterns or reboots
2 addtionnal push buttons
Connection to sensor board so buttons status can be passed to other synchronized boards
At the moment it is designed to sit under the sensor board (which is under the Pixelblaze) with the sensor board header, adding about 5mm thickness, but I might actually be able to fit it BETWEEN the Pixelbaze and the sensorboard, without adding to the total thickness.
Note that the thumbwheel had to be placed under the antenna, so I’ll do some tests as I am afraid it might degrade Wifi signal reception.
Happy to take comments: I will probably need to ask for a revision.
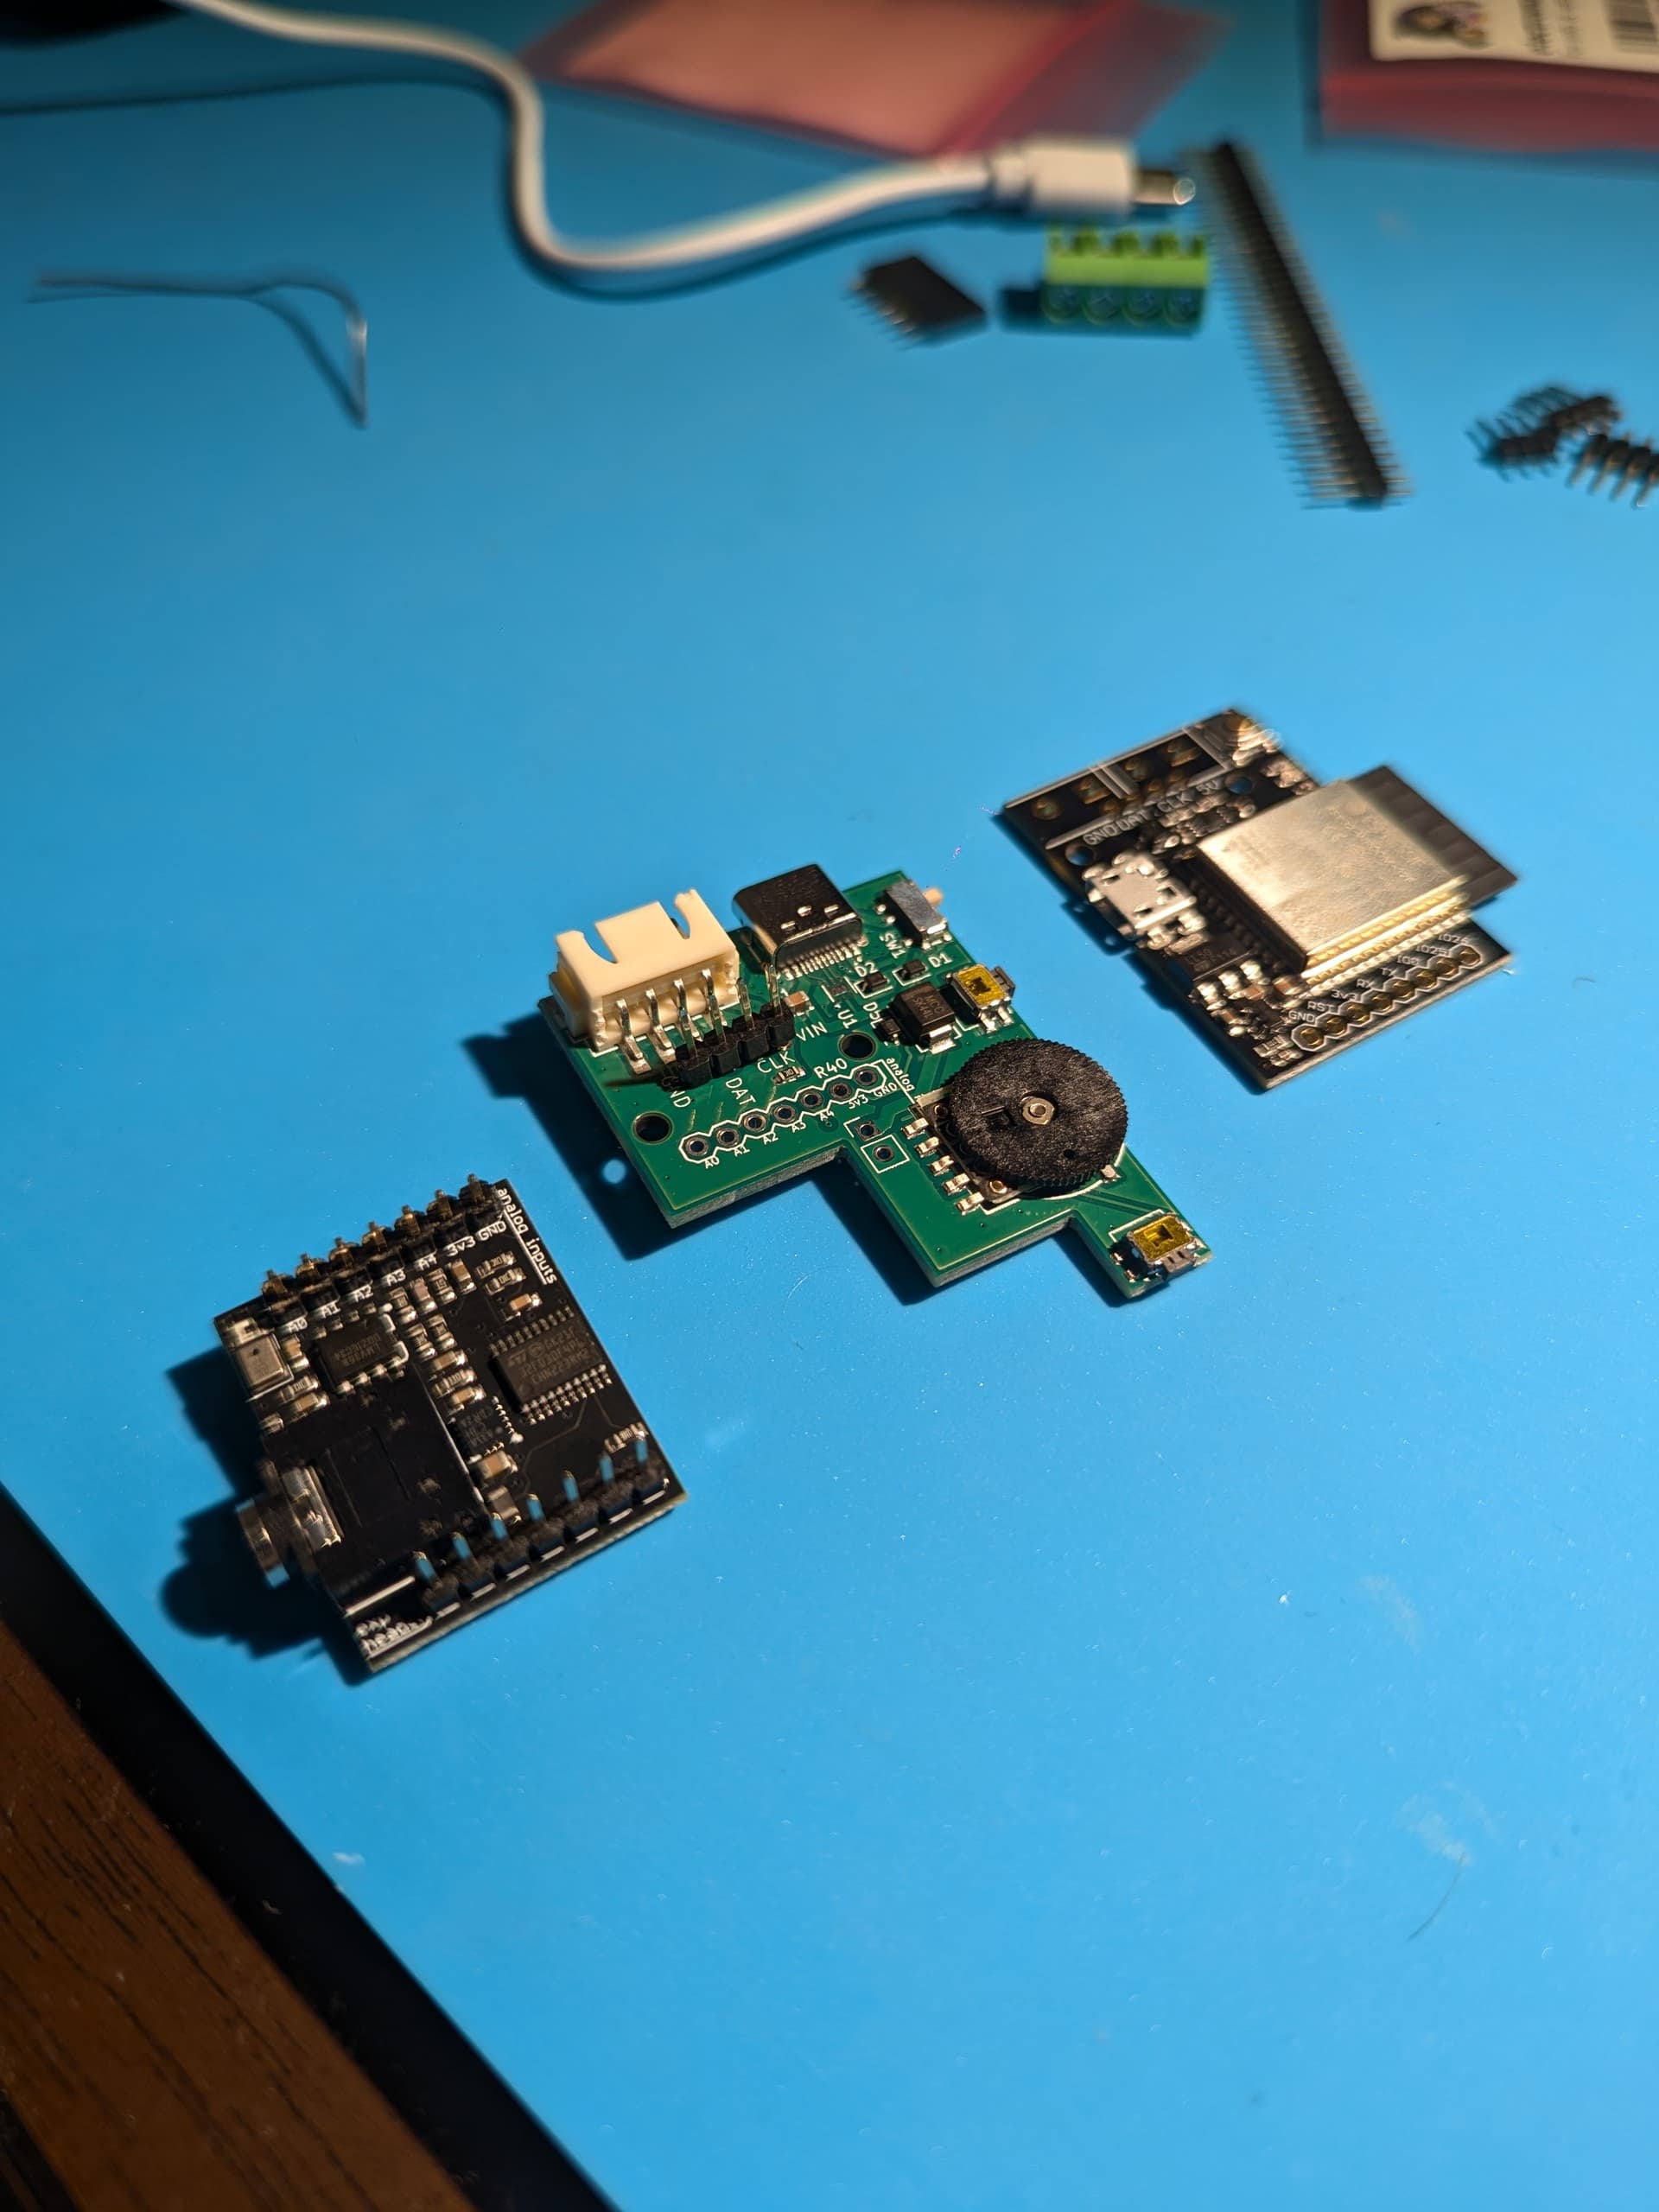
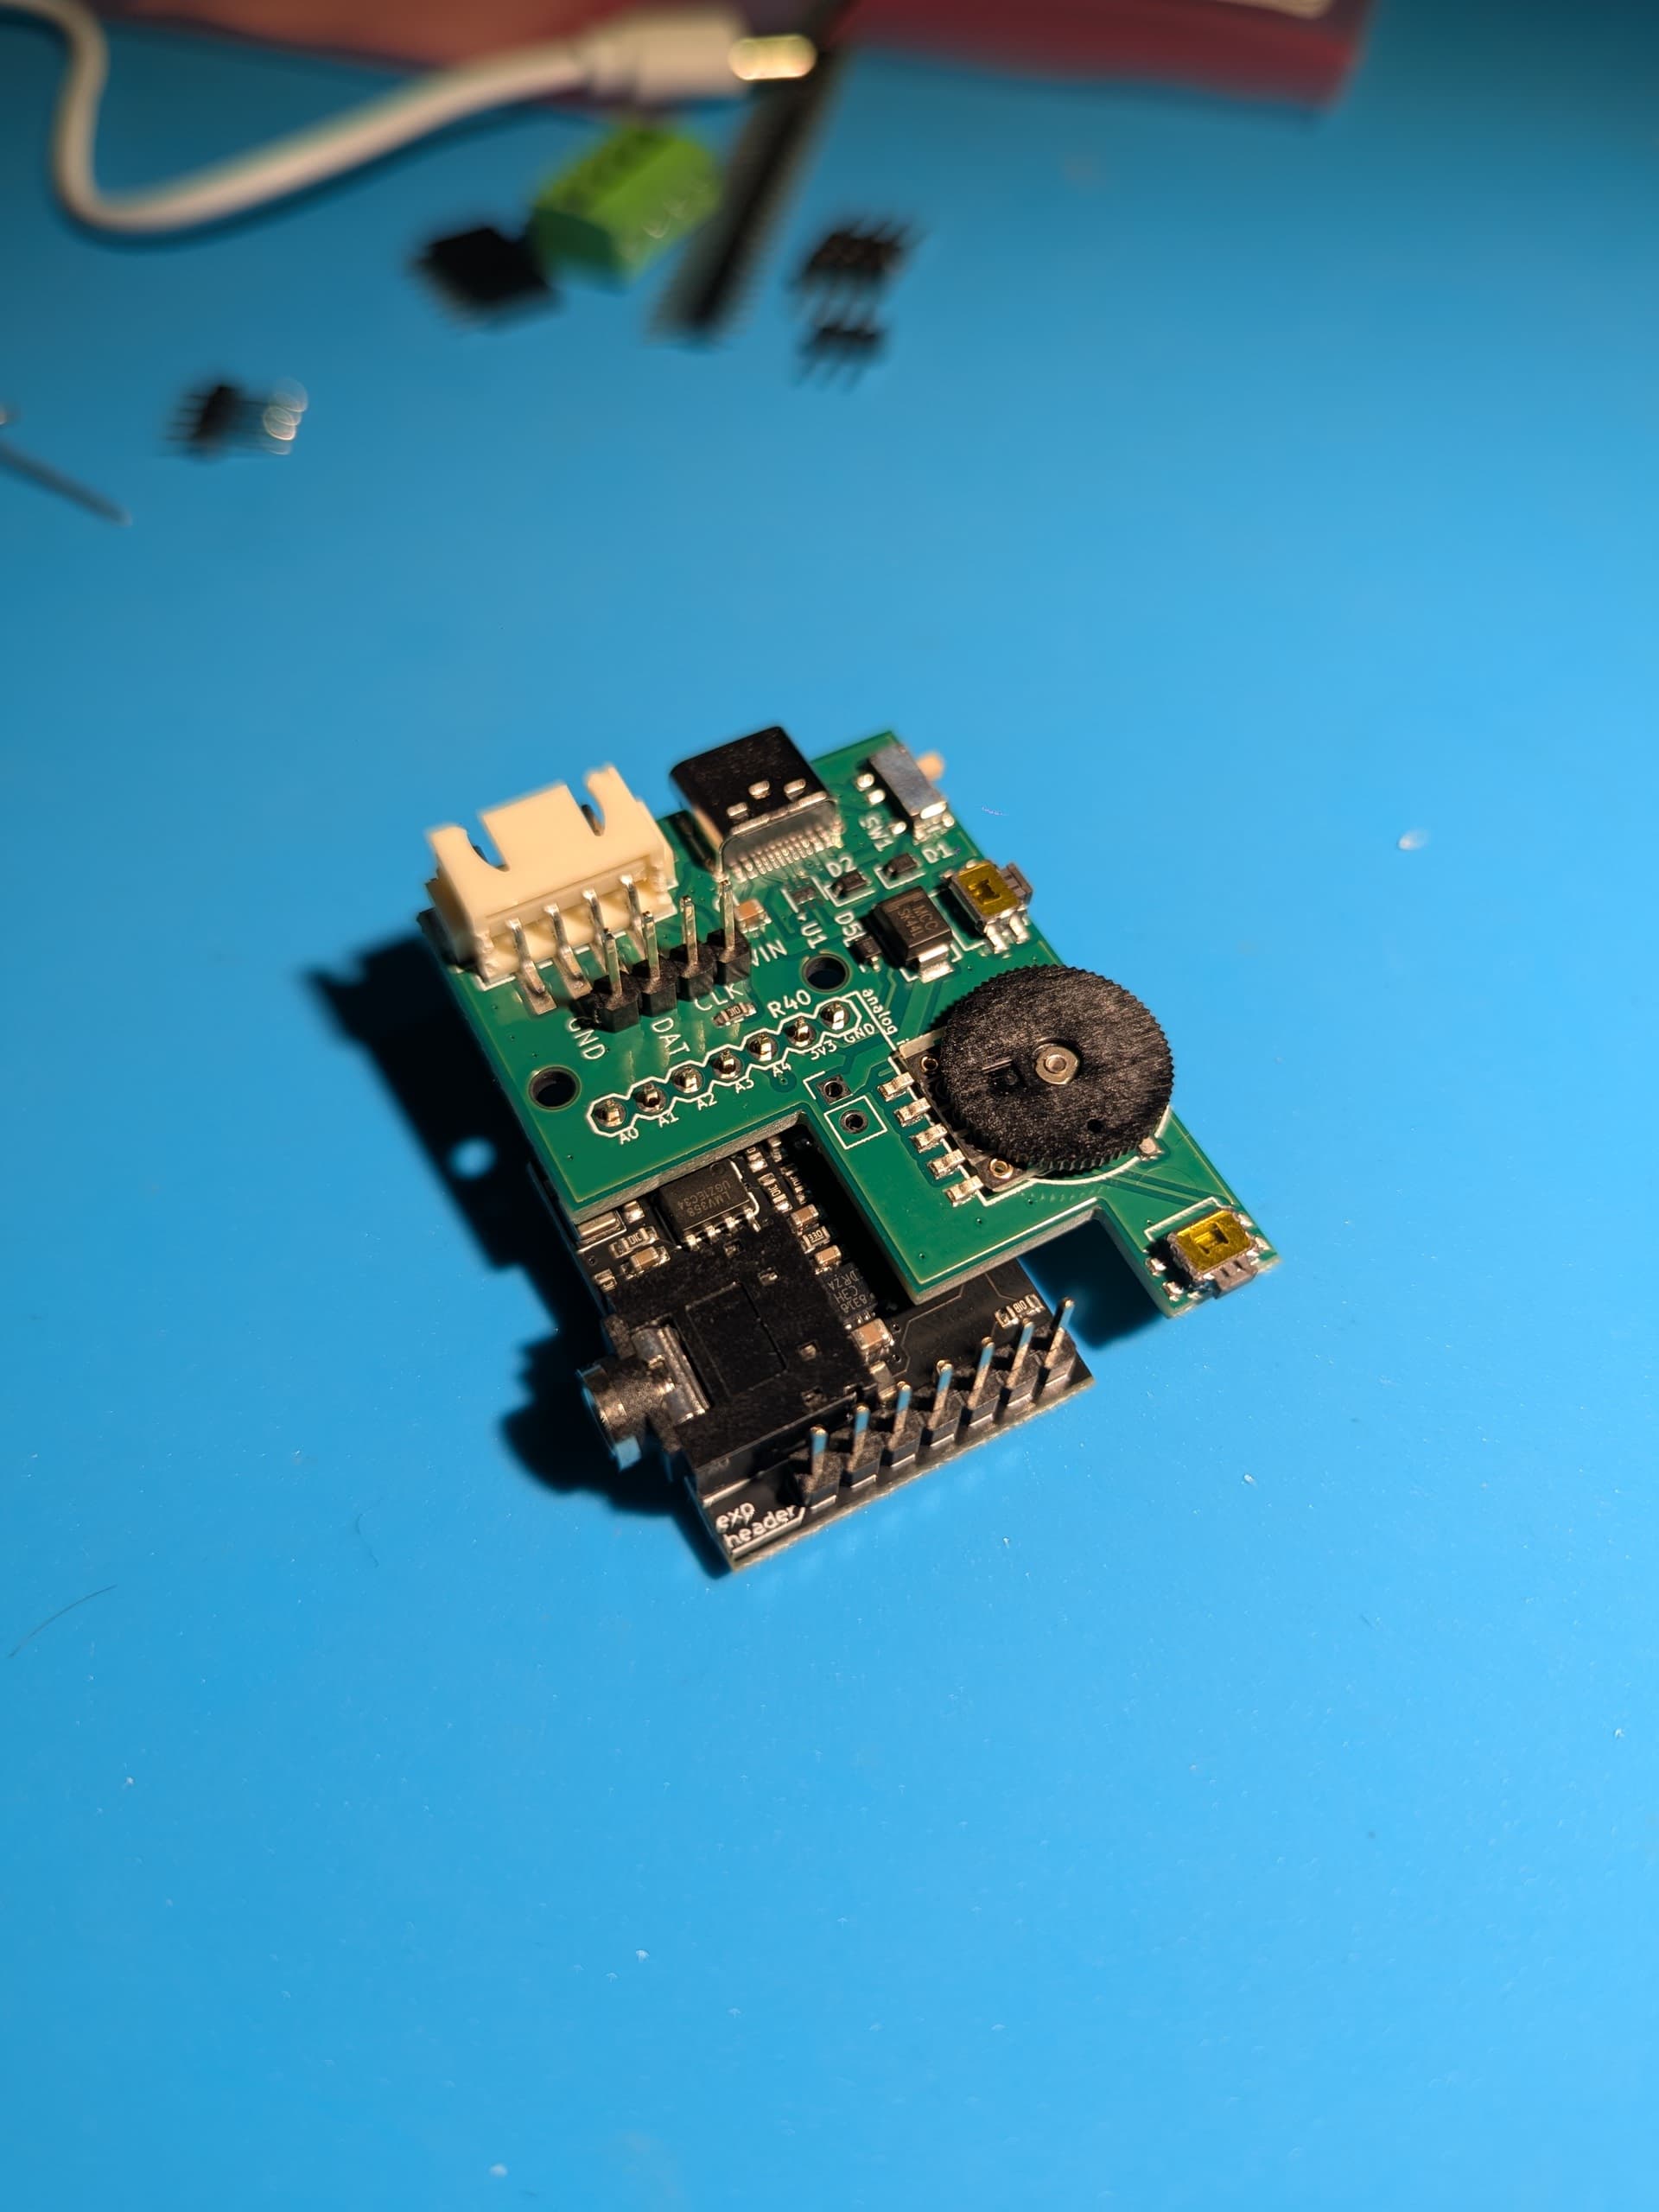
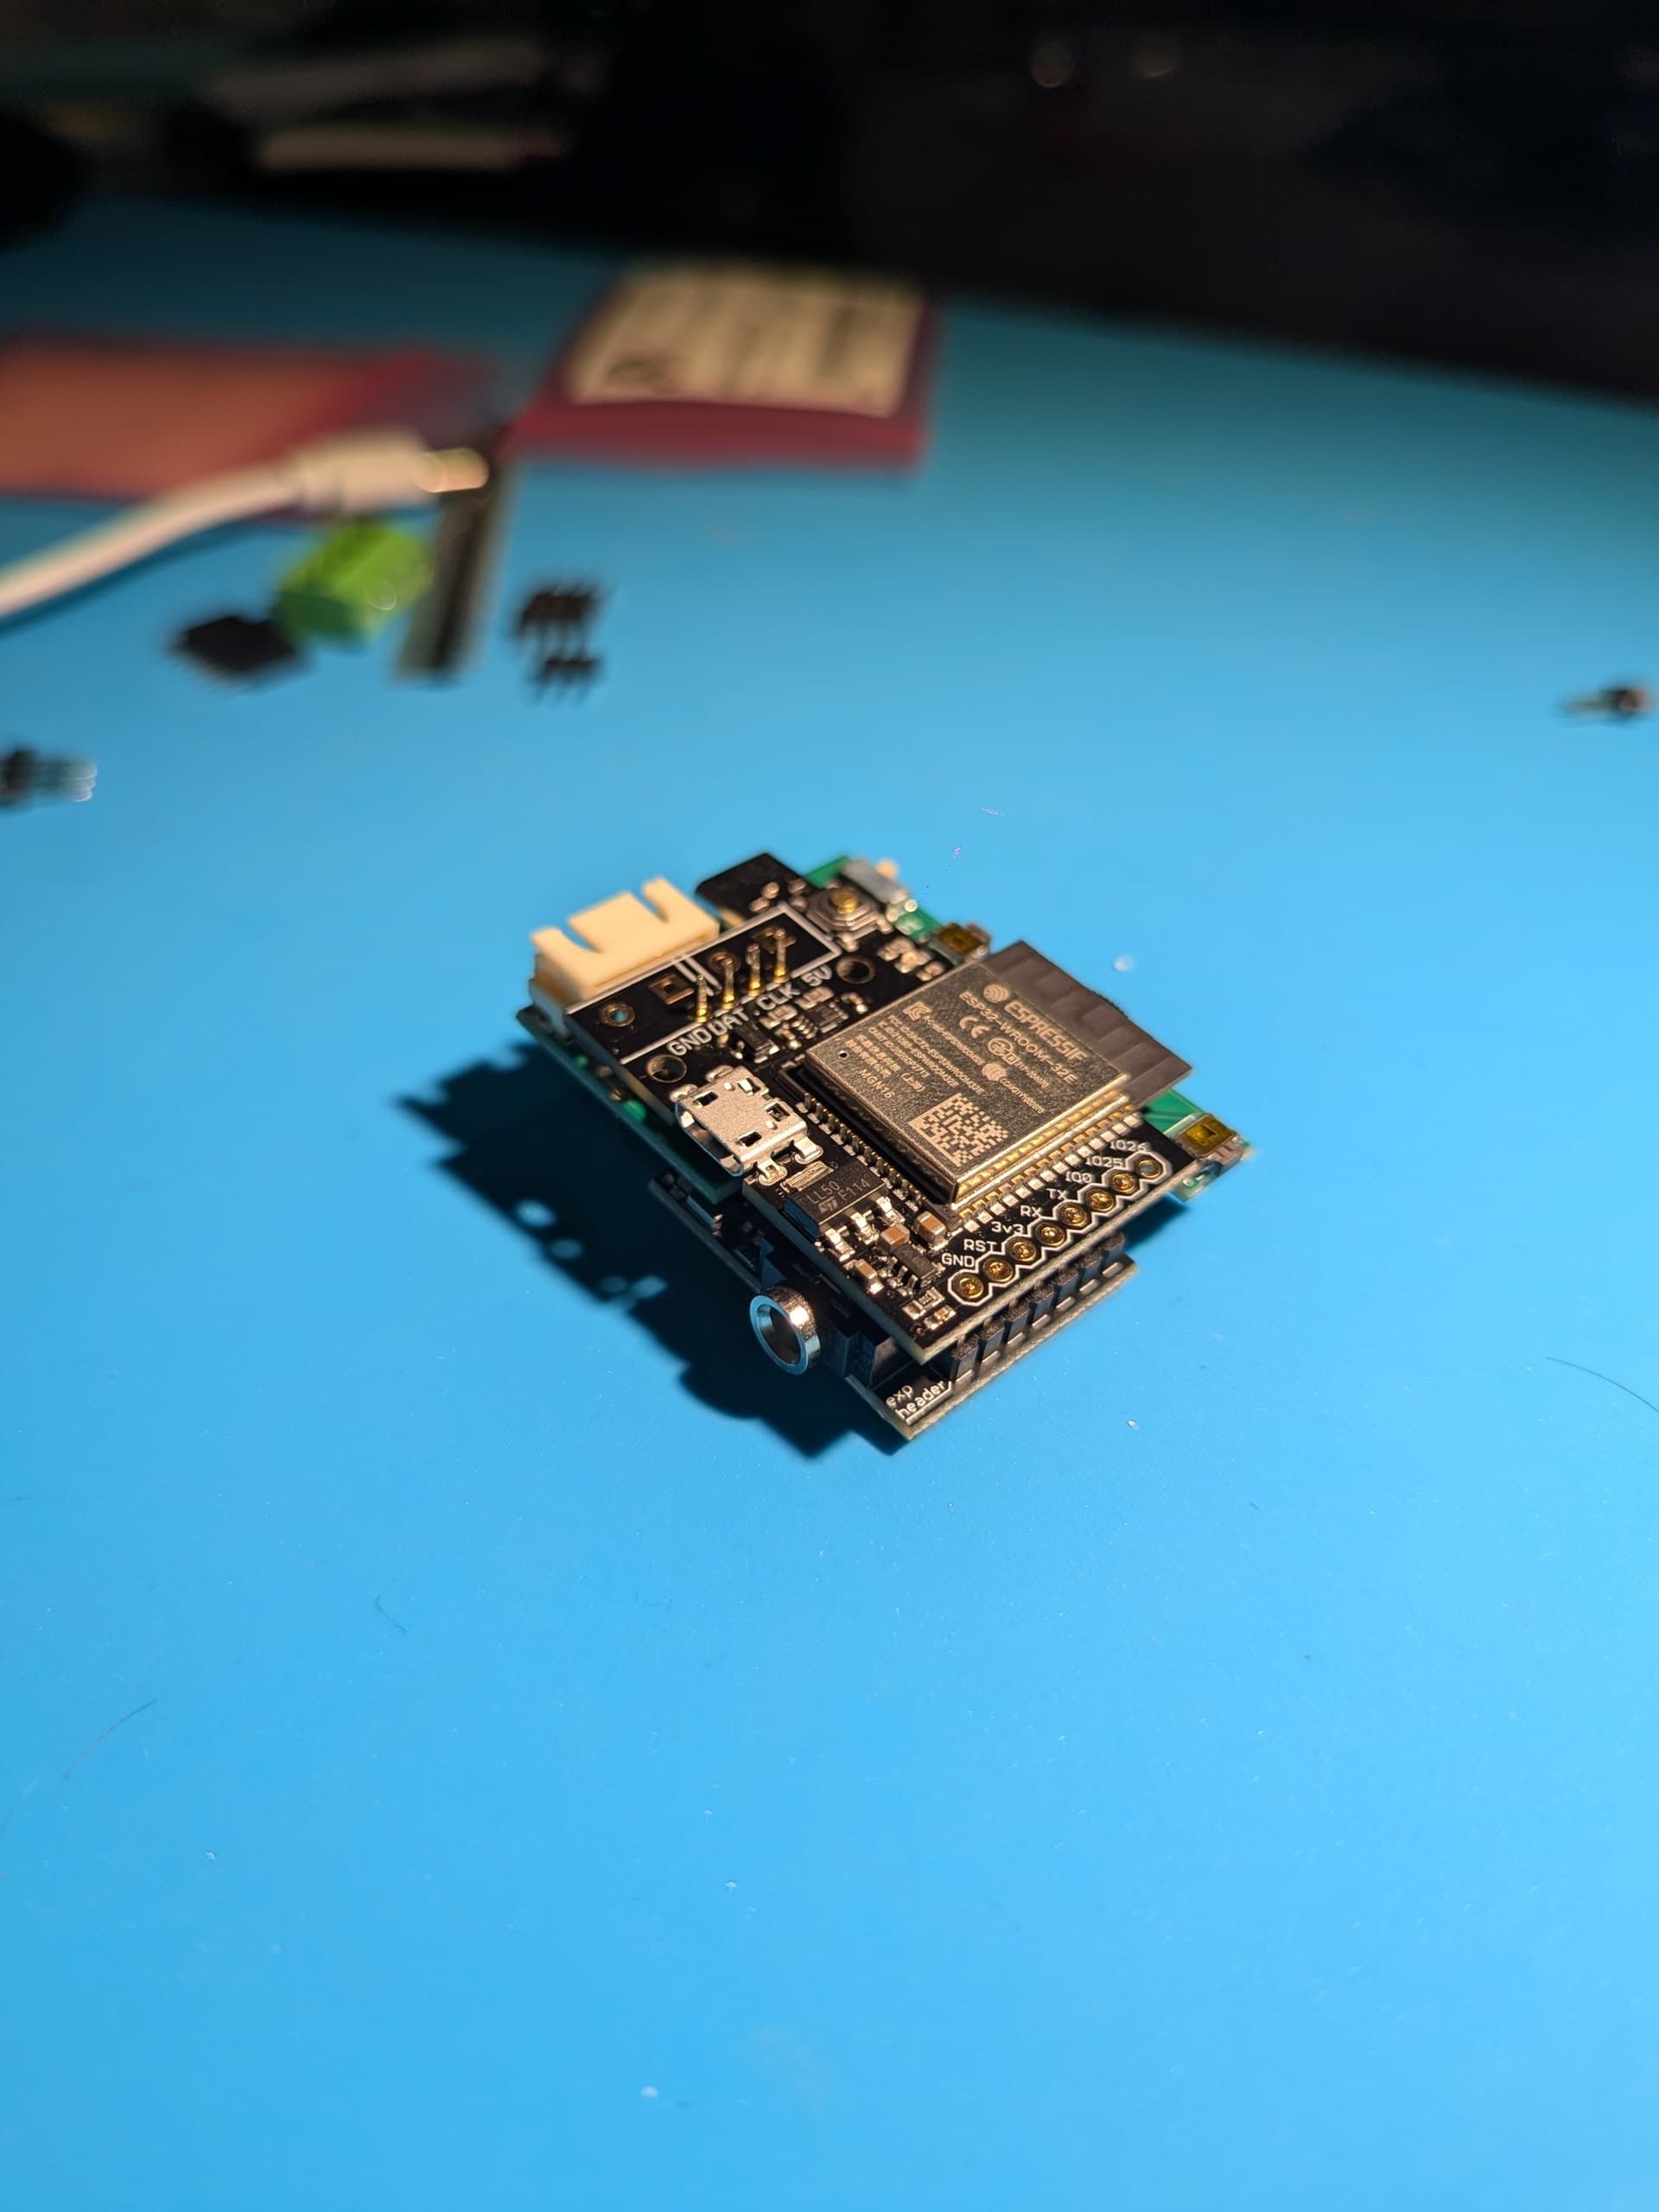
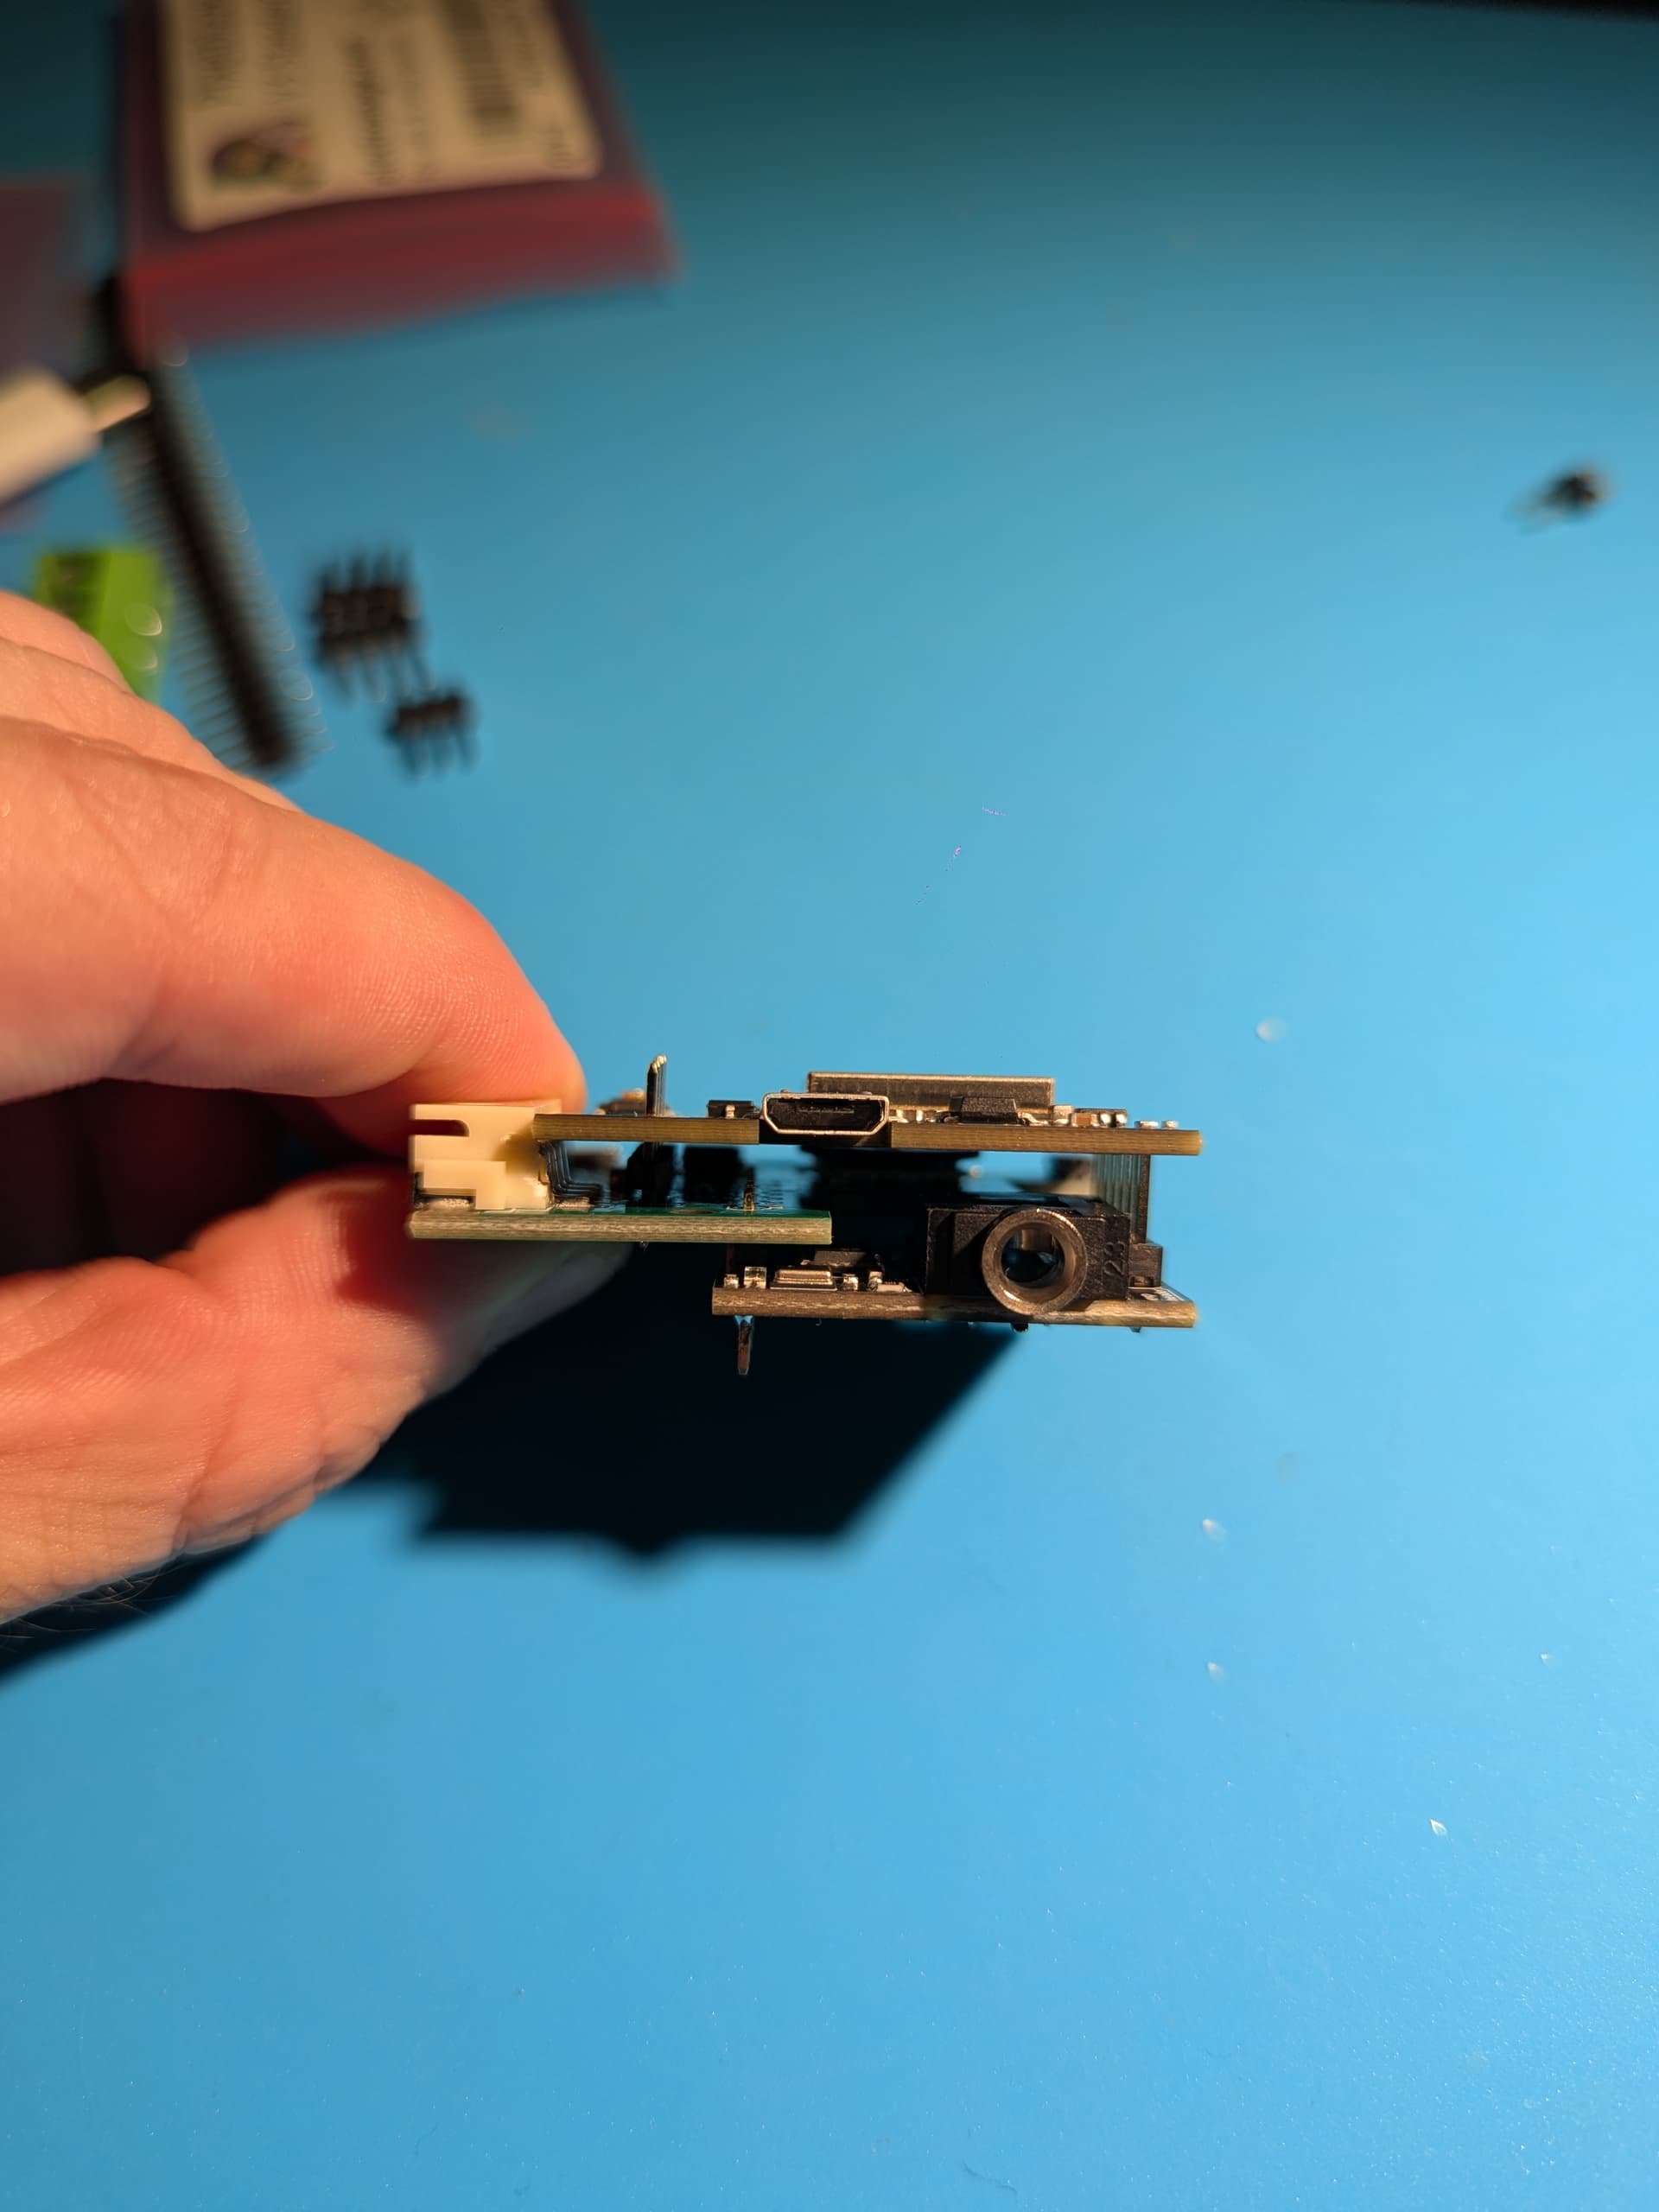
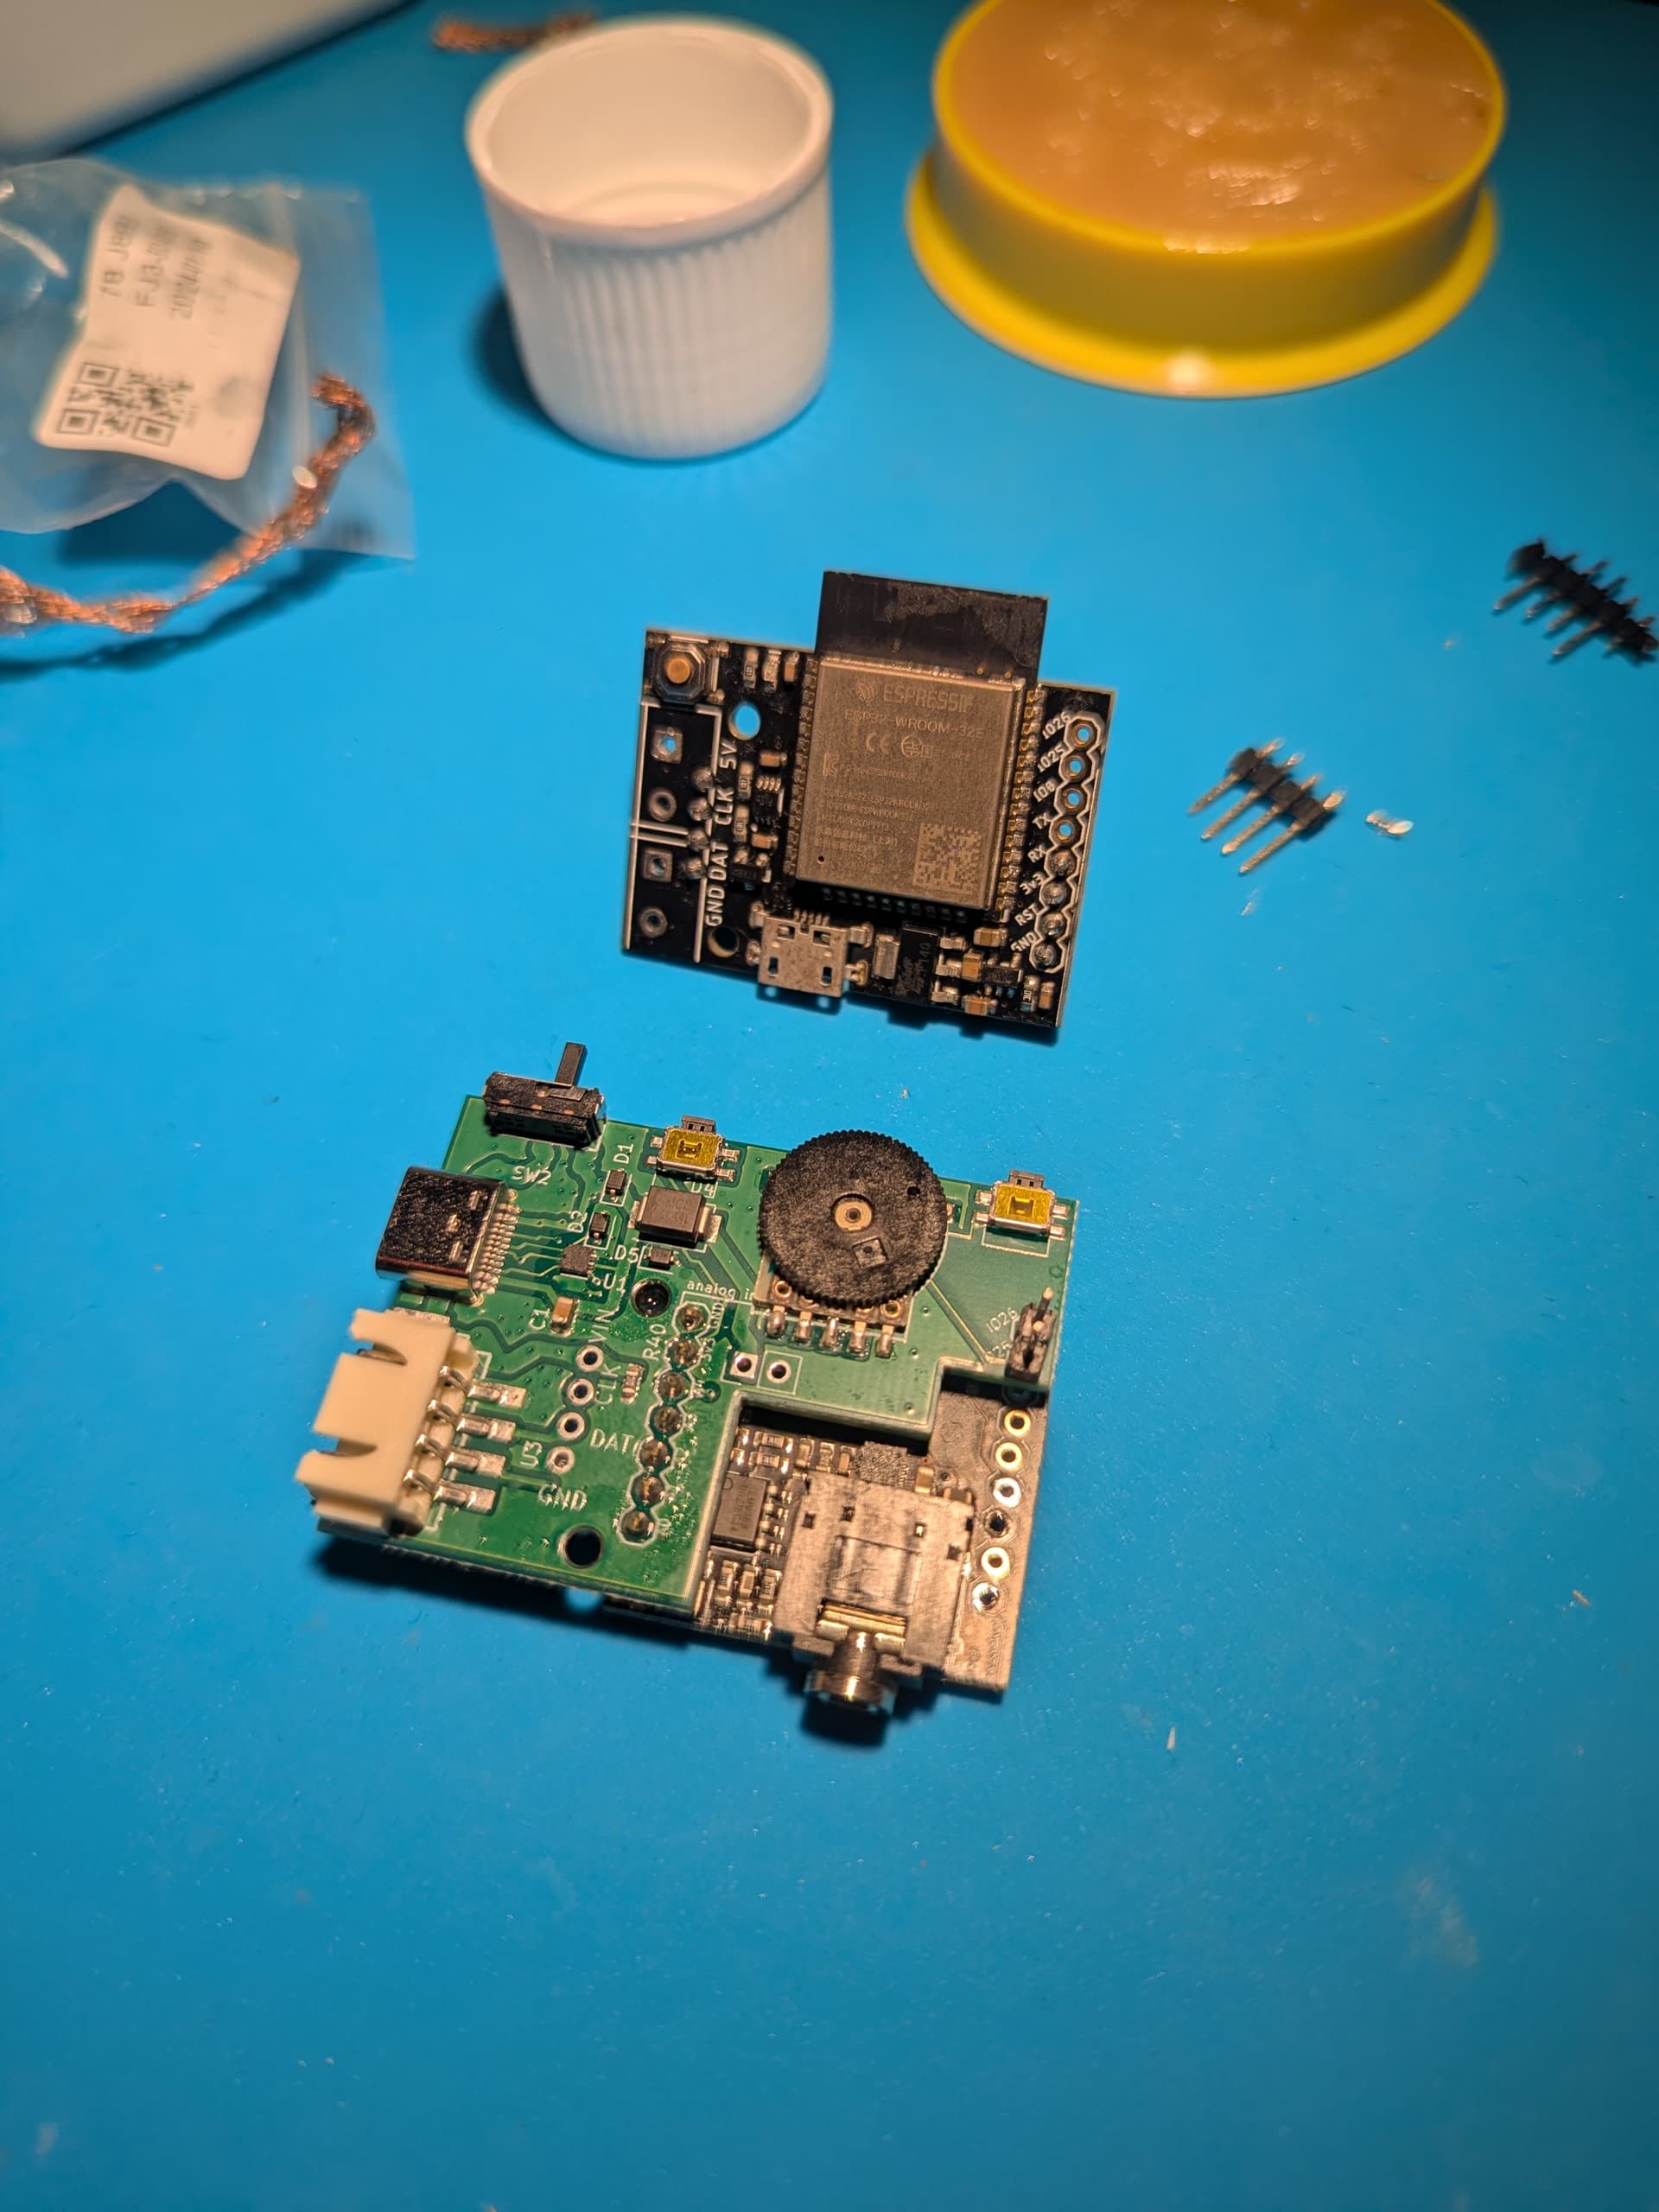
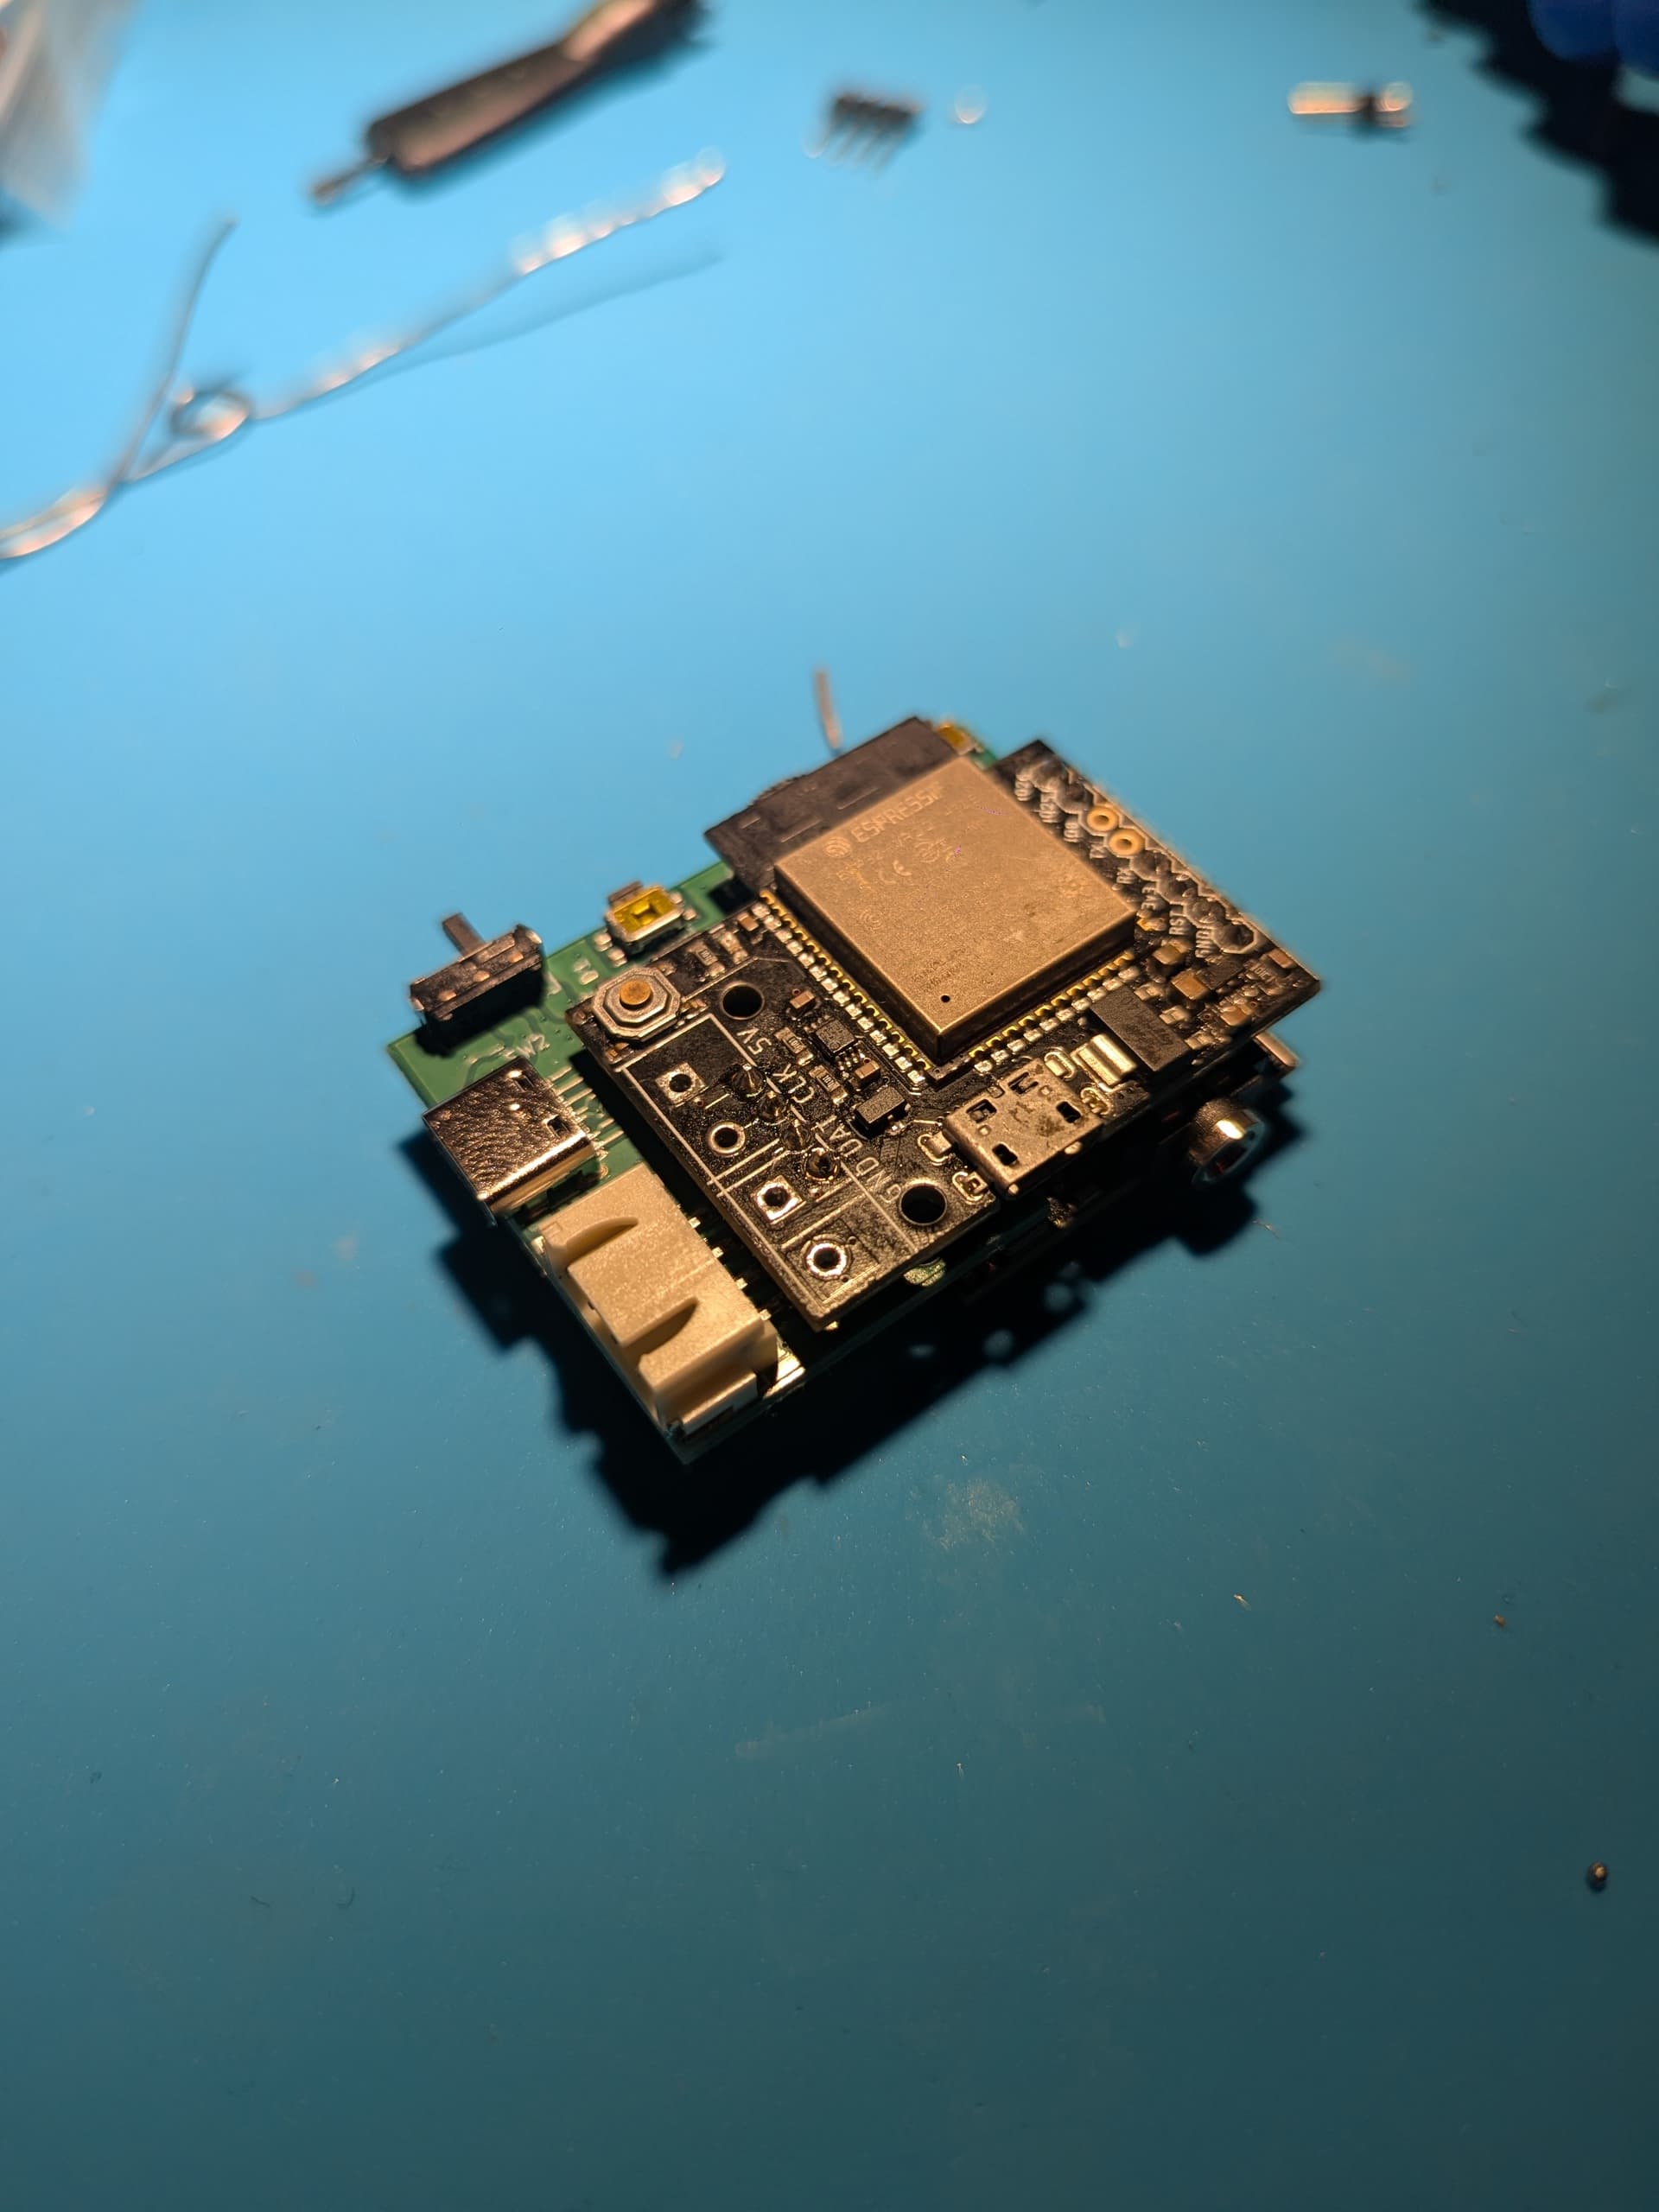
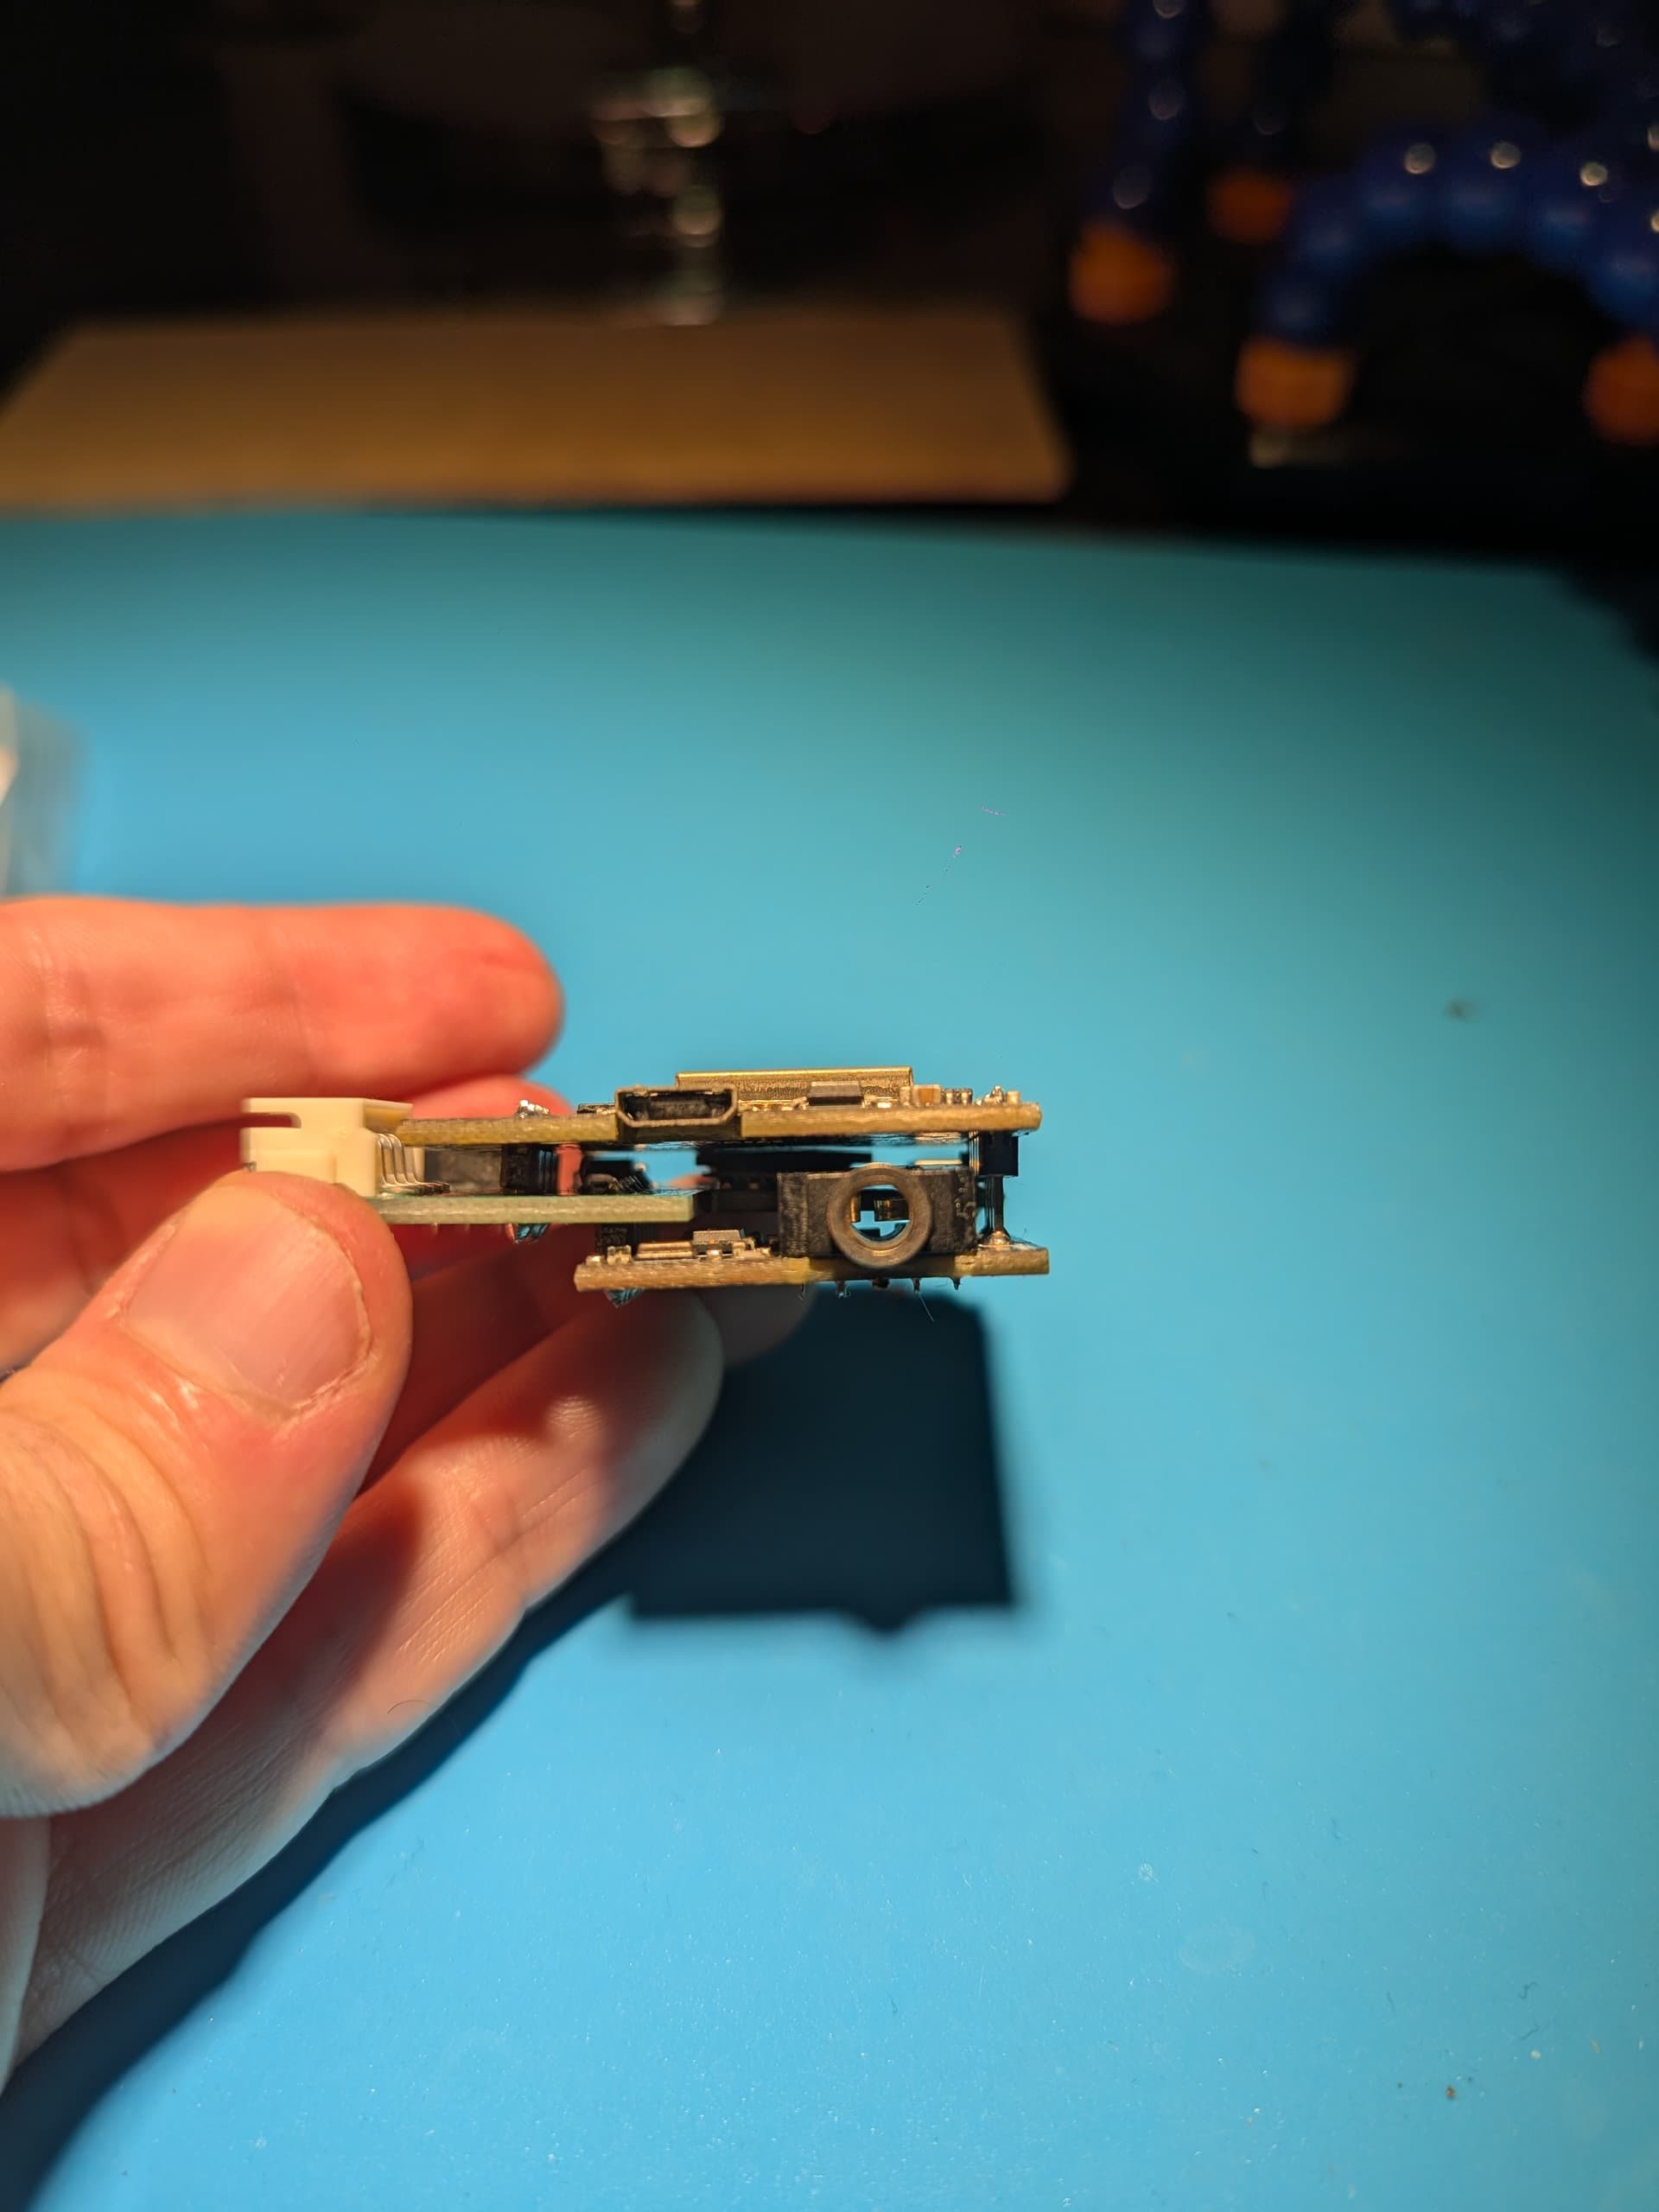
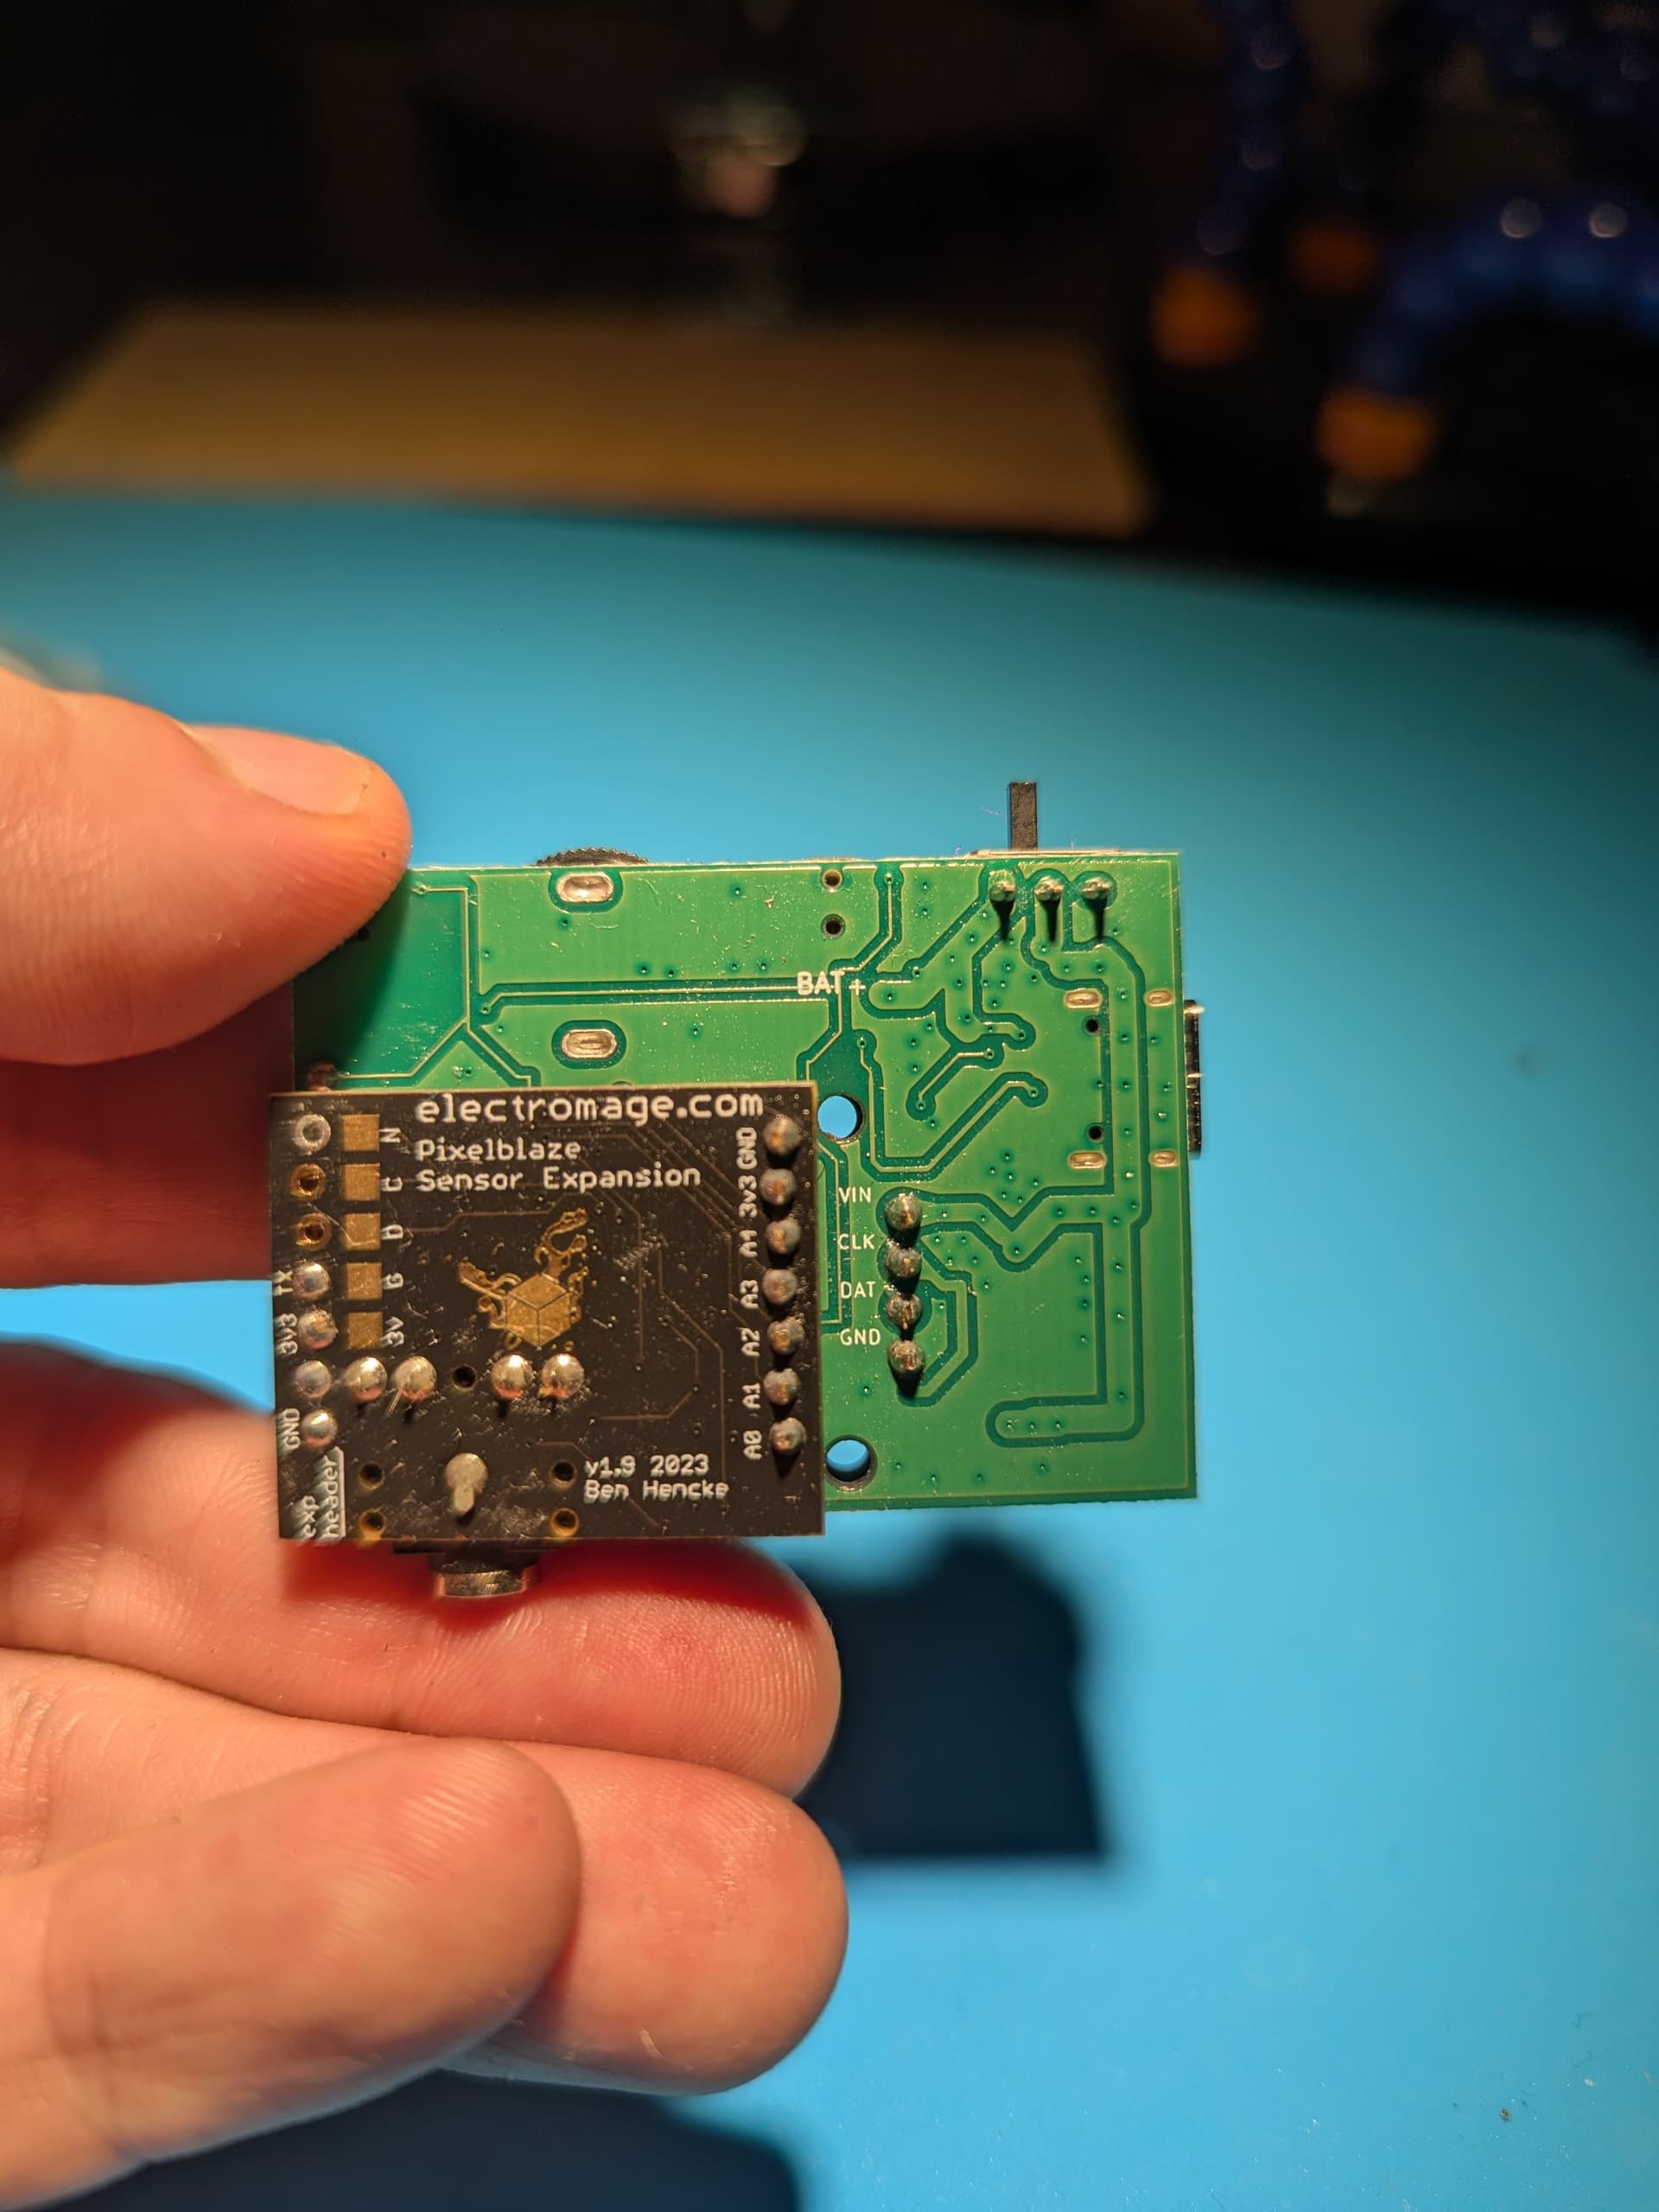
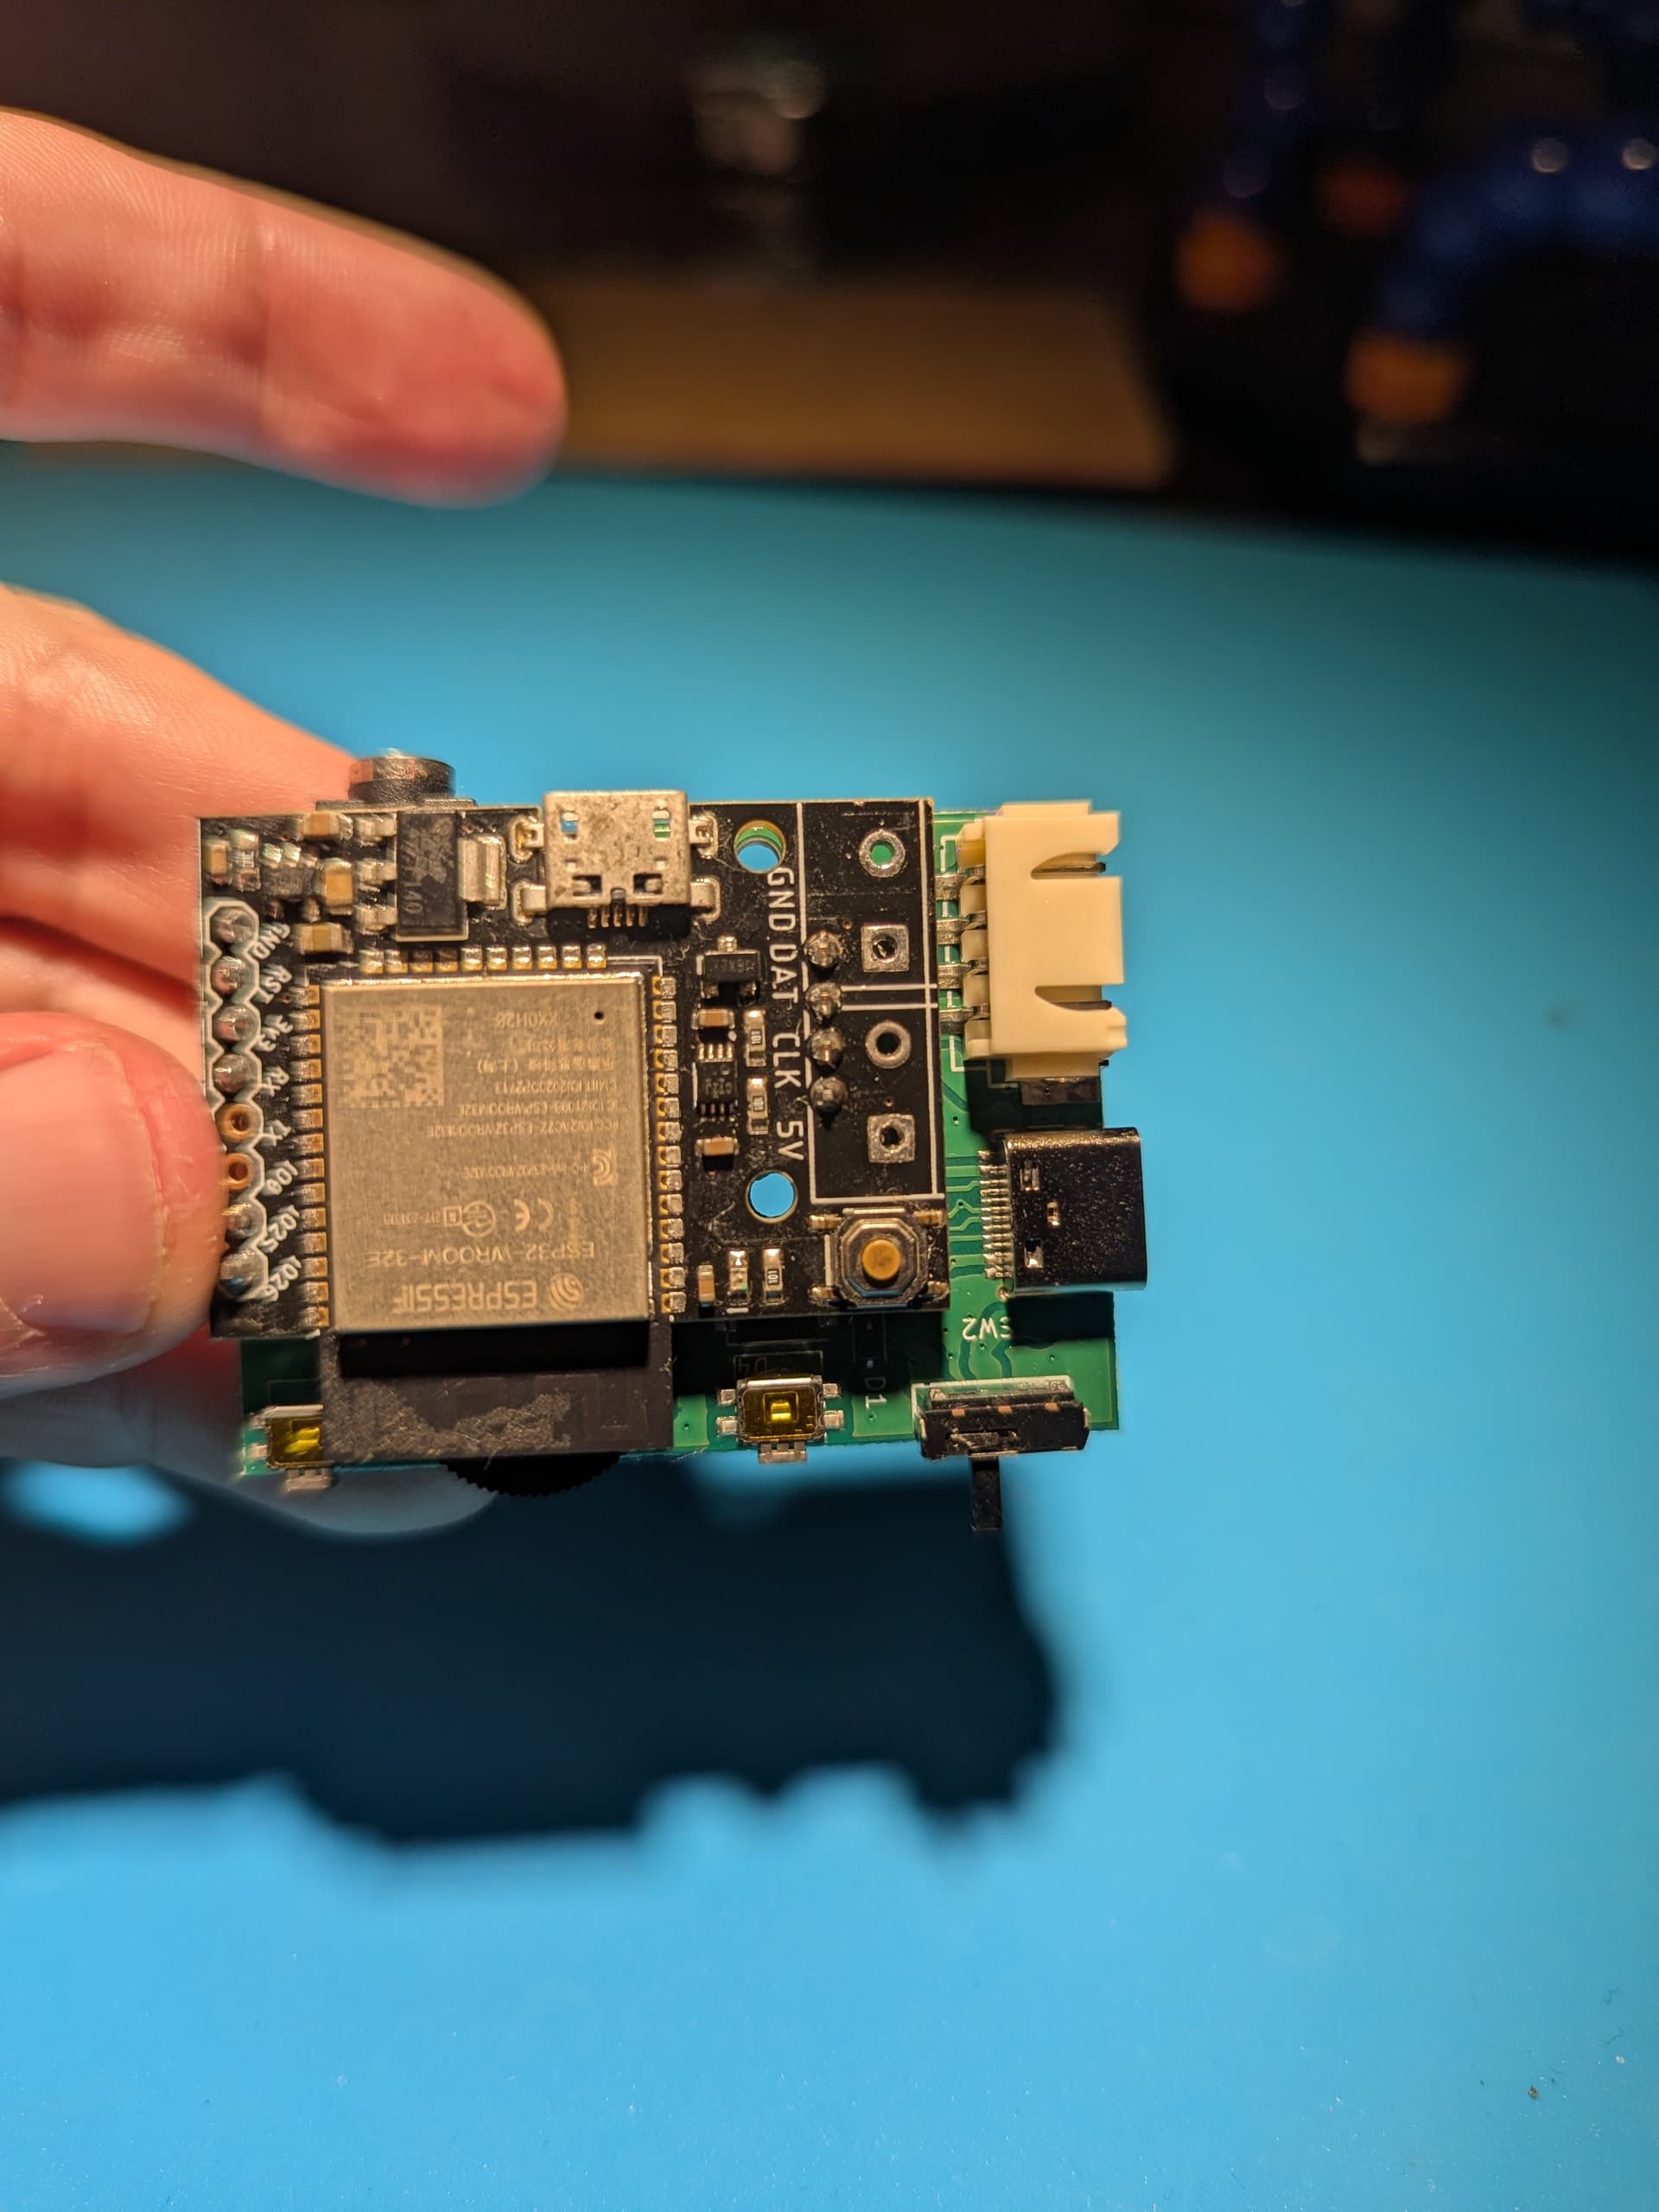
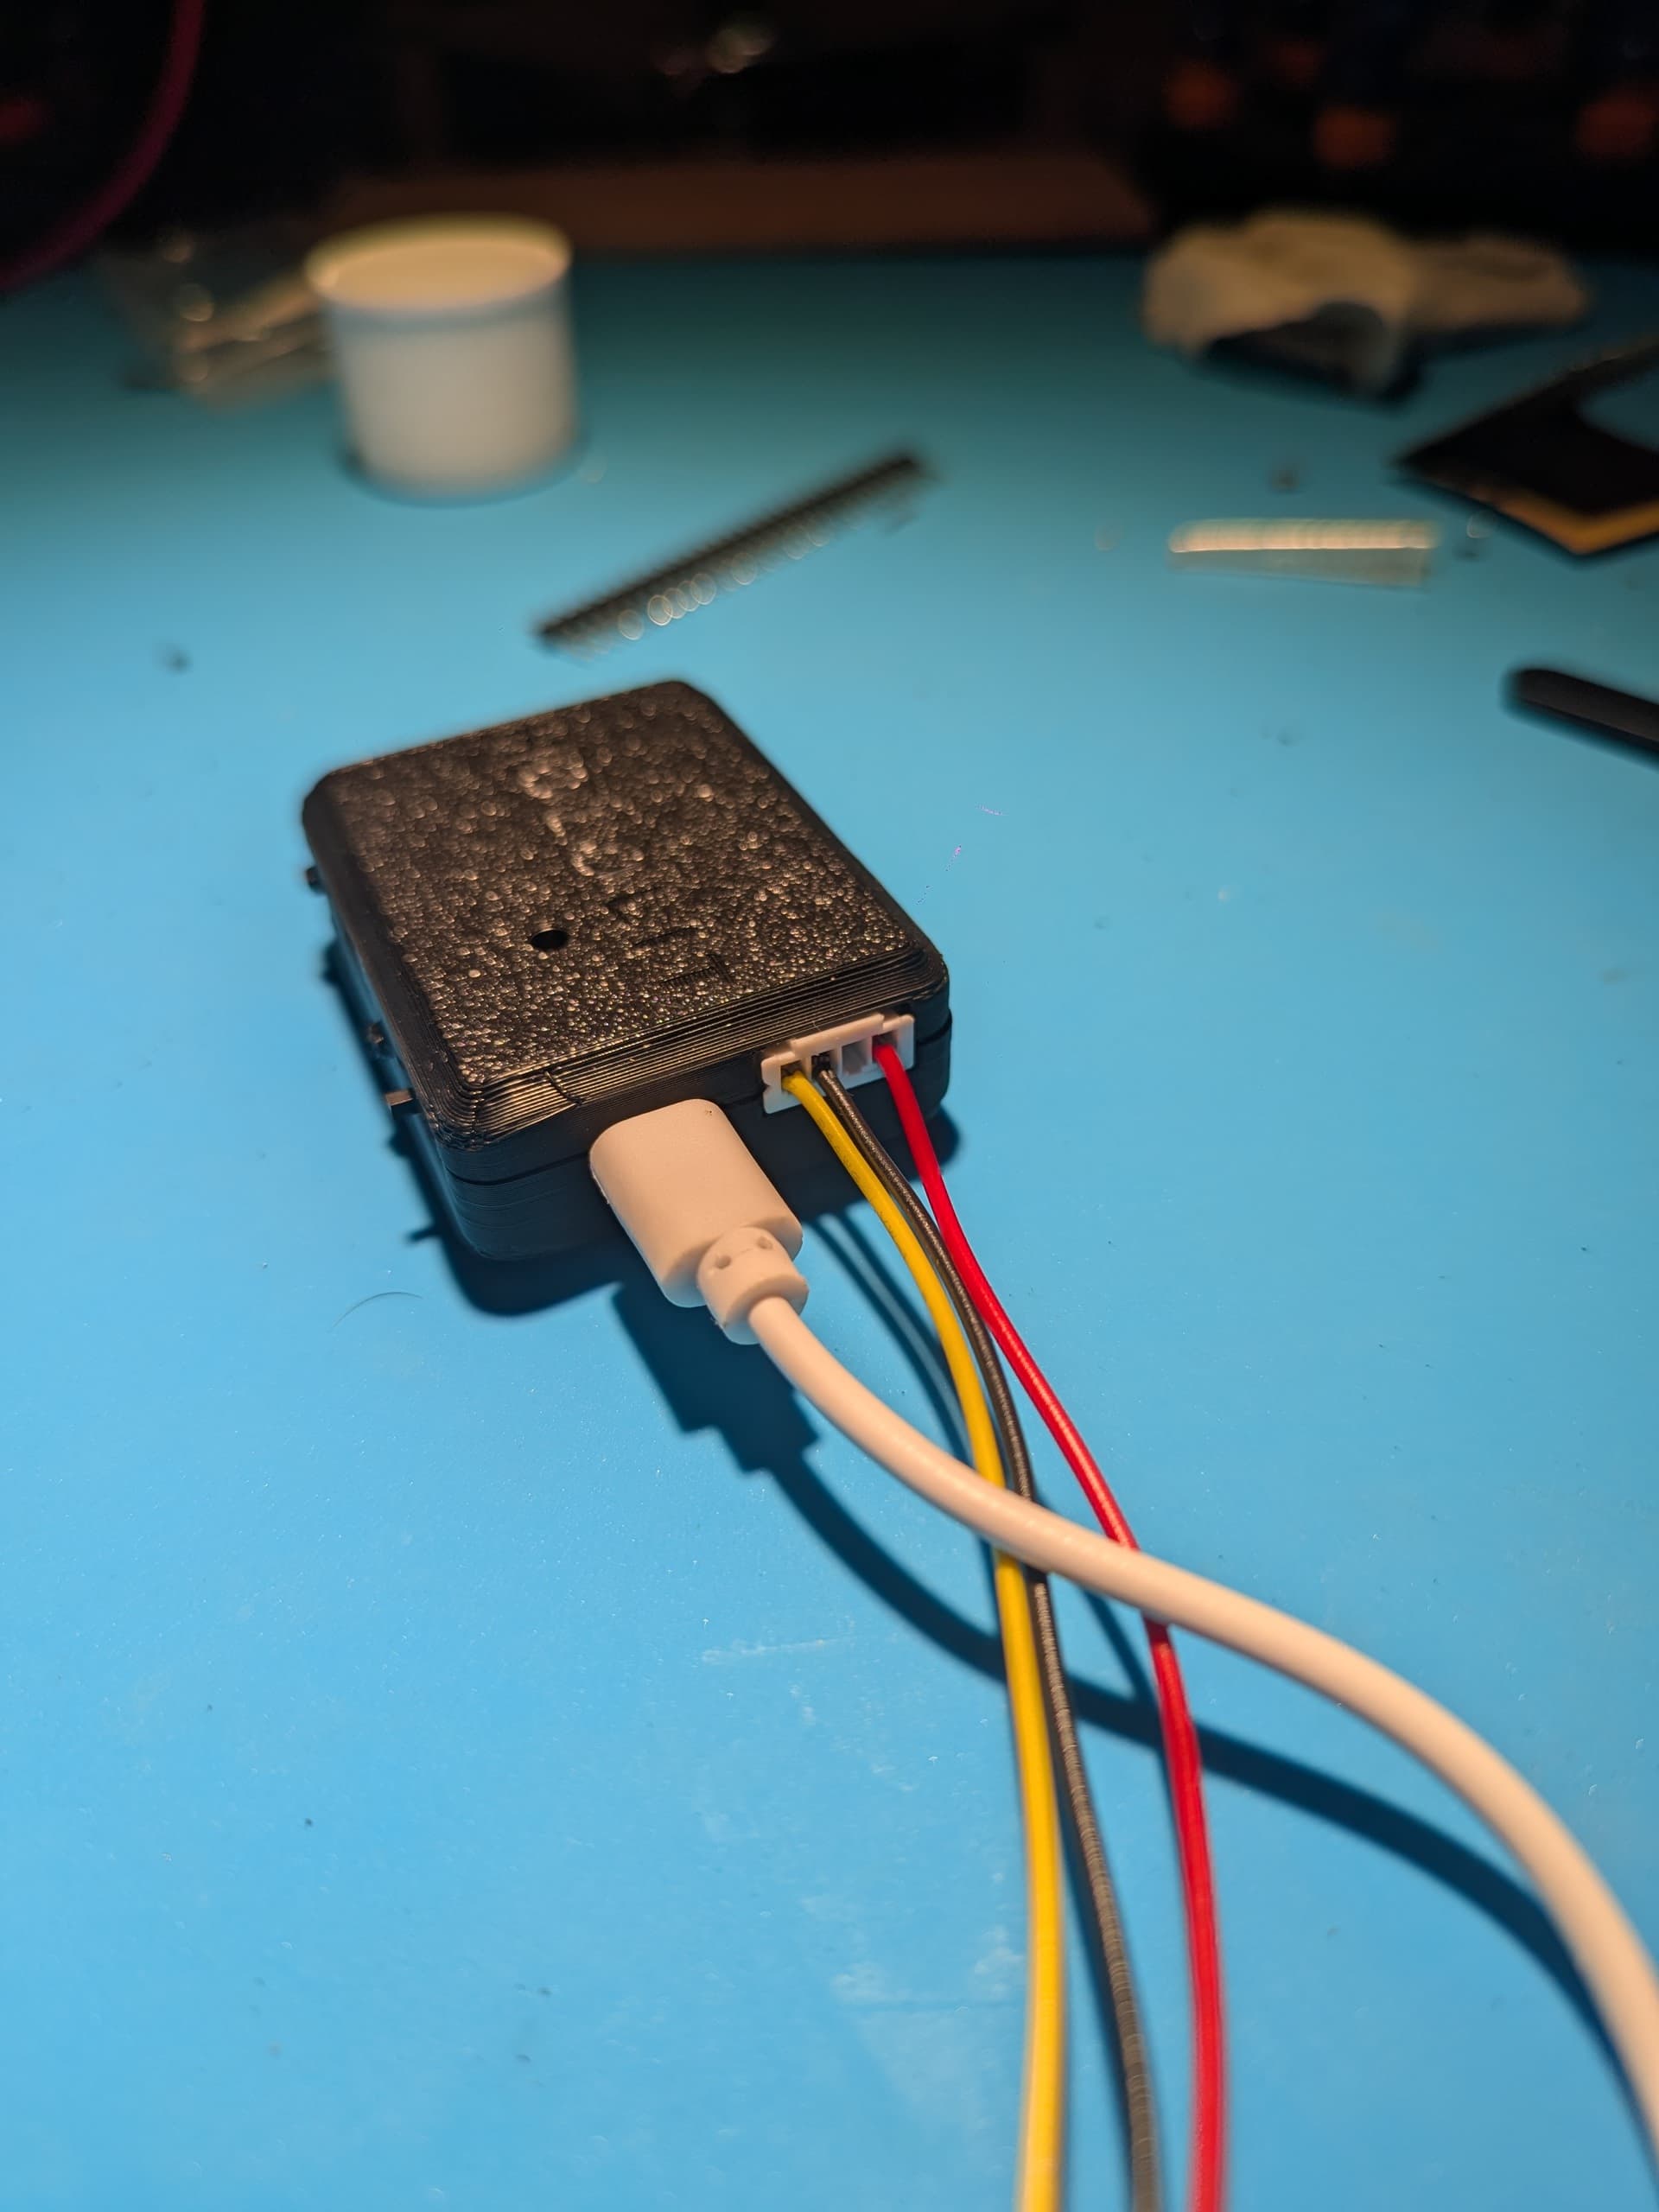
I have received the first version of the PCBs (photos below):
The “control board” fits between the Pixelblaze Standard (V3) and the Sensor Board for a minimal footprint and thickness increase.
Spacing is easy with normal 2.54 pin headers. No need for wires
Board supports USB-C PD up to 3A (will do a few stress tests in the following days to make sure nothing burns)
JST-XH 4-pin for easy LED connections. Compatible with the one sold by Electromage’s shop because it’s pretty hard to find a 4-pin to 3-pin JST in case I want to run normal WS2812 LED for example
2 buttons and 1 thumbwheel for addtionnal controls. I’ll deliver a code framework with it even though it’s pretty basic to handle
IMPROVEMENTS FOR PRODUCTION VERSION:
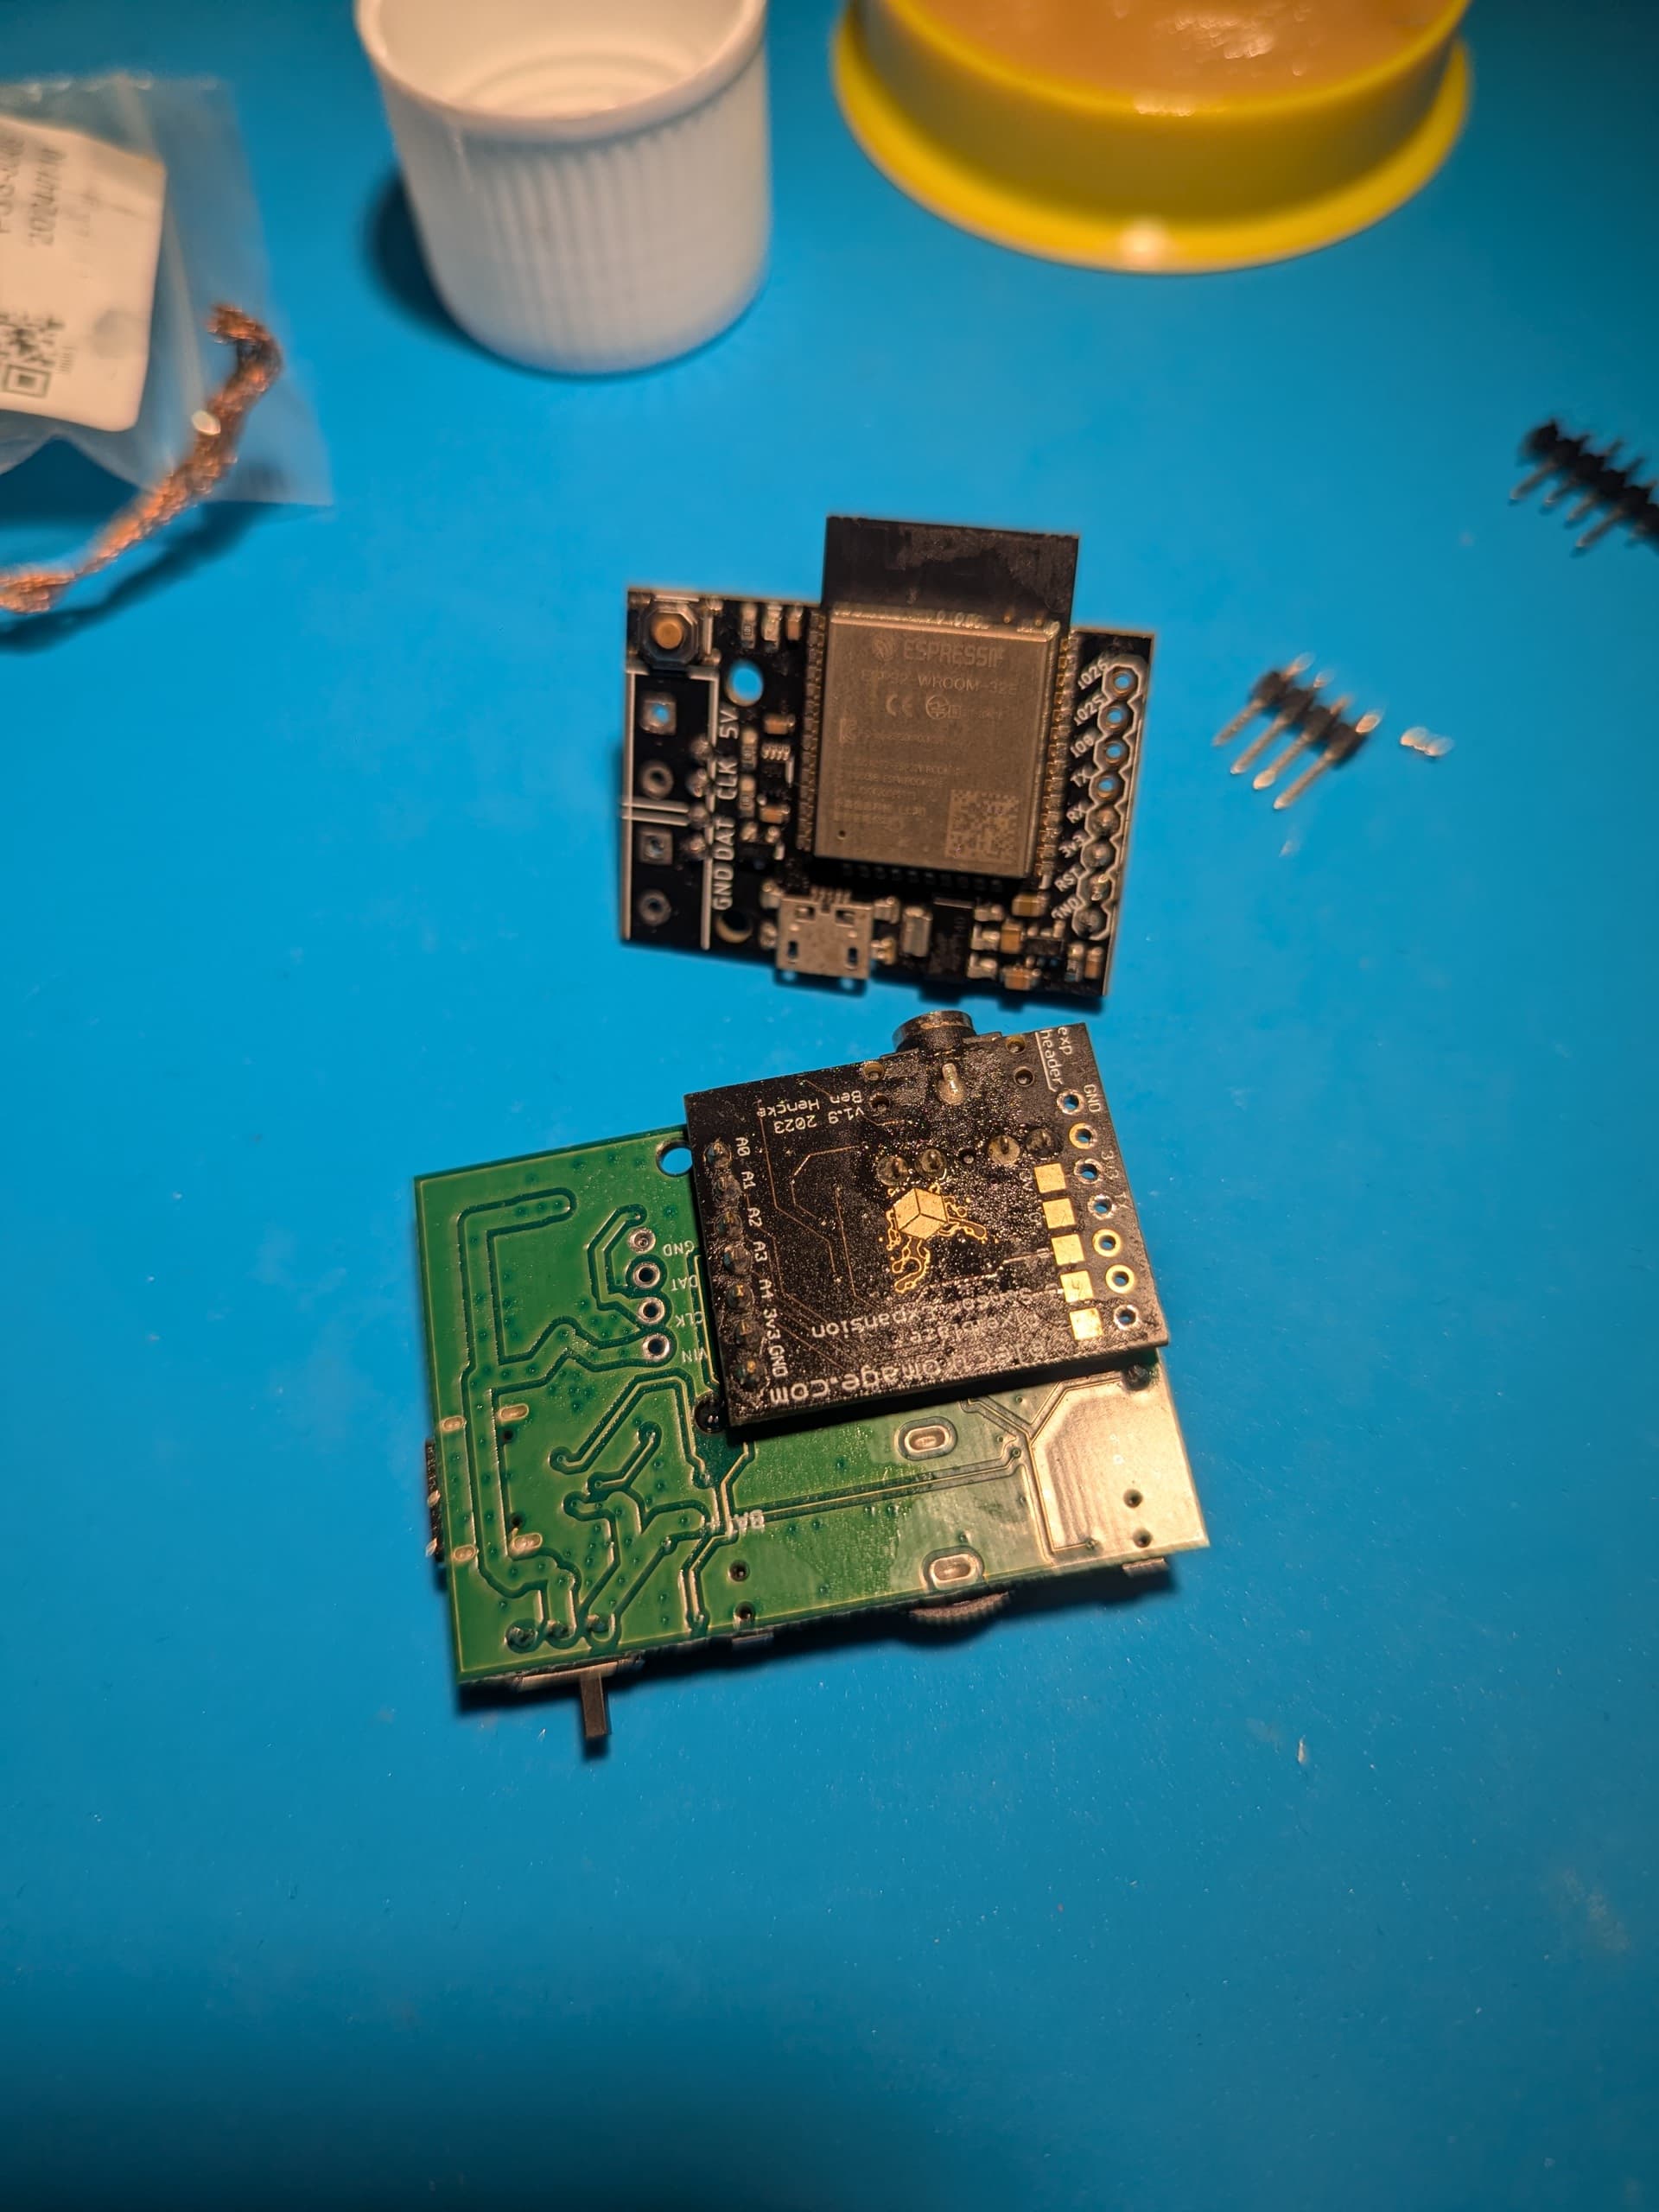
FUNCTIONNALITY: I will try to add some holes to connect to the header used by the Pixelblaze to connector to the Sensorboard to route IO25/26 to the switches as well in case there is no sensor board connected. But it means I would have to go get the 3.3V from the Pixelblaze below. Not easy. If anyone has an idea ?
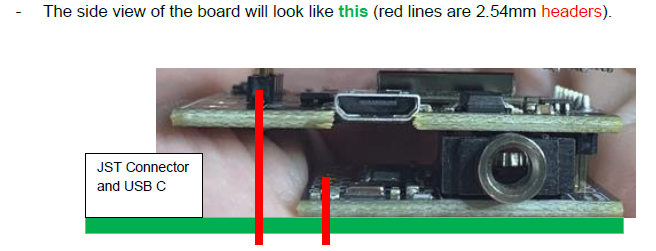
ISSUE: The JST-XH connector is preventing the Pixelblaze and control board to get as close as I’d want (see side view below). I will expand the board 1mm to the right to give more space
QUALITY: Buttons are bit small and hard right now. Will try to find a better component
QUALITY: ON/OFF switch is a bit difficult to access from an enclosure. I will adjust the component
QUALITY: Button facing the side to be re-aligned to the same side as the other button and the thumbwheel (if possible)
I’m taking any suggestions before sending the next version for production.
The board is not cheap to produce in small quantities (like most PCBA), if you’d like one contact me by DM.
Update !
I am about to order the updated version of the PCB !
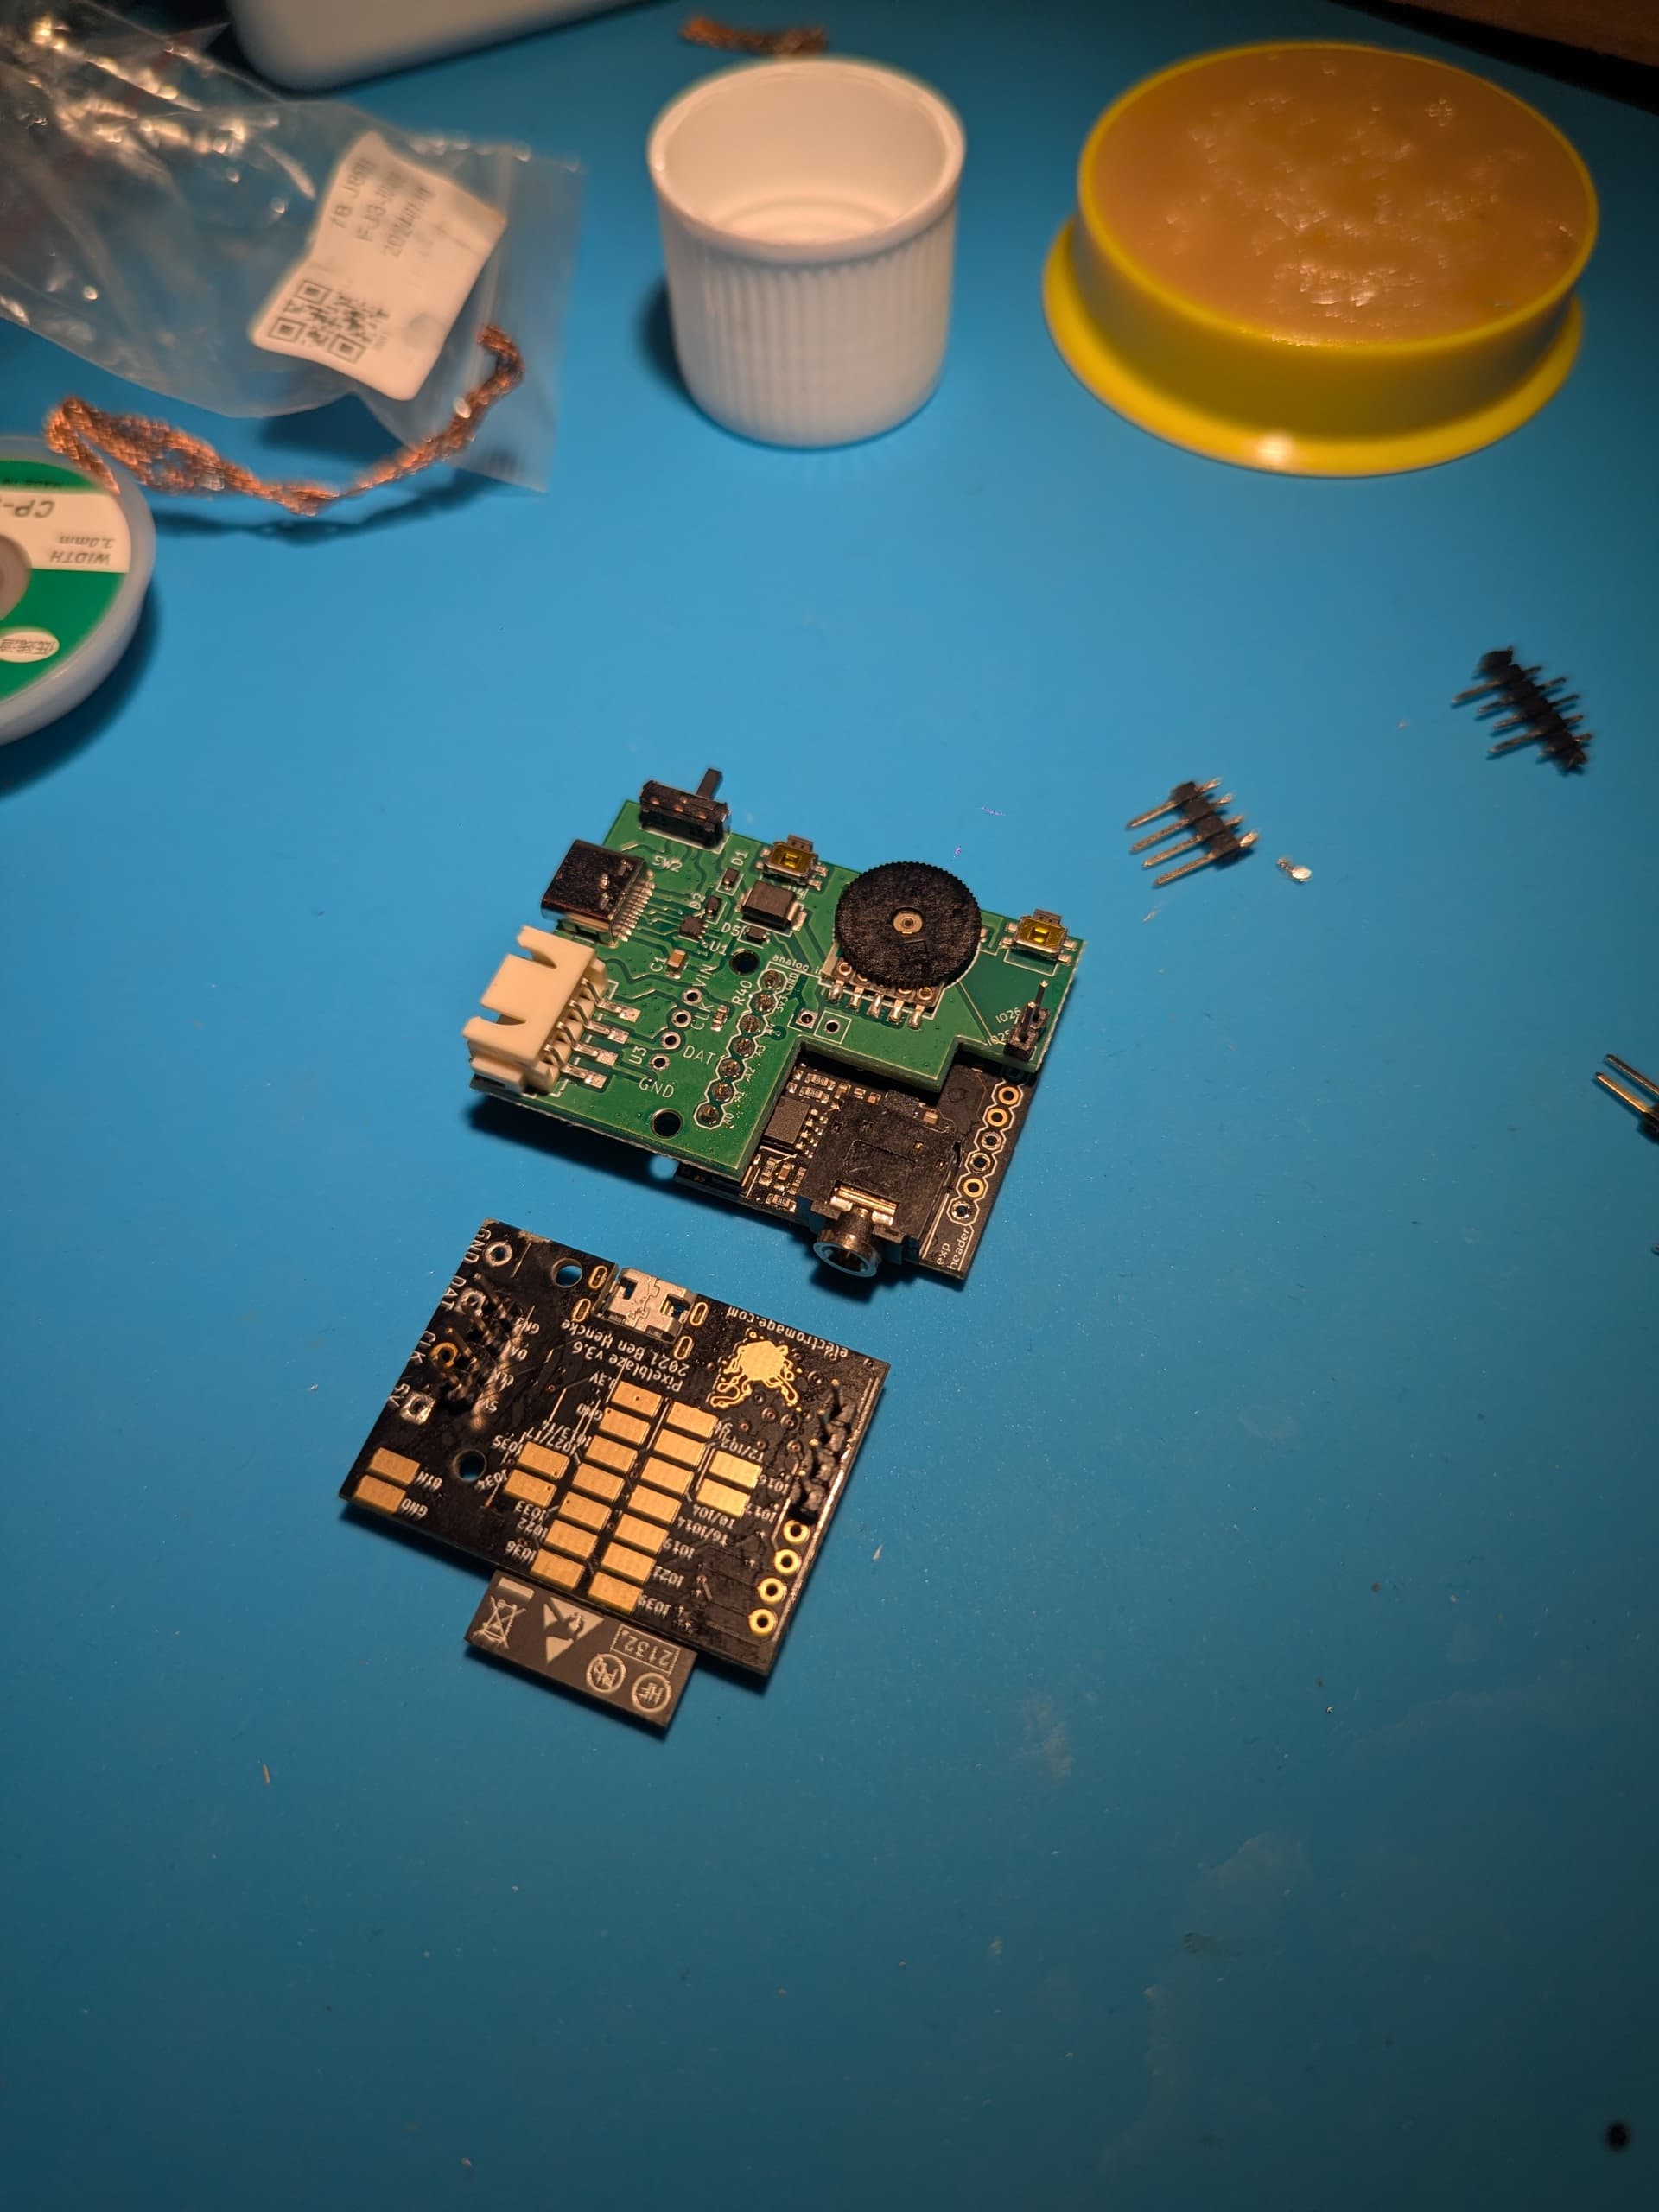
The 2 push buttons and the thumbwheel are all oriented to the same side now (easier to control)
The ON/OFF switch is easier to access (bigger)
I am connecting IO25 and IO26 as well to the 2 push buttons. It allows to use the “hat” board with a Pixelblaze without the sensor board. The only requirement is to solder a small 3.3V cable from the Pixelblaze to the “hat”. Of course the thumbwheel will be disconnected but the buttons will work fine.
If you’re interested by a board let me know in DMs !
Hello !
I have received the PCB and printed the enclosure !
But for some reason the Sensor Board is not detected:
Pixelblaze interface does not show “SB1.0” (empty)
The SB variables watch in sound activated patterns are all at 0
All the normal Pixelblaze functions work and LED are displayed
It is going to be almost impossible to desolder the boards now as they are interconnected by headers (see STL of the assembly enclosed Electronics.stl (6.4 MB)), so i’d like to know if there is any way to troubleshoot this before destroying the assembly.
Sensorboard is powered: I can measure 3.3V on both headers
Same GND is connected (barely any resistance) between the Pixelblaze, Sensor board headers and my board exposed pads
I checked my buttons and potentiometers and they seem to be connected properly (3.3V on one side and A4, A3/IO25, A2/IO26 on the other side)
I did reset the wifi with long press on main button, no change
I might have damaged components when de-soldering headers and re-soldering it to fit my board in between… But if I can do maybe a few basic tests before cutting all headers it would help.
) if maybe someone with more experience than me can check it but I don’t think there is any problem.
The sensor board and my board are only connected using the 7-pin header in the middle. This is only used to:
send 3.3V (coming from PB) to the 2 switches and the potentiometer
get back the 2 switches and the potentiometer to A4, A3 and A2 (I025 and I026 are also connected to A3 and A2, could that create a problem ?)
If I measure resistance between pads:
infinite resistance between any 3.3V pad of the sensor board and any GND (sensor board or other boards)
same between TX/RX and 3.3V or GND between PB and SB
I do measure 3.3V If I probe any 3.3V pad or header pin (including the one used to power the sensor board from the Pixelblaze) of the sensor board vs a GND (on sensor board or else) which leads me to believe the card is correctly powered
I don’t think I damaged any pad when desoldering/resoldering: nothing appeared to have moved and the SMD components are still in position around
I will try to mount another set of PB+SB on another one of my PCBs to see if they work but I’d rather not destroy a second sensor board. Any idea where this issue usually comes from ?