Art project mapping help

I have a project that is looking great using stock patterns, but I’d like to create some arrays to bring out certain patterns within the panel. My problem is, I’m not using a regular grid.

It’s a serial strand of LEDs punched through a board in a roughly spiral shape, and building the arrays has been frustrating, because I’m not an experienced coder by any stretch of the imagination.

I think if I can get some help building ONE array, I can probably figure out the rest (I hope). How would I go about pulling together this kind of pattern, based on that map?

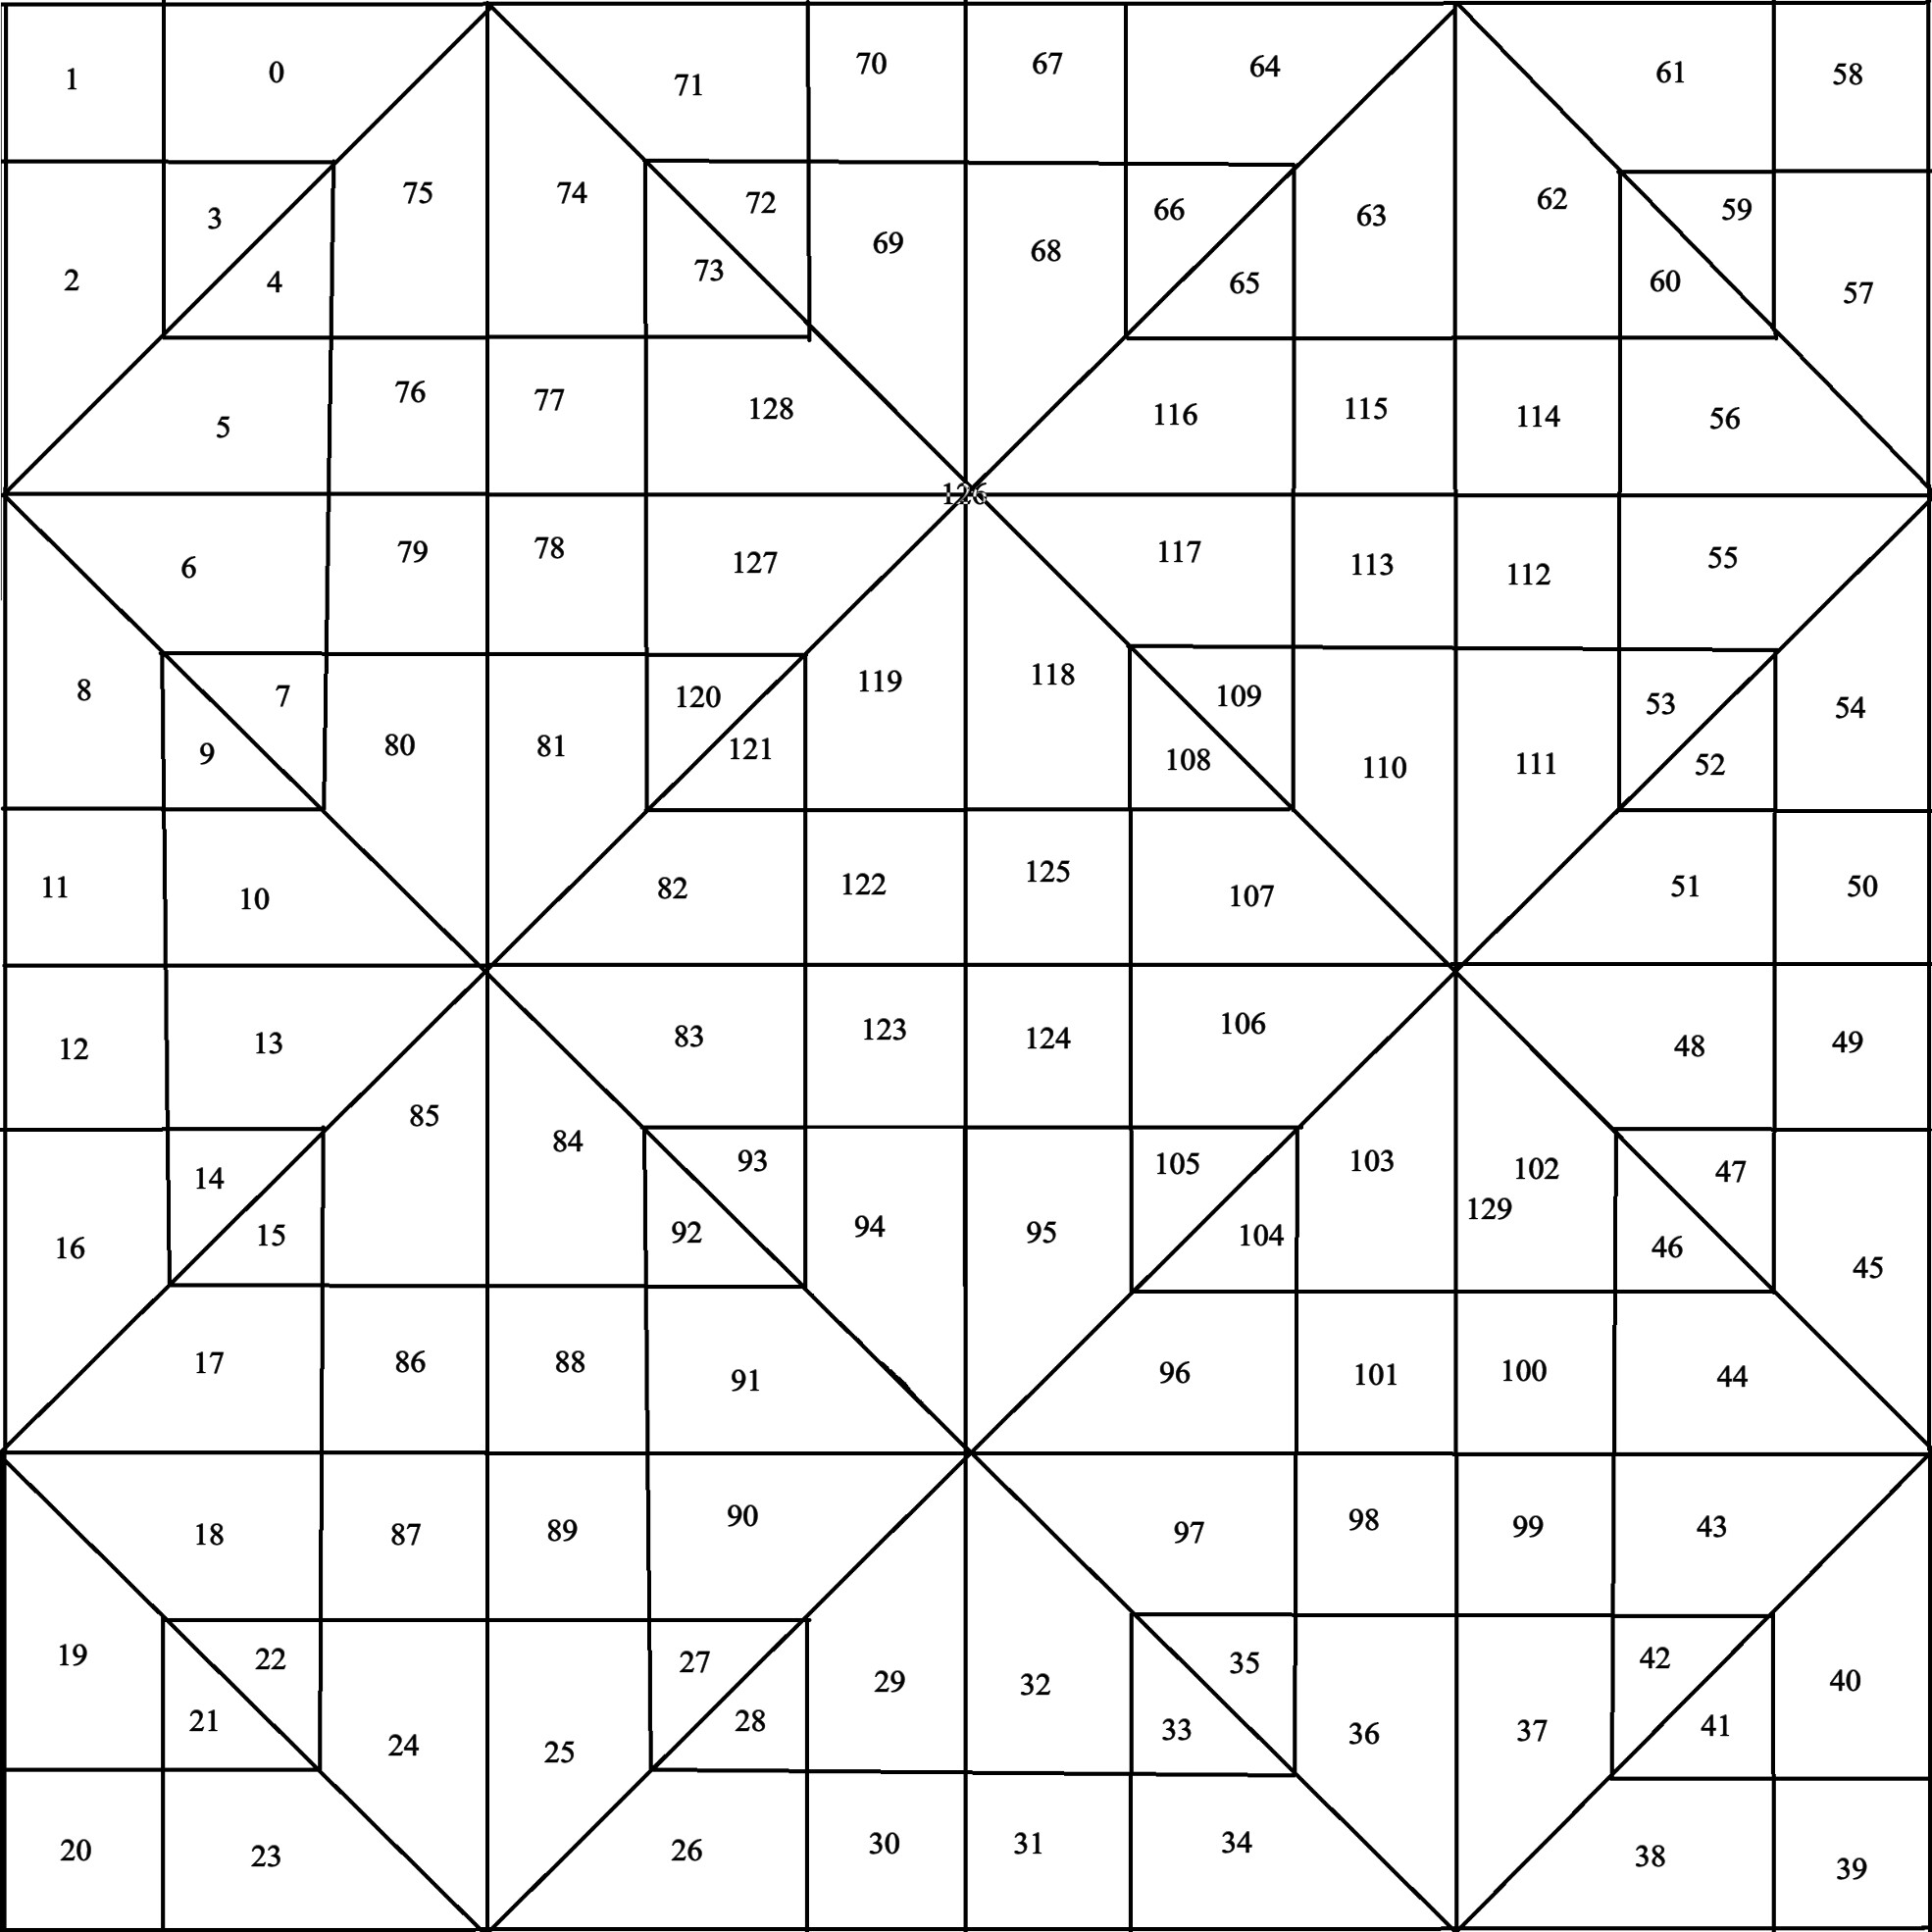
For whatever it’s worth, the mapper gave me these coordinates:

[
[343,92],
[89,100],
[89,350],
[267,273],
[341,352],
[277,533],
[234,707],
[351,867],
[104,859],
[257,938],
[315,1119],
[68,1104],
[91,1305],
[333,1298],
[259,1466],
[336,1537],
[86,1552],
[259,1695],
[259,1908],
[89,2058],
[94,2300],
[254,2140],
[336,2063],
[331,2308],
[501,2170],
[695,2178],
[853,2300],
[863,2066],
[932,2140],
[1105,2091],
[1098,2292],
[1278,2292],
[1286,2094],
[1462,2150],
[1536,2290],
[1546,2068],
[1694,2155],
[1903,2152],
[2050,2308],
[2300,2323],
[2292,2089],
[2132,2145],
[2056,2061],
[2127,1898],
[2152,1712],
[2321,1577],
[2071,1551],
[2150,1457],
[2099,1301],
[2295,1296],
[2313,1103],
[2094,1103],
[2124,952],
[2063,876],
[2298,881],
[2140,695],
[2142,522],
[2308,366],
[2295,94],
[2157,262],
[2068,351],
[2076,91],
[1928,249],
[1704,270],
[1571,84],
[1546,354],
[1452,262],
[1301,81],
[1299,313],
[1103,303],
[1082,81],
[856,107],
[945,254],
[881,338],
[710,242],
[519,242],
[509,489],
[682,499],
[682,682],
[512,687],
[496,927],
[685,929],
[835,1105],
[856,1289],
[705,1419],
[527,1388],
[509,1694],
[504,1908],
[708,1694],
[698,1903],
[922,1885],
[927,1717],
[853,1533],
[935,1444],
[1080,1526],
[1294,1533],
[1459,1707],
[1477,1905],
[1694,1890],
[1898,1898],
[1892,1704],
[1709,1709],
[1908,1454],
[1704,1444],
[1566,1536],
[1462,1447],
[1543,1273],
[1554,1115],
[1475,945],
[1538,866],
[1719,955],
[1908,950],
[1898,715],
[1704,703],
[1910,519],
[1696,509],
[1459,517],
[1464,687],
[1307,840],
[1092,848],
[866,868],
[932,932],
[1072,1100],
[1098,1281],
[1301,1291],
[1301,1085],
[1197,615],
[937,701],
[957,510],
[1849,1504]
]

How I break it down in my head follows.

Corners: [1, 20, 39, 58]

Half squares: [11, 12] [30, 31] [49, 50] [67, 700]

Whole squares:
[76, 77, 78, 79]
[86, 87, 88, 89]
[98, 99, 100, 101]
[112, 113, 114, 115]
[122, 123, 124, 125]

Or I suppose I could do one large array with all of the numbers, but that doesn’t let me pull individual squares out, if I choose to animate them further.

I believe I’m thinking about this in the right way, but I don’t know the syntax to make it happen.

Using the pixel mapper tool and clicking on the numbers or cells you have in the first diagram is a perfectly fine way to map it. The only downside is that each pixel can be in only one location at a time, so for non-square “pixel” shapes generally you want to pick the center point, or whatever point within a shape makes the most sense to represent the entire shape.

If you want to draw out other aspects of this design, you can also add an array in the pattern. So for example you could have the cell size, or shape, or something like that.

I should mention that I already have this built out, and each cell is a single LED bullet.

It’s this thing

Mapping may not be the best idea, but it was the nicest way to get the numbering sequence from the blank graphic of the design. There is one “dead” bulb because toward the end, I couldn’t reach the last couple of cells with the span of wiring between bulbs, so # 126 is behind the board doing absolutely nada. :smiley:

2 Likes

OK, after tinkering for a while, I’ve got the first array that I want to use from the mapper. I re-mapped using my photo instead of the line drawing, and it works a little better.

Now, I need to figure out how to actually USE the code to do things…

//Small Square array
[
[173,222],
[186,1375],
[186,1618],
[189,2762],
[1377,2772],
[1608,2765],
[2792,2787],
[2786,1606],
[2780,1378],
[2770,203],
[1601,194],
[1371,197],
[635,671],
[887,668],
[878,886],
[631,892],
[650,2086],
[650,2310],
[913,2089],
[903,2310],
[2072,2288],
[2328,2304],
[2334,2096],
[2078,2089],
[2309,895],
[2072,892],
[2325,655],
[2075,658],
[1368,1385],
[1371,1622],
[1608,1628],
[1586,1378],    
]

I love your unique design/arrangement. Very cool. I’d imagine some interesting patterns can be had. I’m no programmer either and hope you will post updates with your interesting designs!

Cool project! A thing I would explore is render virtual subpixels. The idea is that each 1x1 is actually a 2x2 cell (or larger), and you generate the subpixel colors in the beforeRender function. Then you average, LERP, whatever all the colors together to get the new color for each cell. The render2D function just looks up the color and writes it out to the pixels.

Your specific setup has the corners splitting a subpixel, so I omitted those in my diagram; there’s nothing saying that the subpixel grid has to be rectilinear!

You could also have the neighboring cells share the color of the subpixel in the corners; if you go this route, then you could easily repurpose all existing 2D patterns onto your subpixel matrix and then use the same LERP code to map it to your cells.

This is very similar to multi-sampling anti aliasing if you’re more familiar with MSAA in games.

ArtWallB 2

1 Like

Thanks for the comment, but this flew WAAAAY over my head. I have no graphics background, and I’ve apparently picked a ridiculously difficult thing to do for teaching myself how to do it. :person_shrugging:

The event I need this for is at the end of May, and I don’t have enough time to understand what I need to do, so I’m probably just going to settle for using built-in patterns this year. Hoping to improve on it in the interim.

Here is the basic code I gave Edie to start learning with if anyone else has this thought. It doesn’t do anything fun, just puts a random color on the pixels she asked for.

//Ok here are all the pixels you want to light up
var squarePixels = [1, 11, 12, 20, 30, 31, 39, 49, 50, 58, 67, 70, 76, 77, 78, 79, 86, 87, 88, 89, 98, 99, 100, 101, 112, 113, 114, 115, 122, 123, 124, 125]

//This is an array to hold all the pixels (pixelCount is set by pixelblaze to the number of LEDs you have configured)
pixels = array(pixelCount)
//Pick a random color
hue = random(1)

export function beforeRender(delta) {
  //Loop through all the pixels and set the ones we want lit to be lit instead of off
  for (i = 0; i < pixels.length; i++) {
    //Loop through the list of pixels we want lit to see if this pixel is in it
    for (j = 0; j < squarePixels.length; j++) {
      /* //This will make things a bit faster, but we don't need it right now...
      if (squarePixels[j] > i) {
        break
      }*/
      if(i == squarePixels[j]) {
        pixels[i] = 1;
      }
    }
  }
}

export function render(index) {
  //At this point the pixels array will be filled out and we set the brightness (i.e. the only way to actually turn an LED on or off with pixelblaze)
  hsv(hue, 1, pixels[index])
}
2 Likes

Thanks, @pboyd04! This is EXACTLY what I needed to get going. If I can see how one array is built, I can start tooling with building my own. Then I’ll start messing with other variables.

I’m still a rank newby at programming, and I have been stumped in this beginner problem for ages. Appreciate the assist!