Bouncing Balls Pattern

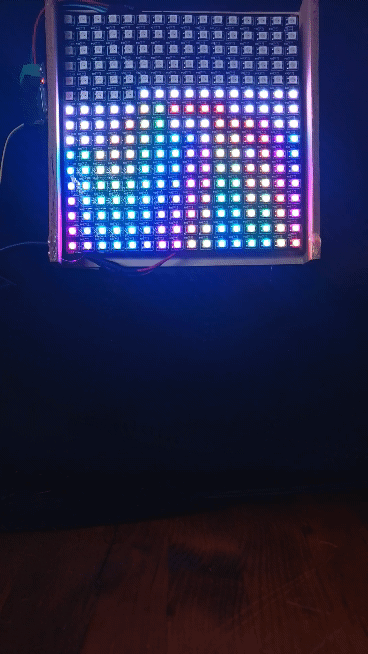
I decided to have a play with the accelerometer and came up with the “bouncing ball” pattern below, inspired by this project. If you don’t have an accelerometer, you can uncomment line 113 to make the balls “rebounce” automatically once they have stopped bouncing. This should also work on a strip if you set the width to 1 (though I haven’t tried that yet).

If anyone has any feedback let me know and I’ll try and incorporate it before uploading to the pattern library.

// Set this to the width of your matrix
var width = 24
var height = pixelCount / width


// Acceleration of gravity in m/s^2
export var gravity = -9.81
export function sliderGravity(v) {
  gravity = -v * 29 - 1
  resetAll()
}

// How sensitive the pattern is to movement from the accelerometer
export var motionThreshold = 0.03
export function sliderMotionSensitivity(v) {
  motionThreshold = v * v * 0.07055 + 0.0195
}

// Whether or not to draw a rainbow pattern under the bouncing balls
export var rainbow = 1
export function sliderShowRainbow(v) {
  rainbow = v >= 0.5
}


export var randomness = 100
export function sliderRandomness(v) {
  randomness = v * v * 500
}

function initGravity() {
  impactVelocityStart = sqrt(-2 * gravity * startHeight)
}

// Get accelerometer info from the sensor expansion board - 3 element array with [x,y,z]
export var accelerometer

var debounce = 0
var prevAccel = array(3)
var diff = array(3)

var dampening = 0.9   // How much dampening to apply to each ball after it bounces
var startHeight = 1   // Starting height of the ball, in meters
var impactVelocityStart

// Keep track of multiple balls, one per vertical strip
var ballHeight = array(width)            // Current height of each ball.
var impactVelocity = array(width)        // The current impact velocity of each ball. This decreases with each bounce.
var timeSinceLastBounce = array(width)   // How long since the last bounce. This helps calcuate the new height.
var startDelay = array(width)            // How long a delay before each ball starts bouncing. The 'Randomness' slider
                                         // affects this.


function resetAll() {
  initGravity()
  for (i = 0; i < width; i++) {
    init(i)
  }
}

// Reset a ball so it starts bouncing again
function init(i) {
  ballHeight[i] = 0
  impactVelocity[i] = impactVelocityStart
  timeSinceLastBounce[i] = 0
  startDelay[i] = random(randomness)
}


resetAll()

export function beforeRender(delta) {
  xa = accelerometer[0]
  ya = accelerometer[1]
  za = accelerometer[2]
  diff[0] = abs(xa - prevAccel[0])
  diff[1] = abs(ya - prevAccel[1])
  diff[2] = abs(za - prevAccel[2])
  totalAccel = sqrt(xa * xa + ya * ya + za * za)
  
  debounce = clamp(debounce + delta, 0, 2000) // Prevent overflow
  
  // Bounce all the balls if sensor board is shaken, no more than every second
  if (debounce > 1000 && totalAccel > motionThreshold) {
    debounce = 0
    resetAll()
  }
  
  for (i = 0; i < width; i++) {
    // If this ball's startDelay hasn't expired, don't do anything yet
    if (startDelay[i] > 0) {
      startDelay[i] -= delta
      continue
    }
  
    timeSinceLastBounce[i] += delta
    time = timeSinceLastBounce[i] / 1000
    ballHeight[i] = 0.5 * gravity * time * time + impactVelocity[i] * time
    
    // Check if the ball has reached the bottom of the strip. If so, bounce it
    if (ballHeight[i] < 0) {
      ballHeight[i] = 0
      impactVelocity[i] *= dampening
      timeSinceLastBounce[i] = 0
      
      
      // If the ball has (nearly) stopped moving, we can kick it back up to full bounce.
      // This is useful if you don't have an accelerometer.
      if (impactVelocity[i] < 1) {
        // init(i)
      }
    }
  }
}

export function render2D(index, x, y) {
  xPixel = floor(x * width)
  yPixel = height - 1 - floor(y * height)
  
  yBall = floor(ballHeight[xPixel] * height)
  
  if (yPixel == yBall) {
    rgb(1, 1, 1)
  } else if (rainbow && yPixel < yBall) {
    hsv((yBall - yPixel) / height + wave(x), 1, 1) 
  }
}
1 Like

Hey Chris!

Looks great. I took a video so other people without a matrix or sensor board can see what it does:

Your code is also really easy to follow.

My only suggestion, and this is more of an aesthetic decision, is whether you want sub-pixel rendering for the height of the balls. I’ve been using this helper a lot:

var halfwidthDefault = 0.125
// Returns 1 when a & b are proximate, 0 when they are more than `halfwidth`
// apart, and a gamma-corrected brightness for distances within `halfwidth`
function near(a, b, halfwidth) {
  if (halfwidth == 0) halfwidth = halfwidthDefault
  var v = clamp(1 - abs(a - b) / halfwidth, 0, 1)
  return v * v
}

I didn’t try it, but you might replace something like this in your code:

with something like:

  yBall = ballHeight[xPixel] * height

  closeness = near(yBall, yPixel, .5)

  if (closeness > 0) {
    rgb(closeness, closeness, closeness)

Thanks for sharing! Even as it is, you should upload it to the pattern database.

I still just have a tangle of wires and I suspect any video I make of it is going to give people LED strip nightmares, so thank you kindly for updating a decent video! :joy:

Good idea. I gave this a try with various halfWidth values but, on my 30 LED/m strips at least, the end result looked somewhat disjoint and “flickery”. I imagine subpixel rendering will work better with more tightly packed LEDs - or maybe also once I have something in place to physically diffuse the LEDs, so I might revisit your subpixel idea then. I’m going to try this on some other patterns of mine though where it might work better.

I have a couple of other ideas for variations on this pattern, will post the results if I come up with anything interesting. In the meantime, I’ve added it to the pattern library as-is, called “Bouncing Balls 2D”.

Thanks again Jeff for the feedback and video!

1 Like

Looks great. However, it seems to “hang” at the top of the arc a bit too long. You might want to use a bit of easing (see other discussions on this idea). For a similar example, when we were playing with KITT on a matrix, the difference between it “hesitating” at the edges vs “bouncing off” was visually noticeable, and changing that helped with the illusion of motion.

Thanks @Scruffynerf. I’d noticed the same thing too. I’ll take a look at your easing suggestion, but I found a very easy quick fix is to reduce the startHeight variable a small amount. In my case 0.98 results in an improvement on a 16 pixel high matrix. Of course this only works for the initial (highest) bounce wheras no doubt easing could be applied to all of them.

1 Like

I like this too – will look really nice on wearables! One strange thing: on Pixelblaze 3 with my particular matrix (the BTF WS2812 16x16), I had to add an else rgb(0,0,0) to the end of render2D() because it was apparently latching undrawn pixel values. I was getting what’s in the GIF below instead of the correct pattern.

Did anybody else see this? (Randomness is set to max. It works perfectly on the same setup and a Pixelblaze 2).

Not sure if the latching thing really constitutes a bug, or just something we should keep in mind. Here’s a very short chunk of pattern that illustrates the issue.

height = width = 16;

export function beforeRender(delta) {
  ;
}

export function render2D(index, x, y) {
  xPixel = floor(x * 16)
  yPixel = height - 1 - floor(y * height)
  
  yBall = floor(wave(x+time(0.1)) * height)
  
  if (yPixel == yBall) {
    rgb(1, 1, 1)
  } else if (yPixel < yBall) {
    hsv((yBall - yPixel) / height + wave(x), 1, 1) 
  } 
  
  // uncomment line below for "correct" sine wave display
  //else rgb(0,0,0)
}

Edit: No, I think it’s just my particular matrix doing this weird thing… Oh well, if you’ve got one of these, I guess you just have to make sure you set all the pixels.

Does the same for me on a spare PixelBlaze 2…