Hello,
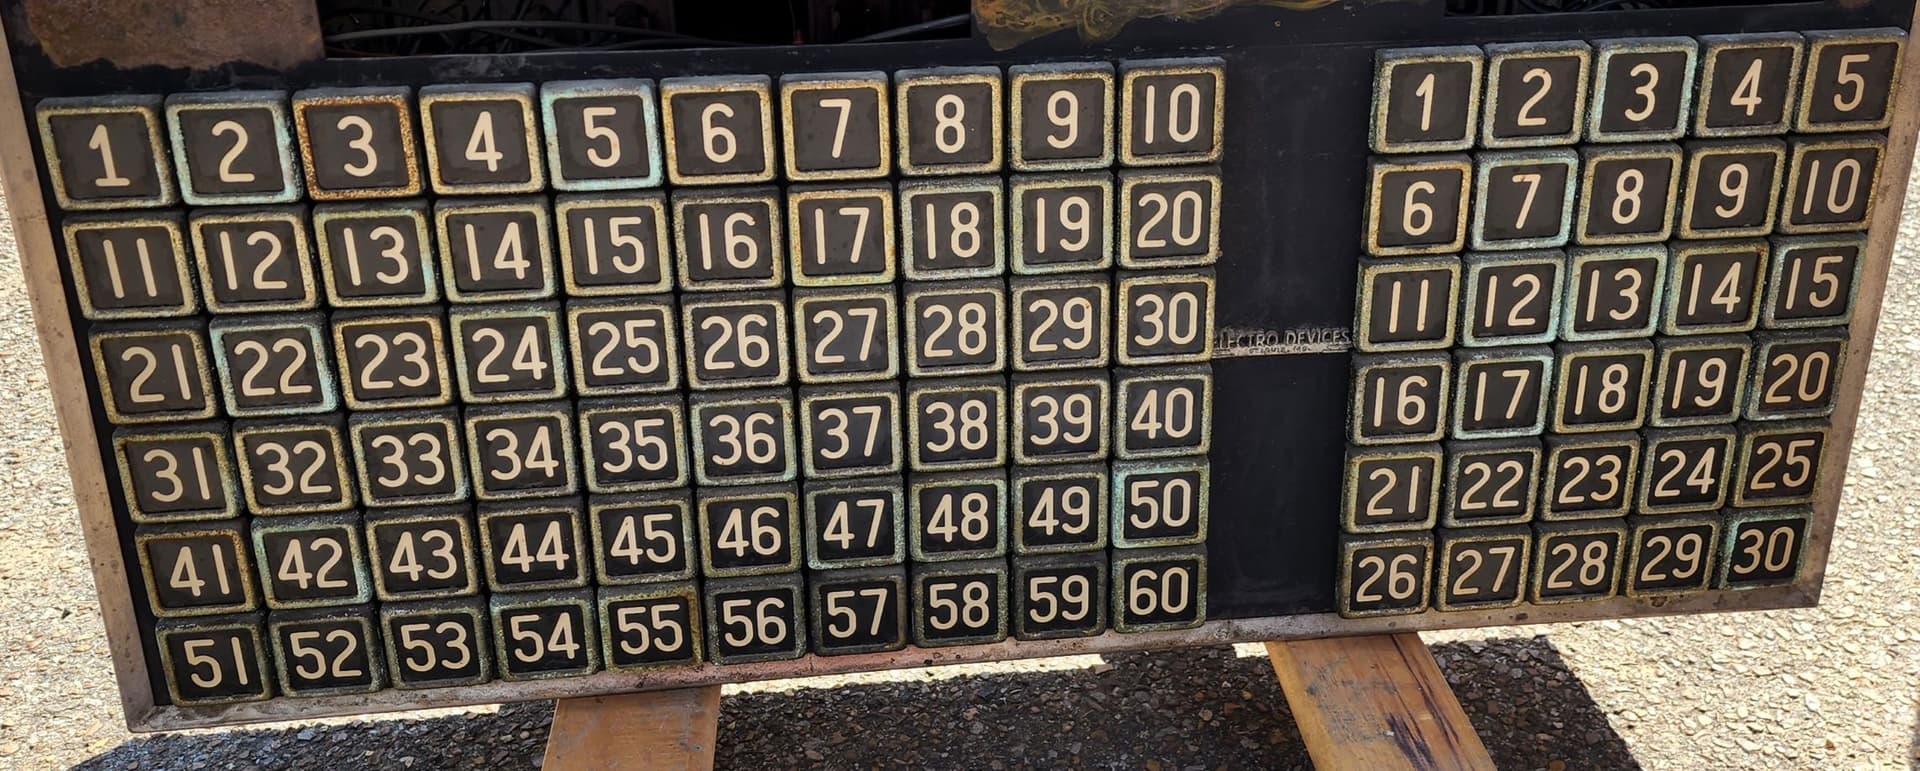
I am restoring/retrofitting an old fire department equipment status board with some 2811 string lights. A little background on me, I have little to no experience writing code but am eager to learn. I purchased the V3 pixelblaze, and was able to connect everything and apply one of the sample codes to the four 50-bulb strings. Here is a picture of the board with the layout being the same on the front and back.
My goal is to have each number light up one at a time (with the corresponding number on the back of the panel also lighting up), stay on for a few seconds, and then go to the next number in sequential order. So the end result would be when the #1 illuminates on the front panel, the #1 on the back of the panel would also illuminate. The 1 through 60 numbers would be in the same sequence and then the 1 through 30 numbers would come next in the sequence. I was able to apply a sample code and modify it so that each light turns on one by one and works its way through all 4 strings but that’s as far as I got. In addition to illuminating each diode (white), I would also like to be able to illuminate certain numbers red as the loop reaches their location (example: #14 would be illuminated red). When the loop reaches the “red” designated numbers, I would like each of those to stay illuminated as the loop continues on to the next number. At the end of the loop, there will be approximately 7 or 8 numbers that will be red. Once the cycle finishes, I would like it to repeat again. For context, the red numbers represent all the fire stations I was assigned to in my career. I hope this was enough information to give you a general idea of what I am trying to do. Any help would be appreciated,
Chris
Hi @onthespot! Cool project. I’d be happy to help.
Question - did you wire them in the order of the numbers themselves, or did you wire each row zig-zag? Or did you define a map in the mapper tab for them?
And is the “1” in the back side (set of 30) wired directly after the 60 of the front?
Thanks for the quick reply! Fortunately I haven’t placed the diodes behind the number panels yet so we can order them however it makes the most sense. My plan was to begin with the #0 diode at the number 1 spot and run to the number 10 spot. It will then drop straight down to number 20 and travel back to number 11 in a zig zag pattern. When it gets to the bottom of the 1 through 60 numbers it will stop at number 51 because of the zig zag order. From there it goes to the number 1 spot of the 1 through 30 numbers in the same zig zag pattern. When it gets to the bottom of those numbers, the strings starts at the number 1 spot of the 1 through 60 numbers on the back panel which is identical to the front side.
If it makes more sense to not do a zig zag. I can wire them in sequential order.
Chris
Both the front and back panels have the 1 through 60 and 1 through 30 number sets. They actually represent Pumpers and Trucks. There is a panel that is not in the picture that the words are engraved on.
Hey Chris - Once you get it wired up as you describe, try this out.
Code
// https://forum.electromage.com/t/help-with-illuminating-an-old-fire-department-equipment-status-board/2303/1

var redPumpers = [3, 9, 23, 30, 59]
var redTrucks = [1, 6, 14]


var periodS
export function inputNumberPeriod(_n) { periodS = _n }

var pumperCount = 60
var pumperColumns = 10
var truckCount = 30
var truckColumns = 5
var totalCount = pumperCount + truckCount


export function beforeRender(delta) {
  step = floor(time(periodS / 65.535) * totalCount)
}

export function render(index) {
  decodeIndex(index)

  if (sequenceIndex < step) {
    if (isPumper) {
      hsv(0, arrayInclude(redPumpers, pumperNumber), 1)  // white or red
    } else {
      hsv(0, arrayInclude(redTrucks, truckNumber), 1)  // white or red
    }

  } else hsv(0, 0, 0)
}

var sequenceIndex // 0..totalCount-1
var isPumper // Boolean
var pumperNumber // 1..pumperCount
var truckNumber // 1..truckCount

function decodeIndex(i) {
  pumperNumber = truckNumber = -1

  sequenceIndex = i % totalCount // the same number on the front and back have the same 0-indexed sequenceNumber

  isPumper = sequenceIndex < pumperCount
  if (isPumper) {
    var row = floor(sequenceIndex / pumperColumns)
    var col = sequenceIndex % pumperColumns
    if (row % 2 == 1) col = pumperColumns - 1 - col // Correct zig-zag wiring

    sequenceIndex = row * pumperColumns + col
    pumperNumber = sequenceIndex + 1

  } else { // Is truck
    // Rushing. Not keeping it DRY.
    var truckIndex = sequenceIndex - pumperCount
    var row = floor(truckIndex / truckColumns)
    var col = truckIndex % truckColumns
    if (row % 2 == 1) col = truckColumns - 1 - col  // Correct zig-zag wiring

    sequenceIndex = pumperCount + row * truckColumns + col

    truckNumber = sequenceIndex - pumperCount + 1
  }
}

function arrayInclude(arr, test) {
  for (i = 0; i < arr.length; i++) {
    if (arr[i] == test) return true
  }
  return false
}
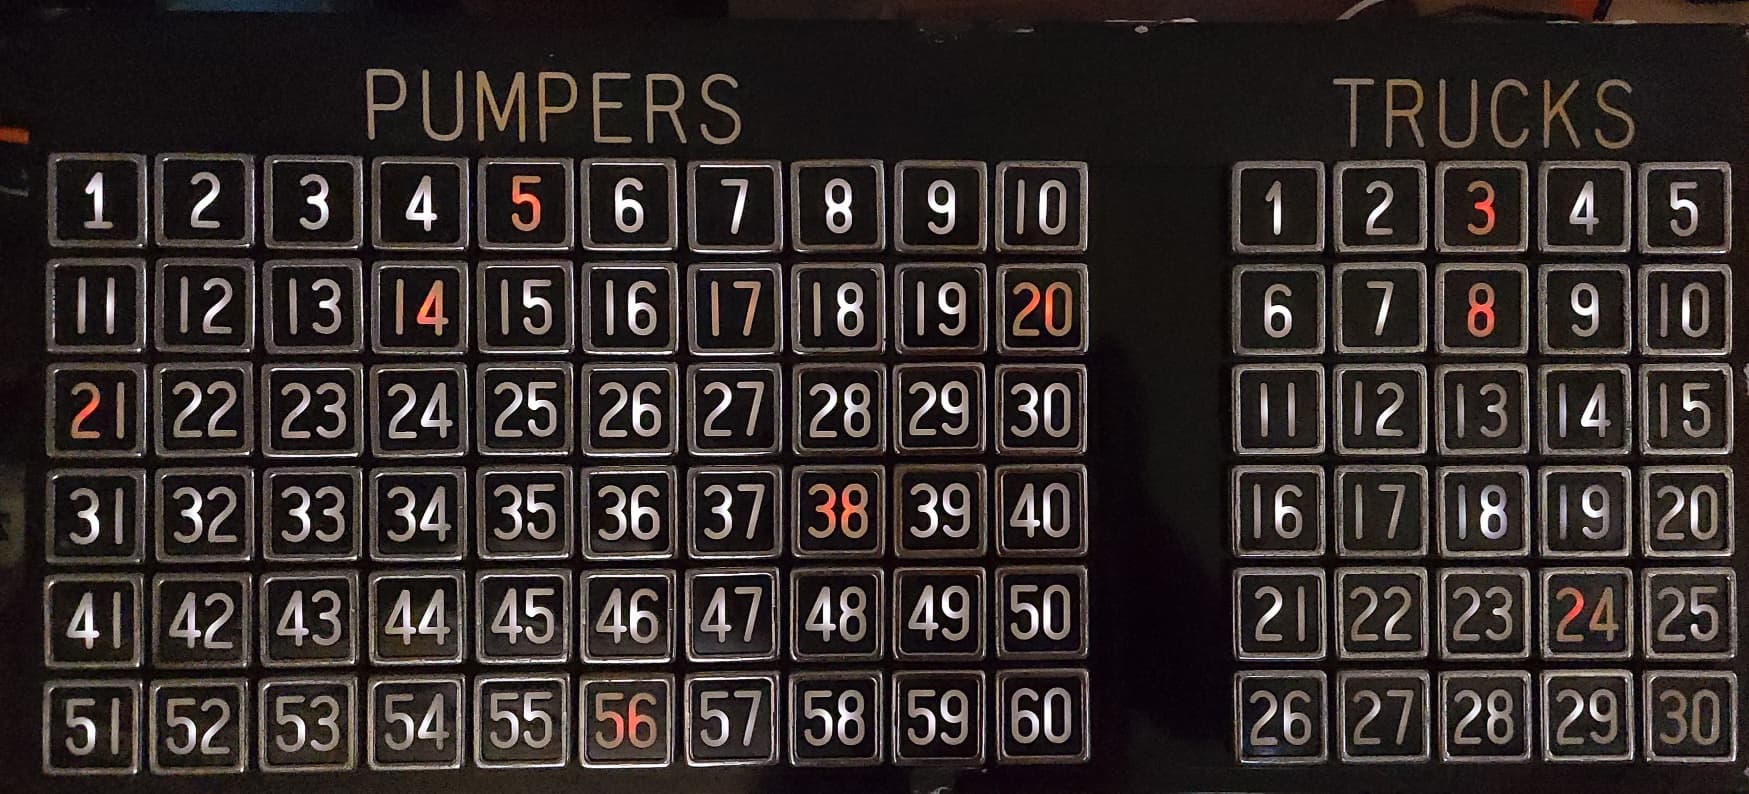
Here’s what it should look like on one side, with the repeat period set to a too-speedy 6 seconds:
And here is what both sides will look like:
Map for anyone curious. Only used for preview.
function (pixelCount) {
  var map = []

  width = 10
  for (i = 0; i < 60; i++) {
    y = Math.floor(i / width)
    x = i % width
    x = y % 2 == 1 ? width - 1 - x : x //zigzag
    map.push([x, y, 0])
  }

  width = 5
  for (i = 0; i < 30; i++) {
    y = Math.floor(i / width)
    x = i % width
    x = y % 2 == 1 ? width - 1 - x : x //zigzag
    map.push([12 + x, y, 0])
  }

  width = 10
  for (i = 0; i < 60; i++) {
    y = Math.floor(i / width)
    x = 16 - i % width
    x = y % 2 == 1 ? 34 - width - 1 - x : x //zigzag
    map.push([x, y, 1])
  }

  width = 5
  for (i = 0; i < 30; i++) {
    y = Math.floor(i / width)
    x = 4 - i % width
    x = y % 2 == 1 ?  width - 1 - x : x //zigzag
    map.push([x, y, 1])
  }

  map.push([x, 14, 3]) // phantom pixel

  return map
}
PS @wizard how cool is it that I could just record the editor preview!! No LEDs attached at all. Love these enhancements.
Jeff,
Thank you!!! I think this is going to be perfect. I am 3d printing 180 diode holders now so I should have it assembled in a week or so. I will send an update when I get it finished.
Thanks again,
Chris
Hi,
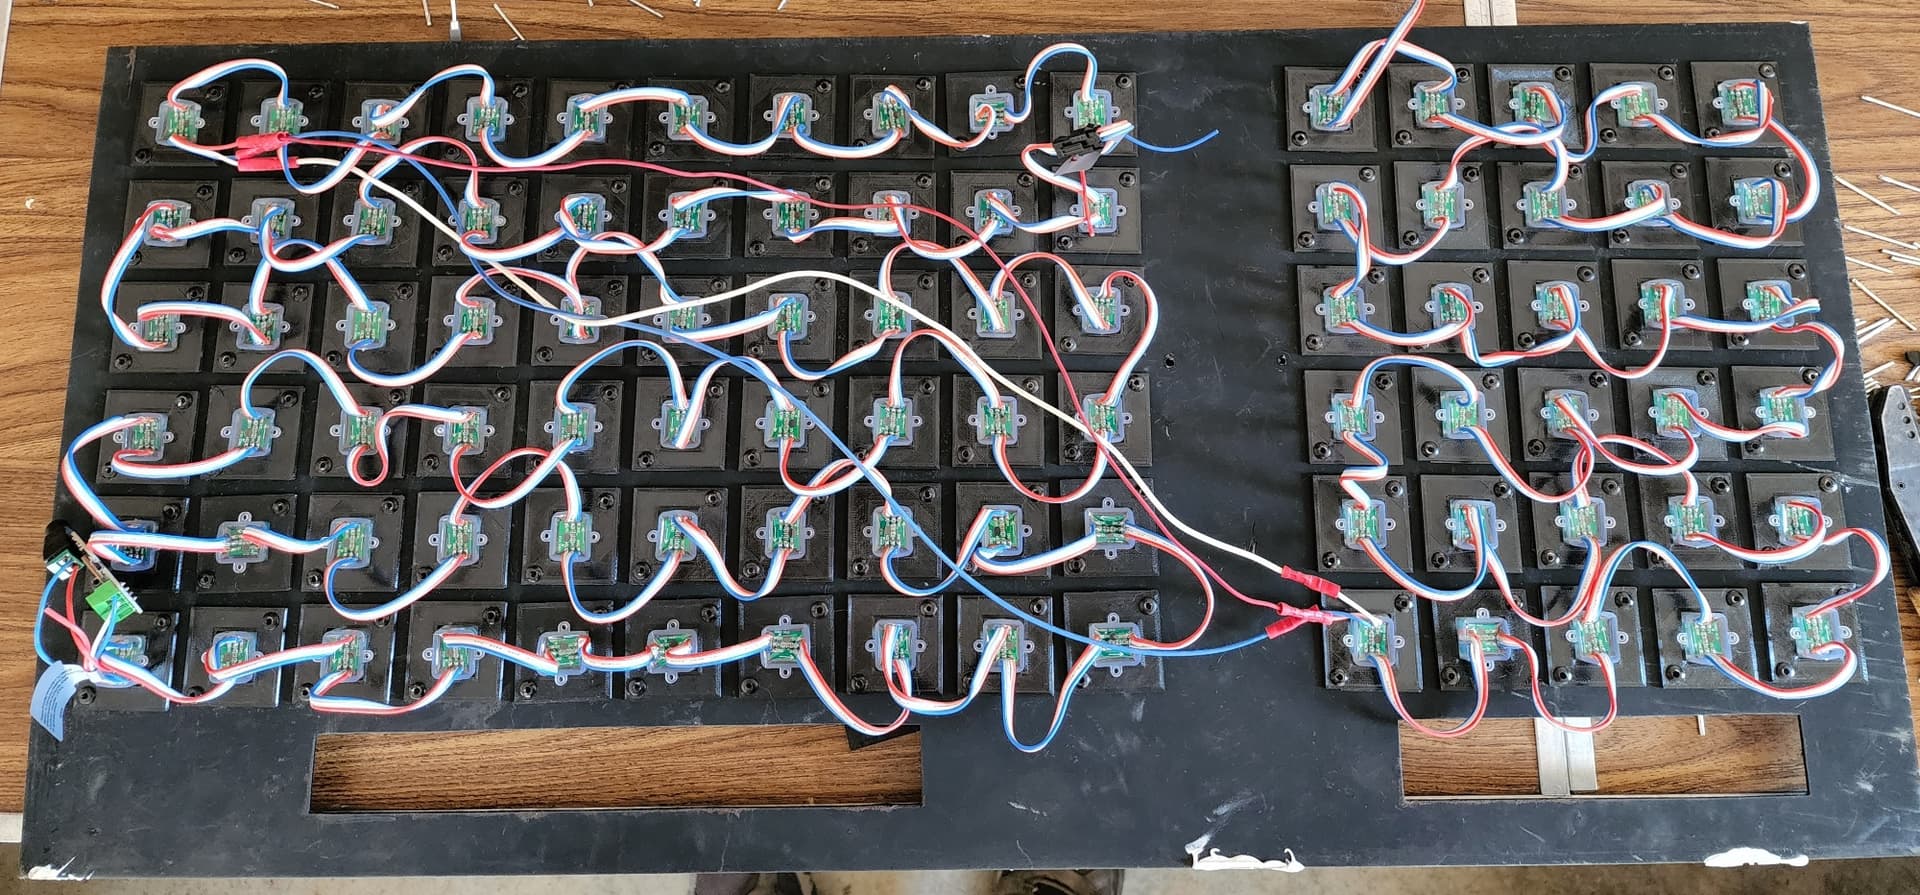
Just wanted to give an update on the project. I was able to get one of the panels wired up and it’s running almost perfect ( Only issue is Truck #30 never lights up. It’s like it gets to the end of the sequence but doesn’t dwell on Truck 30 long enough). Here are some pics of the panel.