I made an LED 3D mapping tool that might be of interest

Hi all! First time poster here,

I just wanted to share a tool I’ve made that 3D scans addressable LEDs. I originally made this for a costume I did years back and thought it was well time to make it a bit more accessible.

I know there are other tools out there but I think this one is a bit different, I’m struggling to do the creative writing so have a list:

  • Doesn’t require any calibration or known camera positions
  • Supports Windows, Mac and Linux
  • Single line Python install
  • Reconstructs live
  • Exports 2D and 3D maps to CSV

I’d love any and all feedback you might have as I’d love to make this as good as it can be <3

Thank you and hope this helps

Mariday

P.S. I hope this comes across ok, I haven’t really done something like this before and kinda nervous!

11 Likes

Hi @TheMariday ,
Welcome to the forum! It was a pleasure to meet you and chat LEDs! Your costume is amazing, and I hope to check out this 3D mapping tool soon!

It looks like there’s a pretty simple API to drop in some communications to a Pixelblaze for mapping, and this takes care of the rest. The output shouldn’t be to hard to get in a format Pixelblaze can read too.

It’s pretty awesome that you capture the normal as well, the direction the LED is facing isn’t something Pixelblaze currently takes into account, but I can imagine all kinds of uses for that in both animations and in the live preview (especially for very dense & complex structures).

Thanks again for sharing this, @TheMariday!

(@zranger1 psst you might want to take a look!)

Pleasure to meet you too!

I’d love to see it integrated with pixelblaze, the backend as you said should be pretty straightforward and I want to add more output formats in the future anyway like .h and json files.

The normal thing was a bit of a biproduct of another feature which I haven’t put in the readme as its a bit specialised but marimapper can also use the led positions and normals to reconstruct a manifold mesh.

Without the normals, mesh reconstruction is a mess!

Glad to share and hope someone finds it useful

Mariday

See? Another place where an easy solution is RenderND(), where the mapper data is an arbitrary-length vector per LED. :smiley:

Just a quick update on this front, thanks to savdb, Marimapper now supports PixelBlaze backend and export!

Massive massive thank you to them wherever they are <3

6 Likes

Have just used the “marimapper” and can confirm that it is awesome, as well as a big time and sanity saver. Here is my friend’s 600 LED Christmas tree post mapping

7 Likes

Great looking tree!

Been meaning to have a play with this mapper for some time. Quick question, what camera did you use and from what sort of distance from the tree?

Woody

1 Like

Good grief!! I feel like Charlie Brown and 3D mapping is a football being held by Lucy!!
Three days into this and I still can’t get it to work!
Here’s what I’ve done so far…

  1. downloaded ‘marimapper’ from GitHub and unzipped it.
  2. replaced a previous copy of Python 3.12 with 3.11 (I have never used Python before, so it’s likely I won’t ever need two versions).
  3. placed a copy of ‘marimapper’ on my desktop, copied and pasted location with “cd” command in PowerShell.
  4. tried to run ‘marimapper’, Python couldn’t find Git.
  5. downloaded Git, Python still unable to find it.
  6. watched three or four YouTube videos, copied and pasted Git “bin” and Git “cmd” onto Path in System Variables.
  7. back onto YouTube again where a nice man named Jana suggested that perhaps my syntax errors and ‘errorno"X"’ may be caused by my not realizing that Windows PowerShell is only a terminal and can run Windows commands as well as running Python. Watch for <<< !!! Definite AHA! moment here.
  8. re-read ‘readme’ and tried using ‘pip’ in PowerShell (NOT Python!!) ‘pip install pipx’,
    ‘pipx ensurepath’, and ‘pipx install git+https://github.com/themariday/marimapper’. That seemed to work and a prompt told me that ‘marimapper’ would now work with a simple ‘.exe’ command.
  9. ‘marimapper.exe’ seemed to work, but then returned this screen…
    (The bottom seven lines are an attempt to run "marimapper’ in Python…)

And to add more confusion, Norton jumps into the mix to save my computer from certain doom!!! Do I have to disable Norton to run Python scripts?

I feel like I’ve driven miles and miles and my actual destination could have been reached on foot if I knew where I was going!
I likely have screwed up the order of one or more of these steps, it’s all a little fuzzy at the moment. I knew it was going to be a challenge for me, but at this point I could use a little help if anyone can see where my mistakes are.
Thank you very much in advance!!!

Hi Glitch!

Lets see what we can do!

So firstly, you are spot on using pip / pipx to install marimapper, by far the easiest and safest way to install the tool. running marimapper.exe in powershell should do what we need!

Next up, why isn’t it?

After a quick google I think there’s two things that could be causing things to explode:

1: Norton anti-virus

I am wondering if Norton is jumping in and blocking marimapper from accessing the libraries it needs.
I’m not sure how to tell Norton not to do this, but the advice I’ve been finding online is that Norton is famously known for blocking pretty much everything and breaking a lot of programs.
Afraid I can’t help hugely here!
The general vibe I get online is that Norton is more of a thorn in peoples side in comparison to using the built in windows security unless you are downloading a lot of dodgy content.

2: Multiple versions of python

The second idea is that multiple versions of python might be confusing the linker. Try uninstalling all references to Python from the Windows uninstall panel and start again with Python 3.11

I’m going to aim to put out a video tutorial over the christmas period, so worst case scenario there should be a step-by-step guide coming out very soon.

I hope this gives you some ideas and thank you for reaching out! I’ll do my best to help where I can

2 Likes

Nice mapping Tool hope to use it like GeekMomProjects did.
Awesome Tree GeekMomProjects.
Which Software did you used to animate the LEDs?
Colin

I tried a Christmas-y thing too - no tree, so I created a tree in a mess of LEDs mapped in 3D space with marimapper

cyl = [0.44,0.2,0.5] // location of the top of the "tree"
cs = 0.4 // Slope of the side of the tree
br = 0.1 // radius of the start at the top of the tree
th = 0.05

var t1
export function beforeRender(delta) {
  t1 = time(.1)
}

// cone SDF
function cylsdf(x,y,z) {
  dx = x - cyl[0]
  dy = y - cyl[1]
  dz = z - cyl[2]
  dr = sqrt(dx*dx + dz*dz)
  if (dy <0 ) {
   // chop off the top (more correct would be intersecting with a plane)
   return 999
  }
  return dr - dy*cs
}

// sphere SDF for the "star" at the top of the tree
function stsdf(x,y,z) {
  dx = x - cyl[0]
  dy = y - cyl[1]
  dz = z - cyl[2]
  dr = sqrt(dx*dx + dz*dz + dy*dy)
  return dr - br
}


export function render3D(index,x,y,z) {
  bv = stsdf(x,y,z);
  if (bv < 0) {
    // inside the start
    hsv(0.15, 0.5, 1.0)
    return
  }
 
  cv = cylsdf(x,y,z);
  v = 1 - smoothstep(-0.03, 0.0, cv)
  if (cv > 0 && cv < th) {
    // blinky colors just outside the edge of the cone
    pl = perlin(x * 15.0,y* 15.0,z* 15.0 + t1 * 10.0,99)
    pl2 = perlin(x * 15.0 + 4,y* 15.0+8,z* 15.0 + t1 * 10.0,99)
    hsv(pl2, 1.0, pl)
    return
  }
  // green cone
  hsv(0.33, 1.0, v * 0.66)
}
3 Likes

I really appreciate your help!
I tried 3 different ways of informing Norton that marimapper.exe was safe and I wanted it to ‘stand down’, but the program was unrelenting in it’s refusal to run the script, despite the override features that I specified in Data Protection…so it got itself uninstalled! Still can’t run the script, but I got a new computer in the process!!! Waaay faster now than it was, I mean minutes, not just seconds faster on initial start-up. Awesome change. Thanks for the good advice!

I then uninstalled all Python versions and started over with 3.11, not much changed, just lots of error messages. So I decided to switch computers and started from scratch on my Samsung Galaxy Book (it’s a notebook style pc running Win 10), downloading Python 3.11, Git, and the marimapper zip. Things were proceeding well and the marimapper program completed one scan, but when I moved the computer and tried for the second scan the following message was displayed,

C:\Users\xxxx>marimapper.exe --device 1 --exposure 10 --backend pixelblaze --server 192.168.1.68
Start scan? [y/n]: C:\Users\xxxx\pipx\venvs\marimapper\Lib\site-packages\numpy\core\fromnumeric.py:3464:
RuntimeWarning: Mean of empty slice.
* return _methods._mean(a, axis=axis, dtype=dtype,*

C:\Users\xxxx\pipx\venvs\marimapper\Lib\site-packages\numpy\core_methods.py:192:
RuntimeWarning: invalid value encountered in scalar divide
* ret = ret.dtype.type(ret / rcount)*

If anyone can help with this I would really appreciate it, I have a couple of 3d Pixelblaze projects I would love to map but I really am Python illiterate!!
I hope this doesn’t sound like, “I’d love to learn how to swim, but I hate getting wet!” :confused:

Sorry for the slow response @Glitch!

Glad to hear about the new, norton-free machine! Sounds like it’s well deserved.

I’ve recently updated marimapper, this might solve this issue as I have seen it myself.

The message you got was a warning so it might be able to be ignored! However if not…

I would highly reccomend installing marimapper with pipx as it might save you a lot of pain, have a look at the readme if you need pointers there.

If you’d prefer to use the zipped file, try re-downloading the zip from github, extracting it and then opening a terminal inside the unzipped folder and run the following commands:

pip uninstall marimapper
pip install .

Thank you so much for letting me know about these issues! It should absolutely 100% work straight out of the box and I don’t expect anyone should need to have python knowledge to run this tool.

Hope this helps and let me know how you get on.

Mariday

P.S. I’ll try and check this thread more often but worst case scenario I’m more active on mastadon

Thank you very much for your help!! When it comes to Python I’m that guy that will help ensure everything is “idiot-proof”! :smirk: I will follow your suggestions and use “pip”. In the meantime, the tree is back in it’s box for eleven months, the pressure is off, and I can learn how to 3D map on some less stressful projects.
Thanks again for giving us the marimapper and I really appreciate the personal assistance!

1 Like

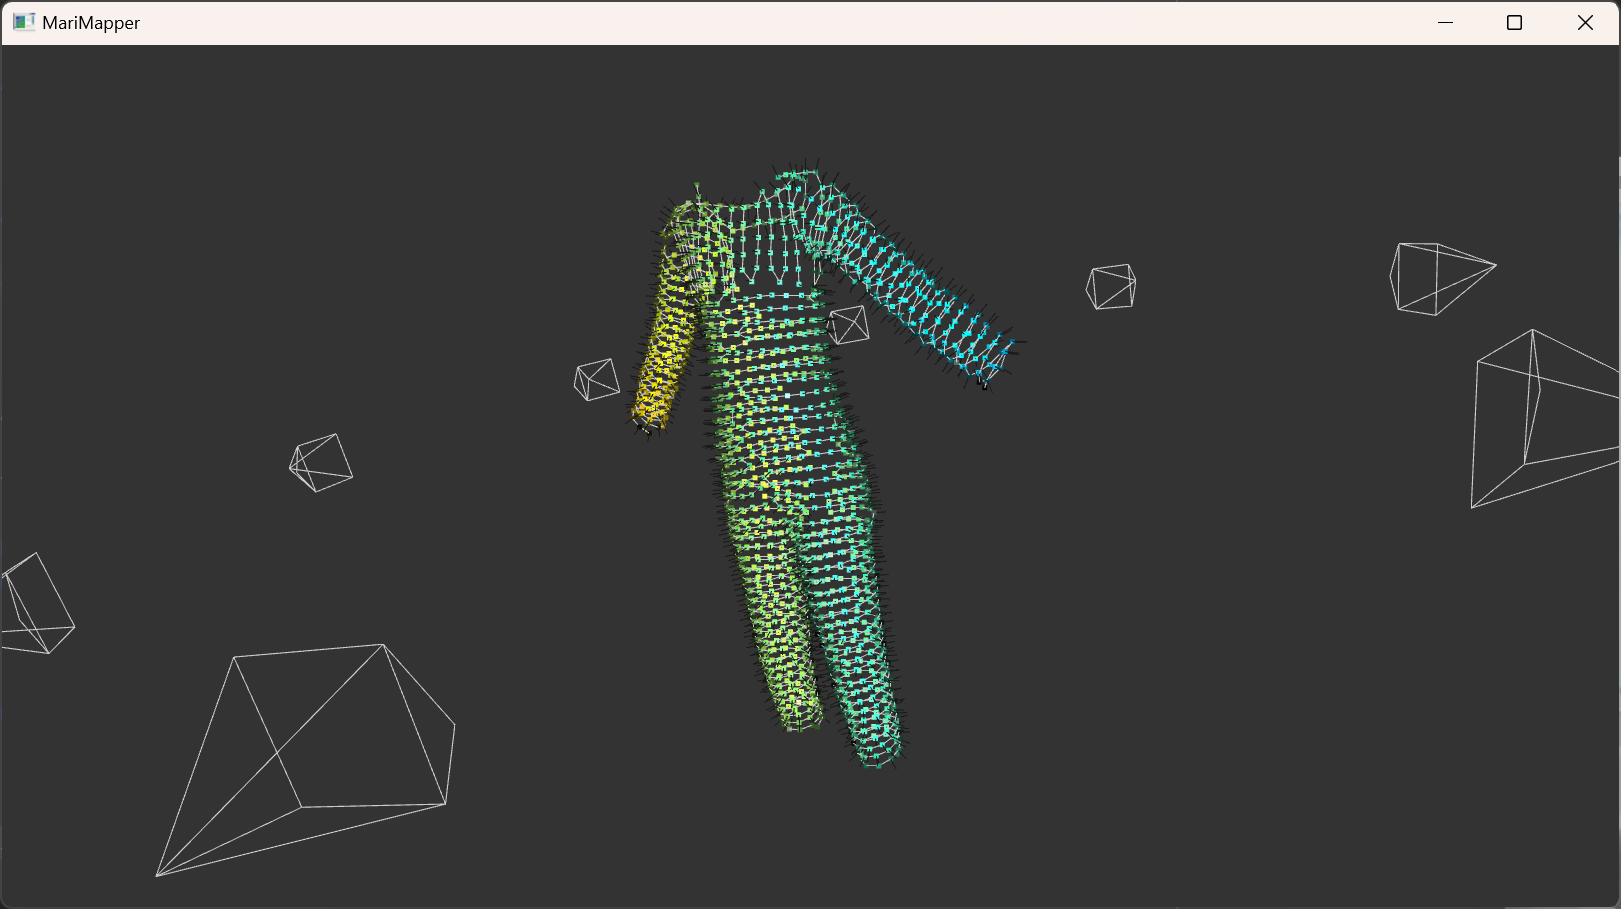
A huge thank you to @TheMariday – I wanted to make my next LED wearable 3D mapped but didn’t know how to approach the problem until this forum post, and this tool worked great. It’s a game changer for this kind of project!

One bug report – this helper function:

def pixelblaze_backend_set_args(parser):
    parser.add_argument("--server", default="4.3.2.1")

didn’t work for me (running on MacOS, fresh install of your code and updated Python); I had to manually set the IP address in the code. (The feature to automatically export a PixelBlaze mapper function also didn’t work, but I just took the XYZ coordinates and made a mapper function in Google Sheets in under five minutes).

For anyone else reading, if you’re using a webcam – such as the native Macbook Pro webcam – which doesn’t support brightness adjustments, this app still well, you may just have to manually adjust the brightness of the LEDs and work in a very dark room with a dark-backdrop (instead of white walls) to absorb bounced light.

The finished shirt:

This build uses all the same approaches of my prior coat build I shared here: Beginners Guide to Making a LED Festival Coat – except it’s now 3D mapped via this post, and is.. a lightweight shirt instead of a heavy coat.

It has 390 pebble pixels over a linen shirt, with a single layer of black silk fabric on top for enough diffusion and to take away the harsh look of bare LEDs and still lets through most of the light. The 3-D mapping was completed BEFORE adding the silk layer, for higher accuracy.

I ran them at only 15% max brightness, usually 10%, which let me work without power injection off a single 5,000 mAh 5v USB battery pack; I was drawing 400-500 milliamps, depending on the pattern. This is, obviously, anything but conservative best practice for power management, but worked well enough for me (it can cause real problems if you set them to all-white or drive the max brightness higher, of course, but there’s always design tradeoffs).

For the first time, I tried these 50mm pitch pebble LEDs with the backup data line, so that if one pixel fails the whole shirt doesn’t have to be repaired. They’re run in a single continuous line, with a careful finesse of where they go from the front side to the backside to avoid a weak point where they’re soldered.

I’ve also posted a pair of videos of it to my Instagram here, and here’s the second video. In both videos, it’s synced via the PixelBlaze “leader /follower” WiFi system to my LED helmet I made previously.

1 Like

Hi Zachary.

Oh my goodness a game changer? Thank you so much for your kind words and amazing work!

Holy hell that jacket is awesome and I love the helmet! I’m so glad that my silly little code helped!

I’ve had a look at what’s gone wrong for you and updated marimapper to 3.4.1 with a fix!

Let me know if this works for you, if installed via UV you should be able to just run uv tool upgrade marimapper.

Apologies for the bug, sadly I don’t test the pixelblaze scripts as I am sans pixelblaze! Massive thanks to savdb for doing the pixelblaze work, except the bug, that was on me!

If you have any feedback at all please do let me know, I’m keen to make it as user friendly as possible.

Thank you again for sharing this, it’s made my day <3

2 Likes

Awesome, and thanks for fixing that bug so quickly!

I should write up the helmet separately – it’s a 2D mapped string of pebble LEDs with a set of custom 3D printed hollow white diffusers on top of them. They have flat and little notches cut in the bottom sides for the pebble LED wires to pass through smoothly. They’re just printed in regular white filament; I’d have to check what kind I used. That project is obviously curved / 3D surface, but I just flattened it to a simple 2D oval for simplified mapping. The battery and PixelBlaze are both inside the closed cell / hard foam of the helmet; I carved out room for them. My previous coat, linked above, used the front middle as a “seam” and was 2D mapped with the “center” point being the center of the back, but with this shirt, that would not optically work, so to make it come to life it needed a tool like yours or a LOT of manual work.

(If you have a project where a PixelBlaze will be actually used and you’ve never used one before – despite having, you know, contributed this to the forum… DM me @TheMariday and I’ll help change that!)

1 Like