Looking for help how to create a pattern

Hi Everyone,

I am looking for help how to create a some sort of “slow glowing fire” patter (I am not sure how to describe it better) for my Living Room COB LED strip. The strip is 24V COB type with only 100 pixels (12 RGB LEDs per pixel). Strip is mounted on the wall right below ceiling. There are 7 artificial segments. 5 wave shaped segments in a middle have 16 pixels and 2 side segments have 10 pixels.
Here is a picture how it looks like (ceiling is right above the strip).

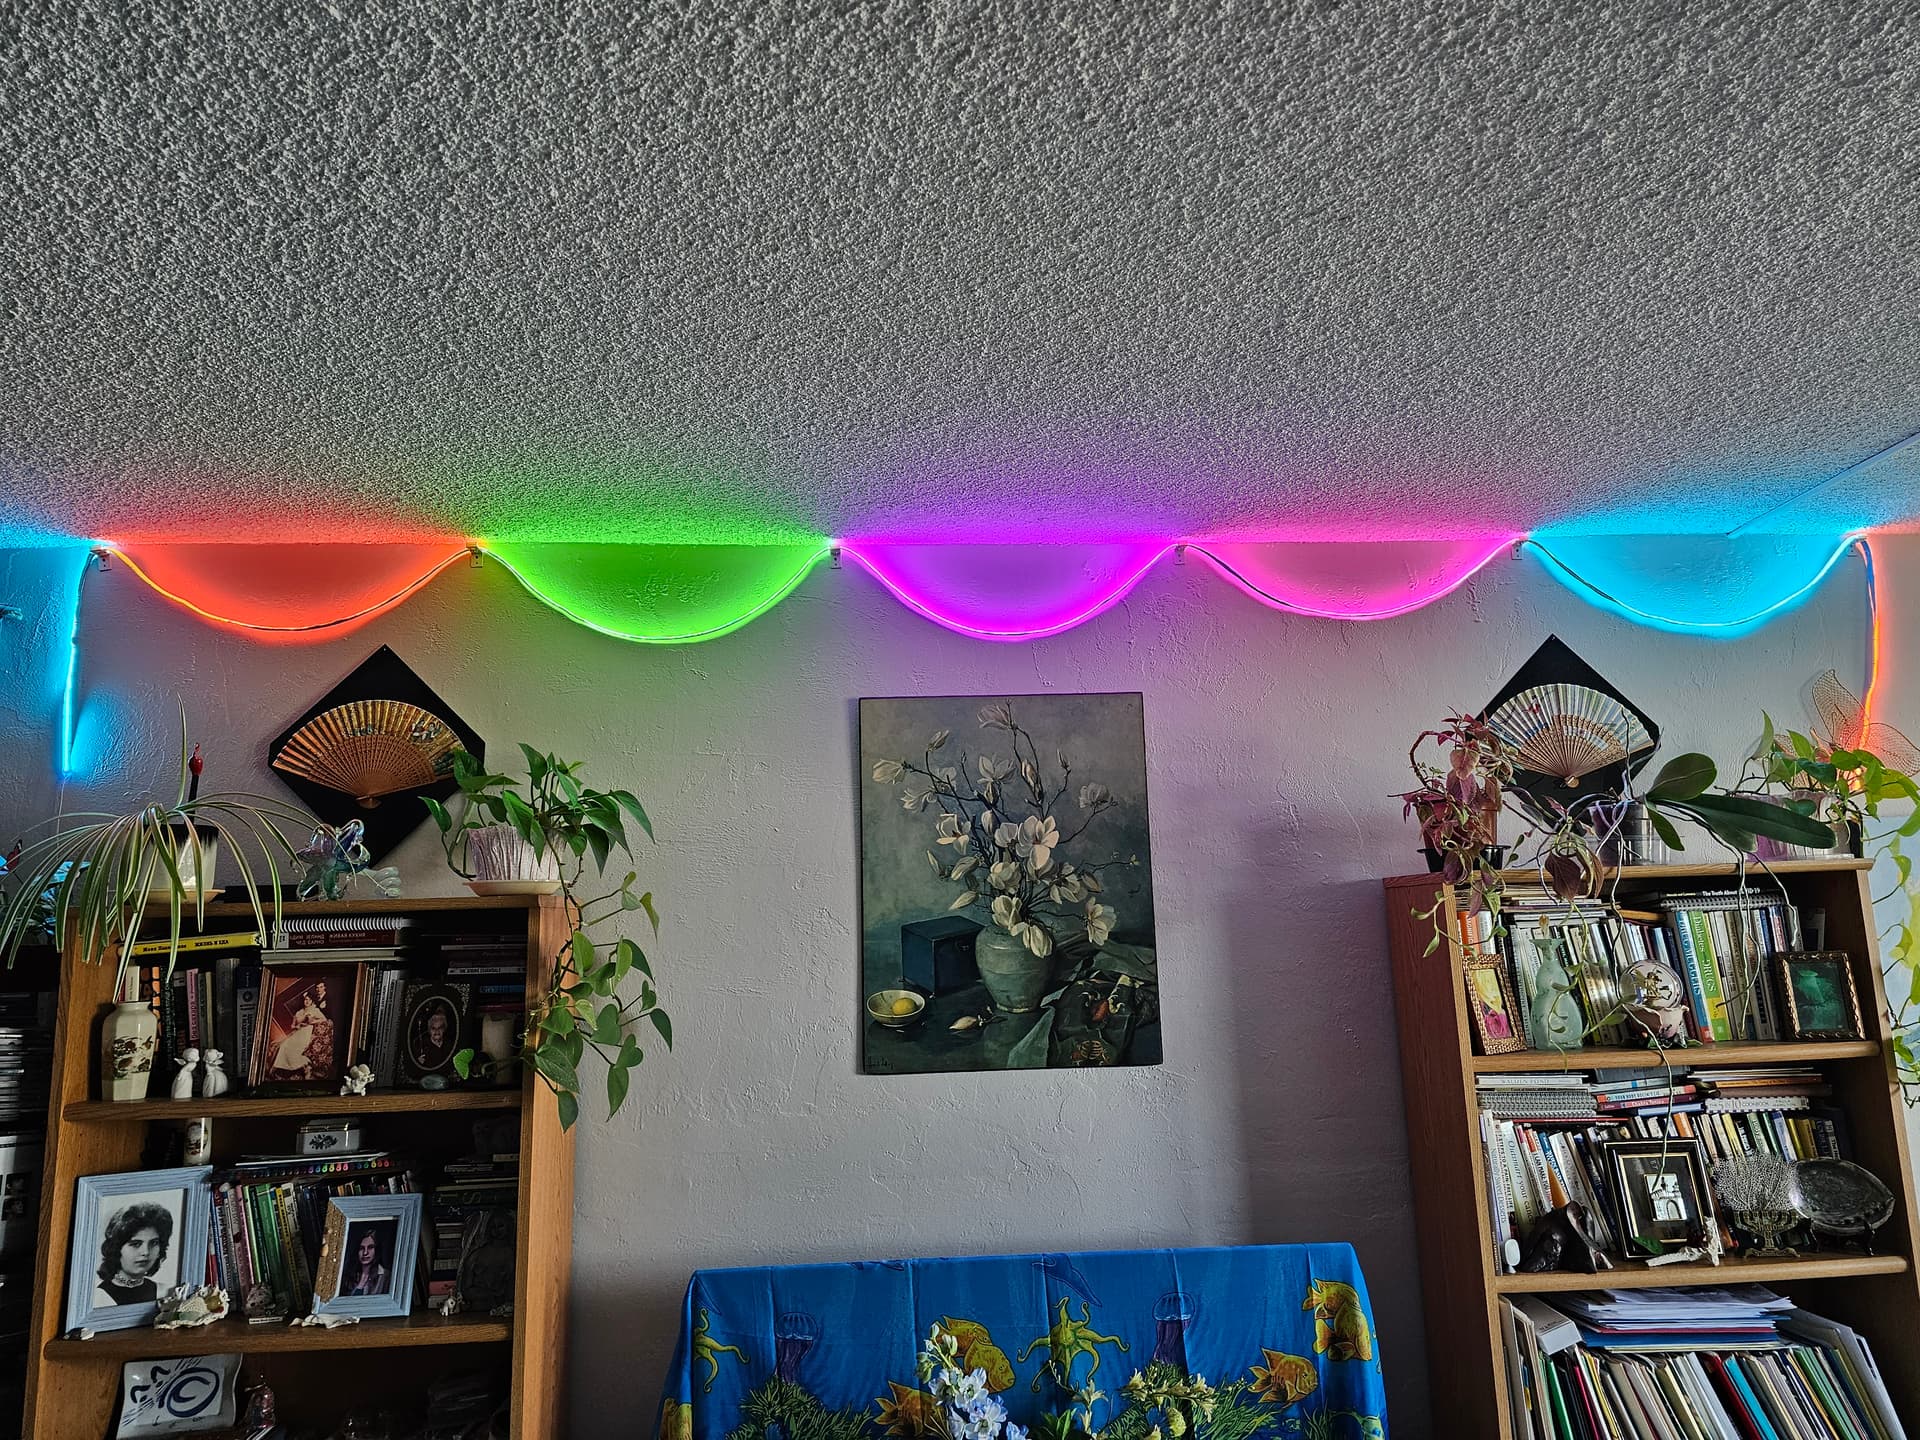
Currently it runs very simple pattern which creates ether colored static segments (please check the picture) or single color for the entire strip. Just in case here is a code:

// Common R, G, B vallues
export var Rc = 1
export var Gc = 0.5
export var Bc = 0
export var enableColor = 1

// Staring Index of each LED Segment
Seg_1 = 0
Seg_2 = 9
Seg_3 = 25
Seg_4 = 41
Seg_5 = 57
Seg_6 = 73
Seg_7 = 89
Seg_8 = 100

// Segment Colors
R1 = 0
G1 = 1
B1 = 1

R2 = 1
G2 = 0.15
B2 = 0

R3 = 0.3
G3 = 1
B3 = 0

R4 = 1
G4 = 0
B4 = 1

R5 = 1
G5 = 0.1
B5 = 0.3

R6 = 0
G6 = 1
B6 = 1

R7 = 1
G7 = 0.15
B7 = 0

R8 = Rc
G8 = Gc
B8 = Bc

/*
export function beforeRender(delta)
{
  
}
*/

export function render(index)
{
  if (false == enableColor)
  {
    R = Rc
    G = Gc
    B = Bc
  }
  else if ((index >= Seg_1) && (index < Seg_2))
  {
    R = R1
    G = G1
    B = B1
  }
  else if ((index >= Seg_2) && (index < Seg_3))
  {
    R = R2
    G = G2
    B = B2
  }
  else if ((index >= Seg_3) && (index < Seg_4))
  {
    R = R3
    G = G3
    B = B3
  }
  else if ((index >= Seg_4) && (index < Seg_5))
  {
    R = R4
    G = G4
    B = B4
  }
  else if ((index >= Seg_5) && (index < Seg_6))
  {
    R = R5
    G = G5
    B = B5
  }
  else if ((index >= Seg_6) && (index < Seg_7))
  {
    R = R6
    G = G6
    B = B6
  }
  else if ((index >= Seg_7) && (index < Seg_8))
  {
    R = R7
    G = G7
    B = B7
  }
  else
  {
    R = Rc
    G = Gc
    B = Bc
  }

  rgb(R, G, B)
}

My wife asked if we can have a “slow glowing fire” effect for this strip. I am 100% sure this is possible but I don’t know how to create it. Any help is very welcome.

Thank you and Happy Holidays,

  • Vitaliy

Hi @Vitaliy,

Those are fantastically smooth and bright!

It is hard to judge what sort of fire effect might look good, because I don’t have anything of similar LEDs/pixel layout or density.

Here is something to try though – a slightly modified version of the fire/candlelight effect I’m currently using on 60 LED/meter strips atop a long exposed beam at my house. It has speed and complexity sliders which will (in an ideal world) let you adjust it to work on your setup.

"Fireglow" pattern code

export var speed = 0.0125;
export var complexity = 5.6;


// controls movement speed
export function sliderSpeed(v) {
  speed = mix(0.005,0.2,v*v)
}

// controls the complexity of the pattern
export function sliderComplexity(v) {
  complexity = 0.5 + v * 8
}

// generate a single layer of our noise field
function fbm(x,y) {
  return perlinFbm(x,y,PI,complexity,0.8,3);
}

// build slow moving fire-like pattern from layers of noise
function pattern(px,py) {
  k = sin(PI2 * px + t1)
  
  r = fbm(k,py + t1);
  r -= fbm(py - t1,k);
  
  return 0.5 + r / 2;
}

var timebase = 0;
var t1;
export function beforeRender(delta) {
  timebase = (timebase + delta / 1000)  % 3600;
  t1 = timebase * speed;
}

export function render(index) {
  // find value of noise field at this pixel
  pos = index/pixelCount;
  var f = pattern(pos, 1-pos);
  
  // compute fire color, saturation and brightness from noise field value
  
  // constrain hue to the yellow/orange range
  hue = 0.002 + f * 0.03;
  
  // desaturate the highest values just a little to make
  // it look hotter
  sat = 1.925 - f;
  
  // use gamma adjusted value for brightness
  bri = f * f;
  
  hsv(hue, sat, bri);
}

Thank you very much for shearing this very nice pattern. It looks very good and already appreciated (but not yet 100% approved) by my wife. These two Sliders definitely will help to fine tune the look but this will take some time to play with. I should be able to control "speed’ and “complexity” vars from Hubitat with yours very nice HE Driver (which I am using for all my strip lighting projects) and leave Sliders control in place. Am I right?

Of course you can control it from the HE driver! And if you need something different to win final spouse approval, let me know – I might be able to help.

Thank you, everything looks very good “as is”.
But looking on this pattern I got an idea. I guess, this pattern may look even better if I can run some sort of separate instances for each segment. I am sure, I saw some time ago you created a multi-segment option which allows to run different patterns per segment but I never tried it. In this case I would like to run the same patter for each segment. Could you please remind me how to do this?

Fire is always interesting. Getting a really good look is very installation specific.

Here’s an updated pattern to try. It uses the segment definitions from your earlier post, and runs a slightly different variation of the pattern on each segment. It’s also visually a bit smoother, which might look better on your COB strips.

(To get this pattern to do multiple segments just required modulo arithmetic on the pixel location to restart the math at each segment boundary, plus a small offset to make each segment slightly different.)

Fireglow update
// initial pattern settings
export var speed = 0.25;
export var complexity = 2.15;
var blendGradient = 0.25;

// timers
var timebase,t1;

// description of LED strip arrangement
var nSegments = 7
var segmentStart = [0,9,25,41,57,73,89,100]

// array to holds precomputed values for each pixel where the integer portion
// is the segment that the pixel is in, and the fractional portion is represents
// the pixel's position within the segment, from 0 to 100%
var segmentData = array(pixelCount)

// initialize segment data for each pixel
function initializeSegmentData() {
  segment = 0;  
  pos = 0;
  len = segmentStart[segment + 1] - segmentStart[segment]
  
    for (i = 0; i < pixelCount;i++) {
      if (i == segmentStart[segment + 1]) {
        segment++;
        len = segmentStart[segment + 1] - segmentStart[segment]    
      }
      
      pos = (i - segmentStart[segment]) / (len - 1)
      segmentData[i] = segment + pos;
    }
}

// controls movement speed
export function sliderSpeed(v) {
  speed = mix(0.05,0.5,v)
}

// controls the complexity (feature density) of the pattern 
export function sliderComplexity(v) {
  complexity = mix(1.15,5,v)
}

// generate a single layer of our noise field
function fbm(x,y) {
  // perlin turbulence parameters:
  // (x,y,z,lacunarity,gain,octaves)
  return perlinTurbulence(x,y,PI,0.5,0.85,3);
}

// build slow moving fire-like pattern from layers of noise
function pattern(px,py) {
  k = sin(PI2 * px + t1)

  // two layers of noise, moving in opposite directions  
  r  = fbm(px * k,py * k);
  r1 = fbm(py * -k,k * -px);
  
  // use another (simpler, faster) gradient noise function to blend the first two
  // (lower values of blendGradient will make smoother blends)
  r = mix(r,r1,0.5 + perlin(px * blendGradient,py * blendGradient,PI,PI2))
  
  return clamp(r,0,1);
}

// allows changing of speed without visual disruption
export function beforeRender(delta) {
  sf = (1000 / (speed / complexity))
  timebase = (timebase + delta / sf)  % 3600;
  t1 = timebase
}

export function render(index) {
  // determine which segment we are in, and our position within the segment
  
  // find value of noise field at this pixel
  // the position value is derived from the segment number and the pixel's position in the segment
  pos = complexity * (floor(segmentData[index]) / nSegments + frac(segmentData[index]));
  var f = pattern(pos, 1-pos);
  f = f * f;
  
  // compute fire color, saturation and brightness from noise field value
  
  // constrain hue to the yellow/orange range
  hue = 0.01 + f * 0.03;
  
  // desaturate the highest values just a little to make
  // it look hotter
  sat = 1.5 - f / 2;
  
  bri = f;
  
  hsv(hue, sat, bri);
}

initializeSegmentData();

FANTASTIC!
And again VERY BIG THANK YOU!

I took a short video but for some reason it fails to upload.
However in reality this pattern looks much better than on the video.
WAF is 100%+
I am still playing with setting for a final setup. I had to increase speed slider to 1.5 otherwise speed is a bit too slow. On this strip single pixel is 12 LEDs but because this is COB style pixel physical size is 2". This is a bit too big but still looks very good. I have around a 5V COB strip with 1200 pixels (single LED per pixel) but because it is 5V it will require few (2-3) power injection points. This is certainly doable but not very desirable for this specific case.