Mapping twin circle OR setting start/end points of LED string

Hi all!

Just looking for any assistance in how to best approach the mapping of a project.

I have a 50 LEDs configured in the image below.

I would like to change the order of the LEDs, so instead of going around the string as per normal, i would like to have it change for eg. 1-33 and then swap to 11-28 and then 34- 50. Repeating this new led order, continuously.

My vision of the new order below

If any more info is required please let me know!!

Thanks in advance

1 Like

If you have the expansion board, the easy way would be to adress each circle as a separate chanel, and specify which LED the first circle ends and which LED the second circle starts.

For example if all your circles are 60 leds, with the expansion board you are able to tell the pixelblaze the first circle ends at LED 40, and the second circle starts at LED 20. Does this make sense or am I confusing you? Let me know.

yes i do have the expansion board :slight_smile:

hmmm maybe I should have said expanded on my reasons for the above pattern

The reason for the desired pattern is so the motion of the pattern appears to be continuous, looping around the centre circle thing before going around each outer circle radius.

Would this be possible with your solution?

This is the current LED wiring

thanks!

thats two separate circles right?

Which channel do you want to go first? channel 0 or channel 1?

if you want Channel 0 to go first, the settings should be start at 4 and end at 3, then channel 1 would start at 24 and end at 23
If you want channel 1 to go first, then it will start at 24 end at 23, then Chanel 1 will start at 4 and end at 3

Is this in line with what you are trying to accomplish?

thanks heap for you input!

Physically yes they are 2 circles, electrically they are wired as below, one single string.

But no sorry i dont want two circles goin round and round independently or playing one after the other if thats what you mean?

I hope im not mis-understanding you!

Thats what you want to accomplish, but I believe it would be better if you wire them as separate channels then in the settings you specify where one circle starts and ends and where the other starts and ends as well.

I am sure it could be done inside the code, which its not my area of expertise. I am more of a hardware hacker, so maybe Ben or Jeff can chime in.

Hi! Thanks for the wiring diagram, that really helps.

I think you might not need the mapper. The mapper is best when you want to run patterns written in terms of 2D space on your particular project and wiring. In that way it also makes it a lot easier to use patterns other people write for their projects.

I think you might be best served by writing your own maps to transform your physical indices to another arrangement. I’m going to use the term “map” and “remap” in the examples below, but they do not refer to the built in mapper. We’re just writing our own index-transforming maps.

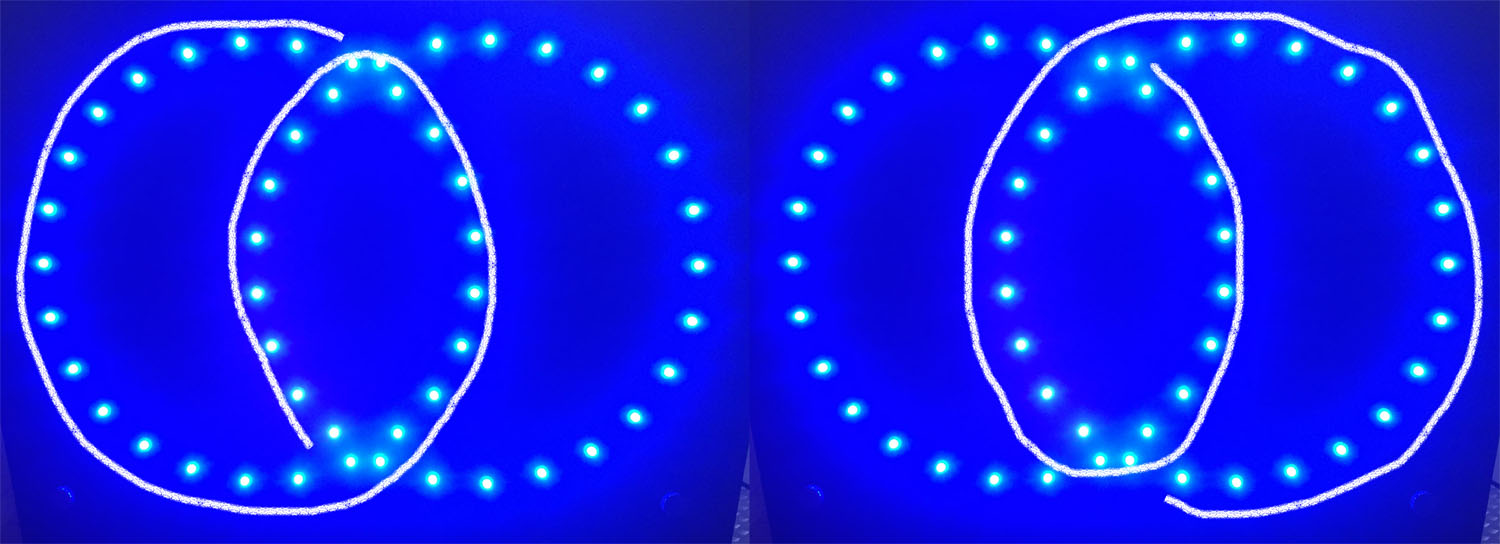
For example, let’s figure out this transform:

Here’s code for a small color changing pulse traveling along your physical indices:

export function render(index) {
  // (map will go here)
  v = index == floor(time(0.05) * pixelCount)
  hsv(index / pixelCount, 1, v)
}

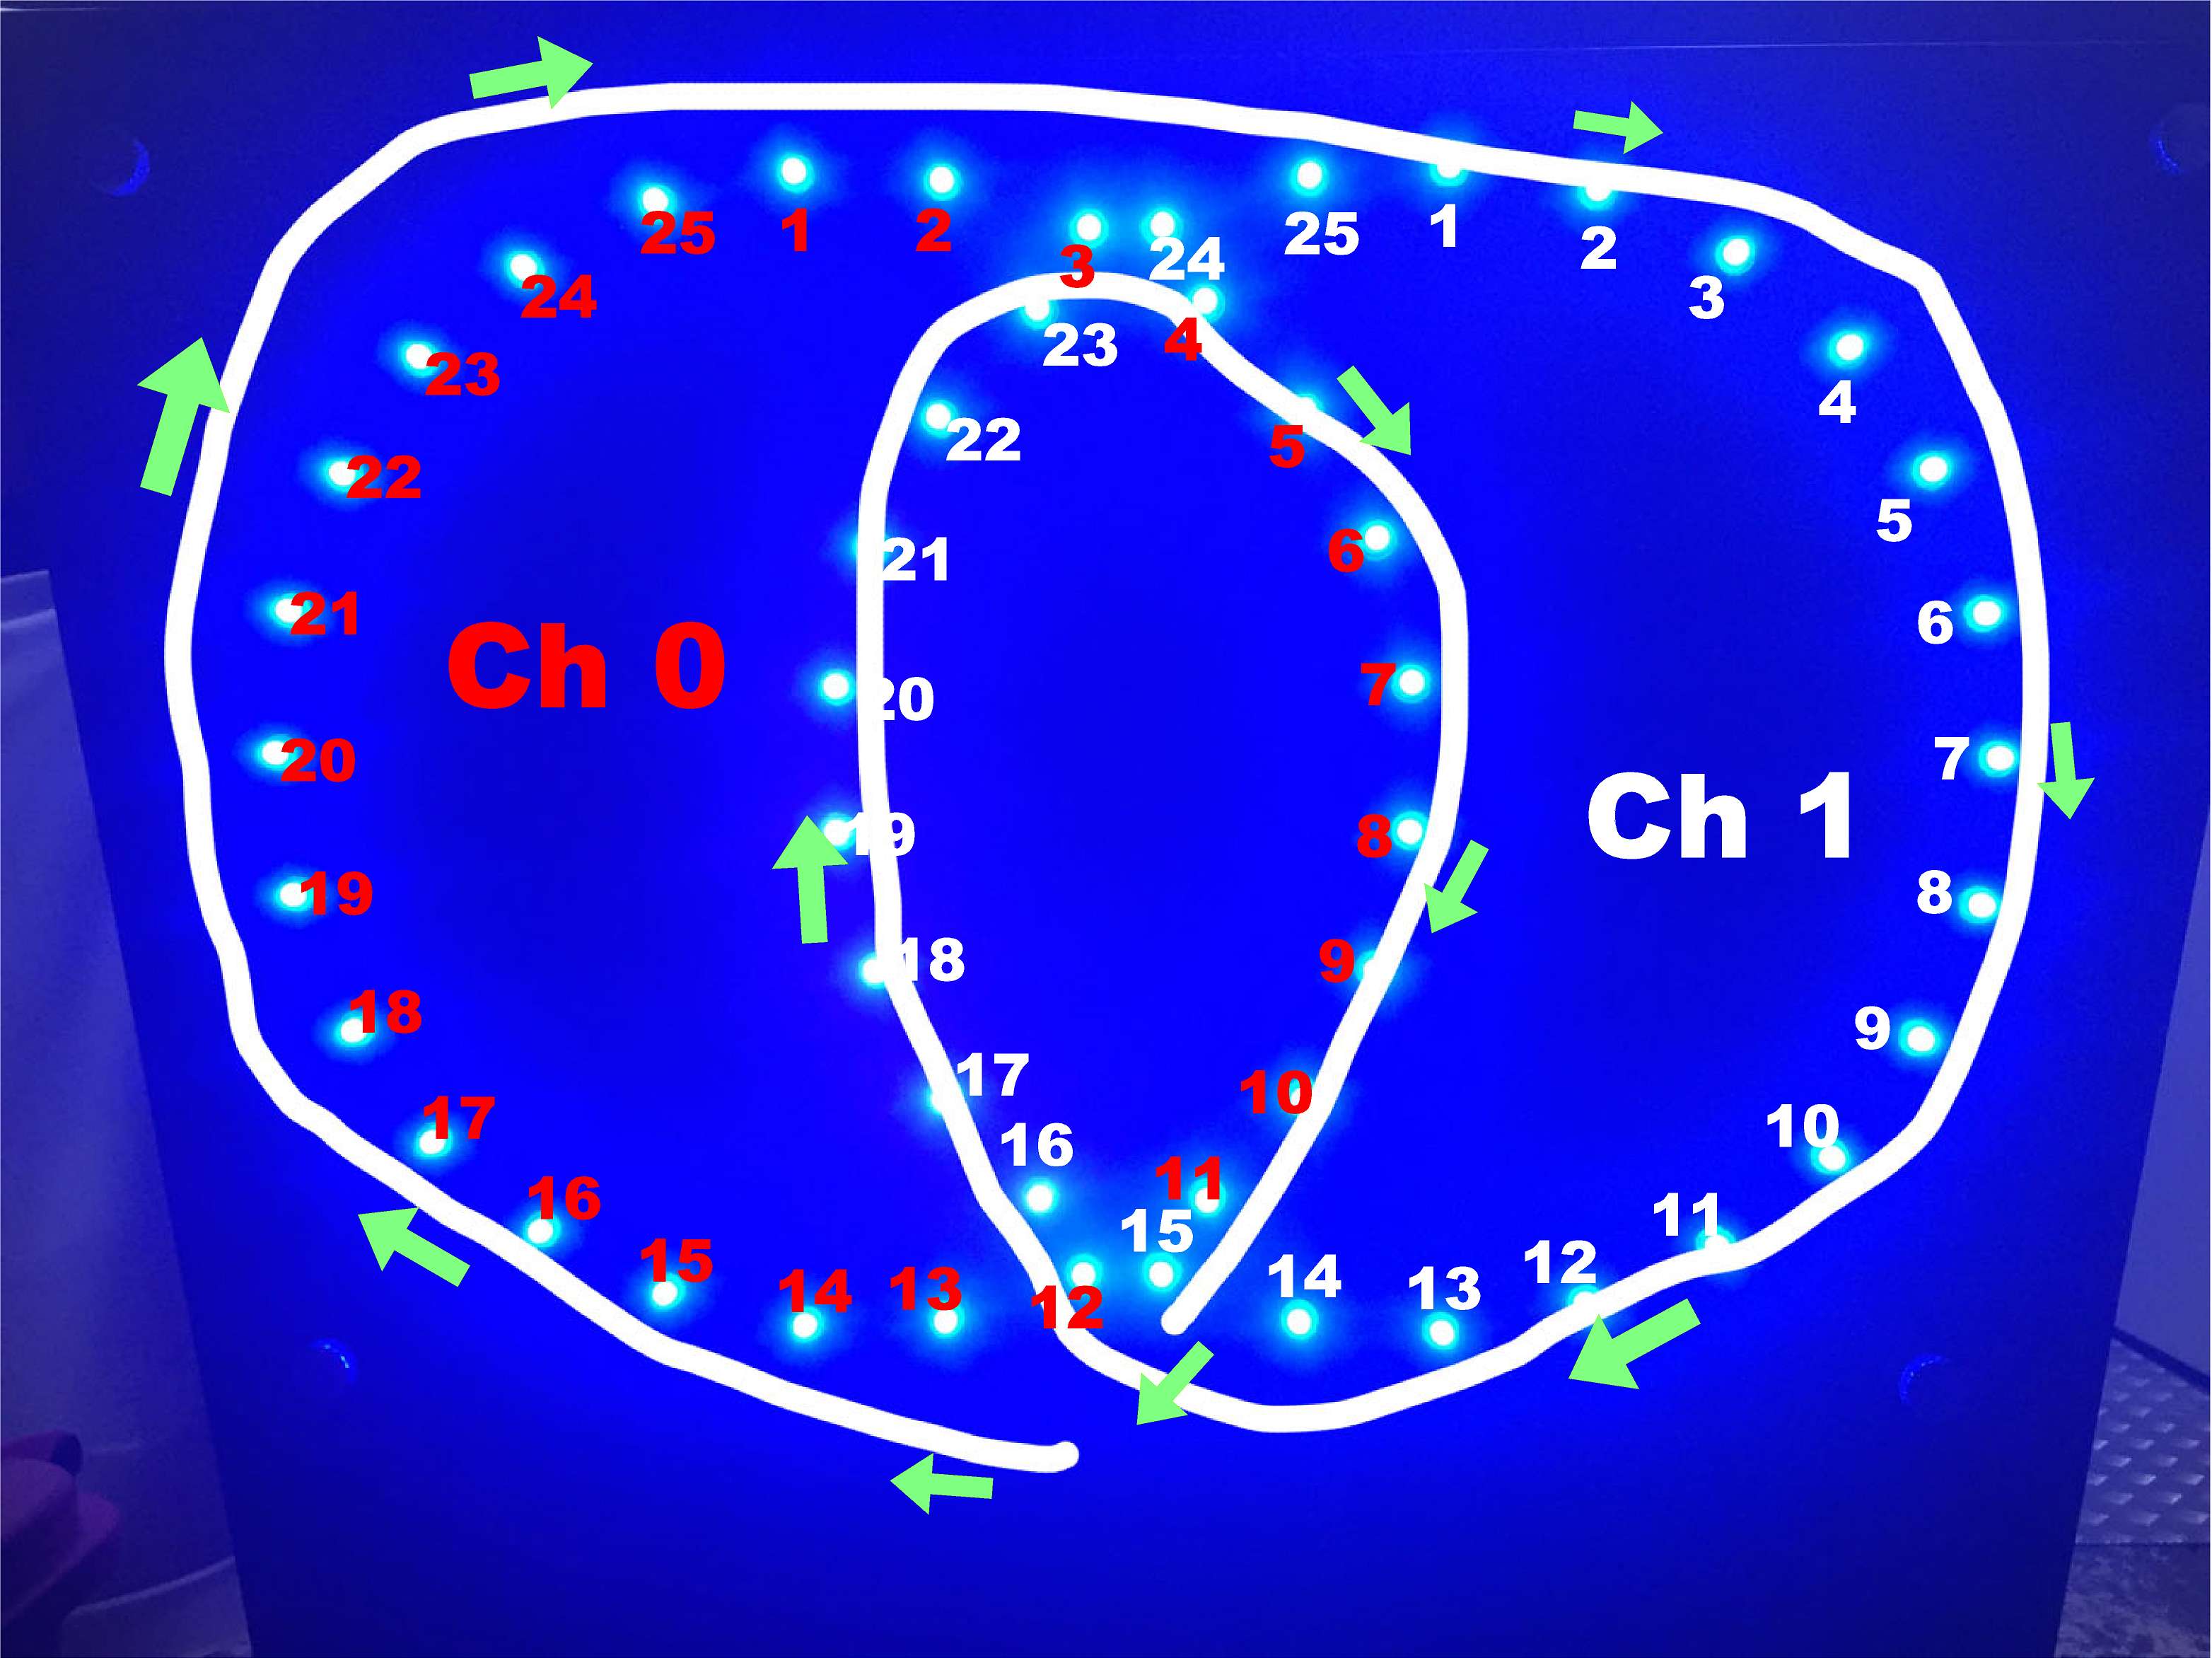
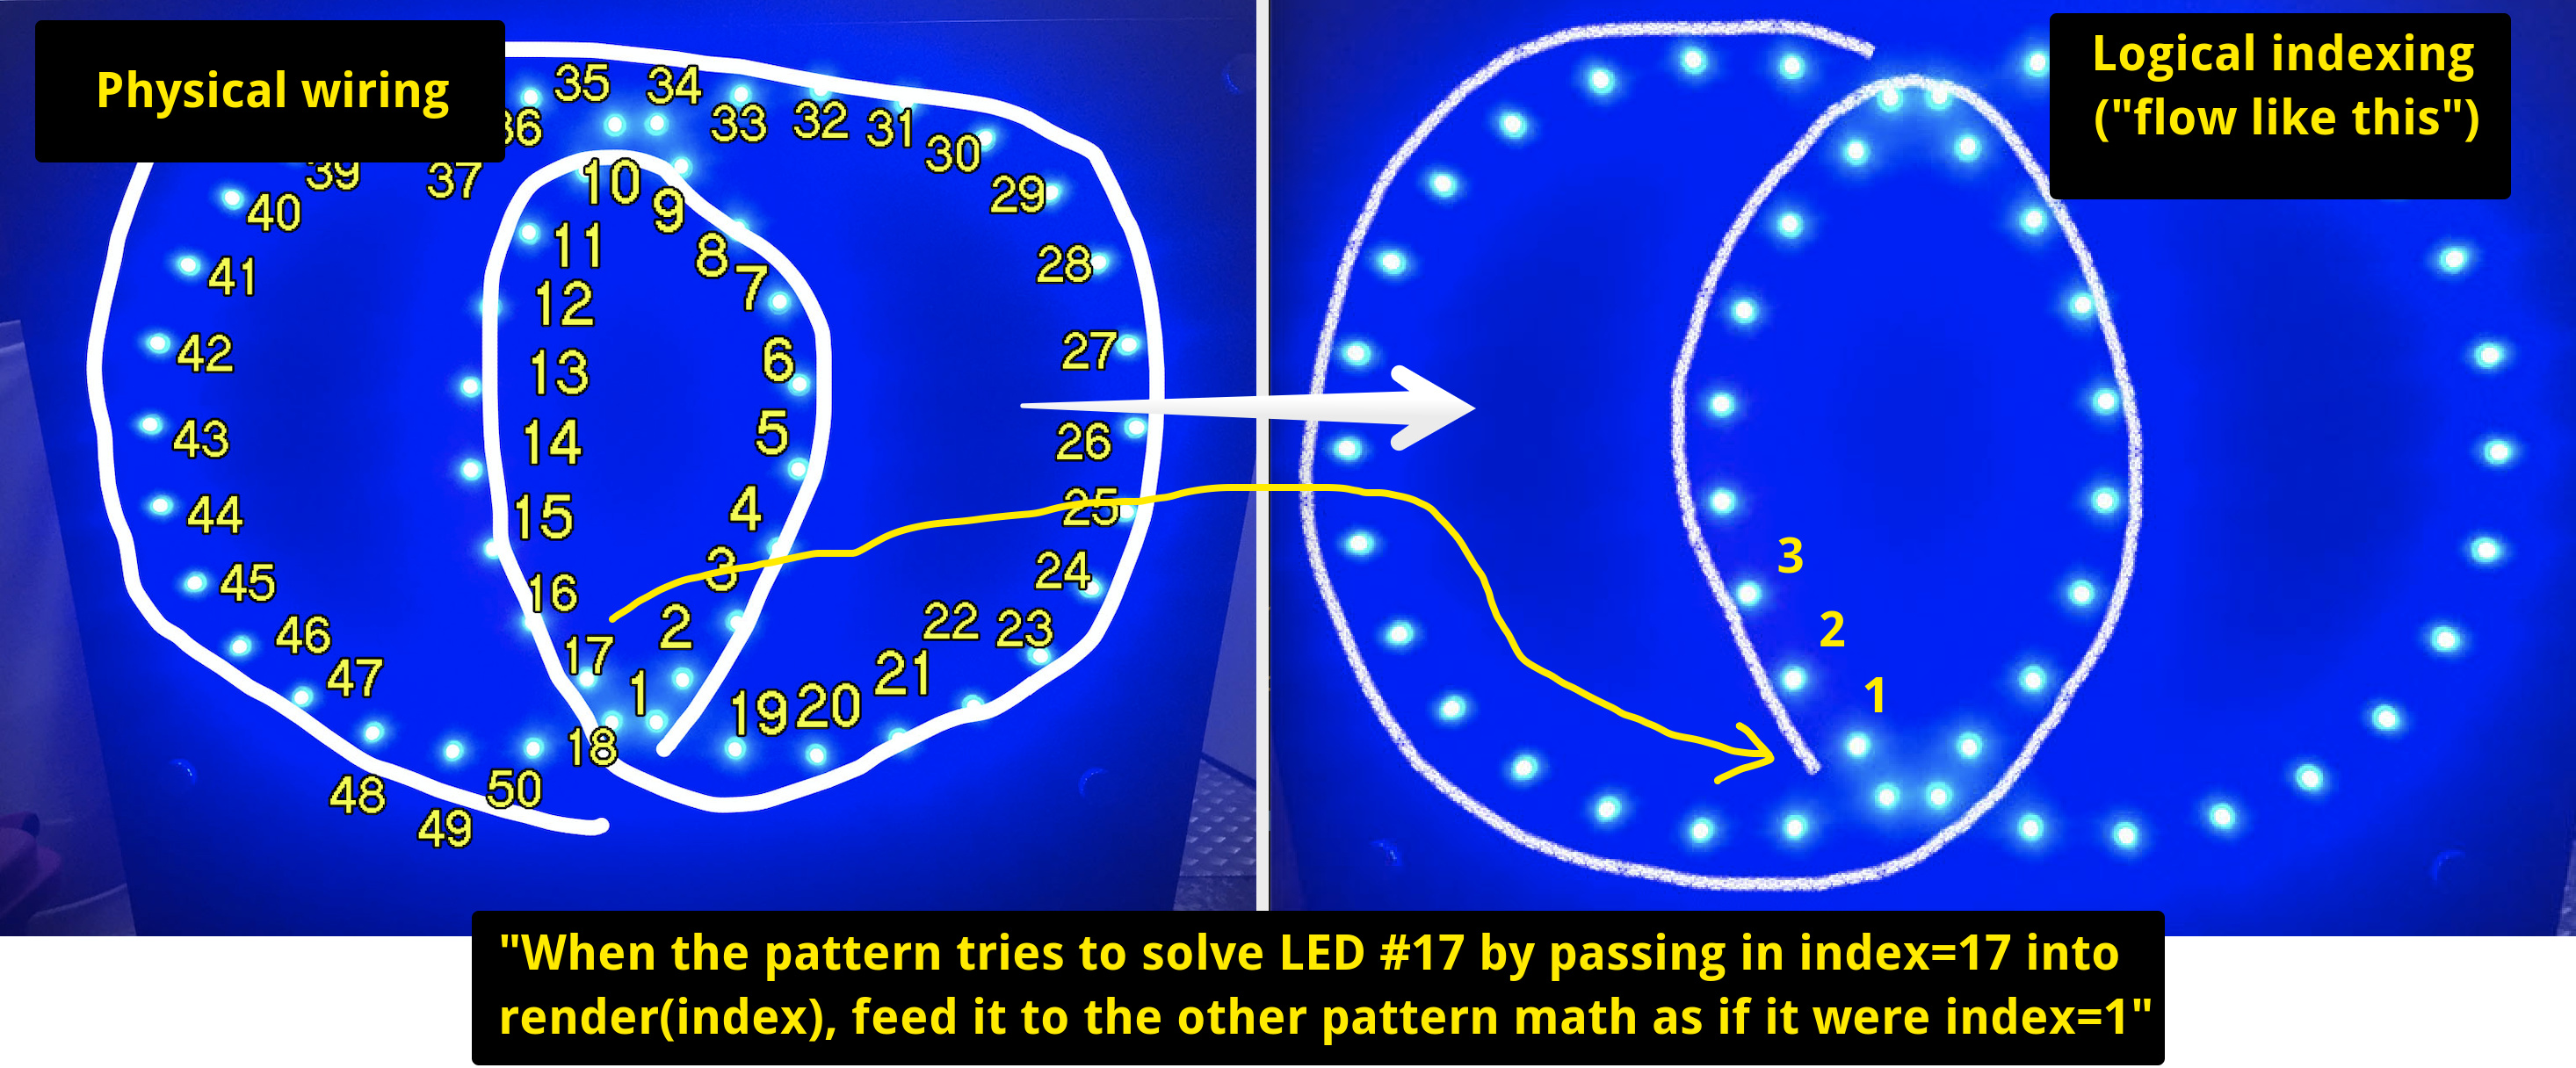
So we need some code to say, “When render says index is 17, let’s feed it to the rest of the math as if index = 1”. Here’s the map I think you want:

17 => 1     9 => 11       50 => 21
16 => 2     8 => 12       49 => 42
...         ...           ...etc
10 => 8     1 => 19   

35 => 9     18 => 20 
34 => 10                 

One way to make the map would be to code a bunch of if ranges. Let’s only do the first 8 pixels. Note how we are transforming index to something called newIndex so we find-and-replace those terms in the code below the map transform. (You could also reassign index itself but maybe that’s a touch less clear.)

export function render(index) {
  if (index >=10 && index <= 17) {
    newIndex = 18 - index // 17 becomes 1, 10 becomes 8
  }
  
  v = newIndex == floor(time(0.05) * pixelCount)
  hsv(newIndex / pixelCount, 1, v)
}

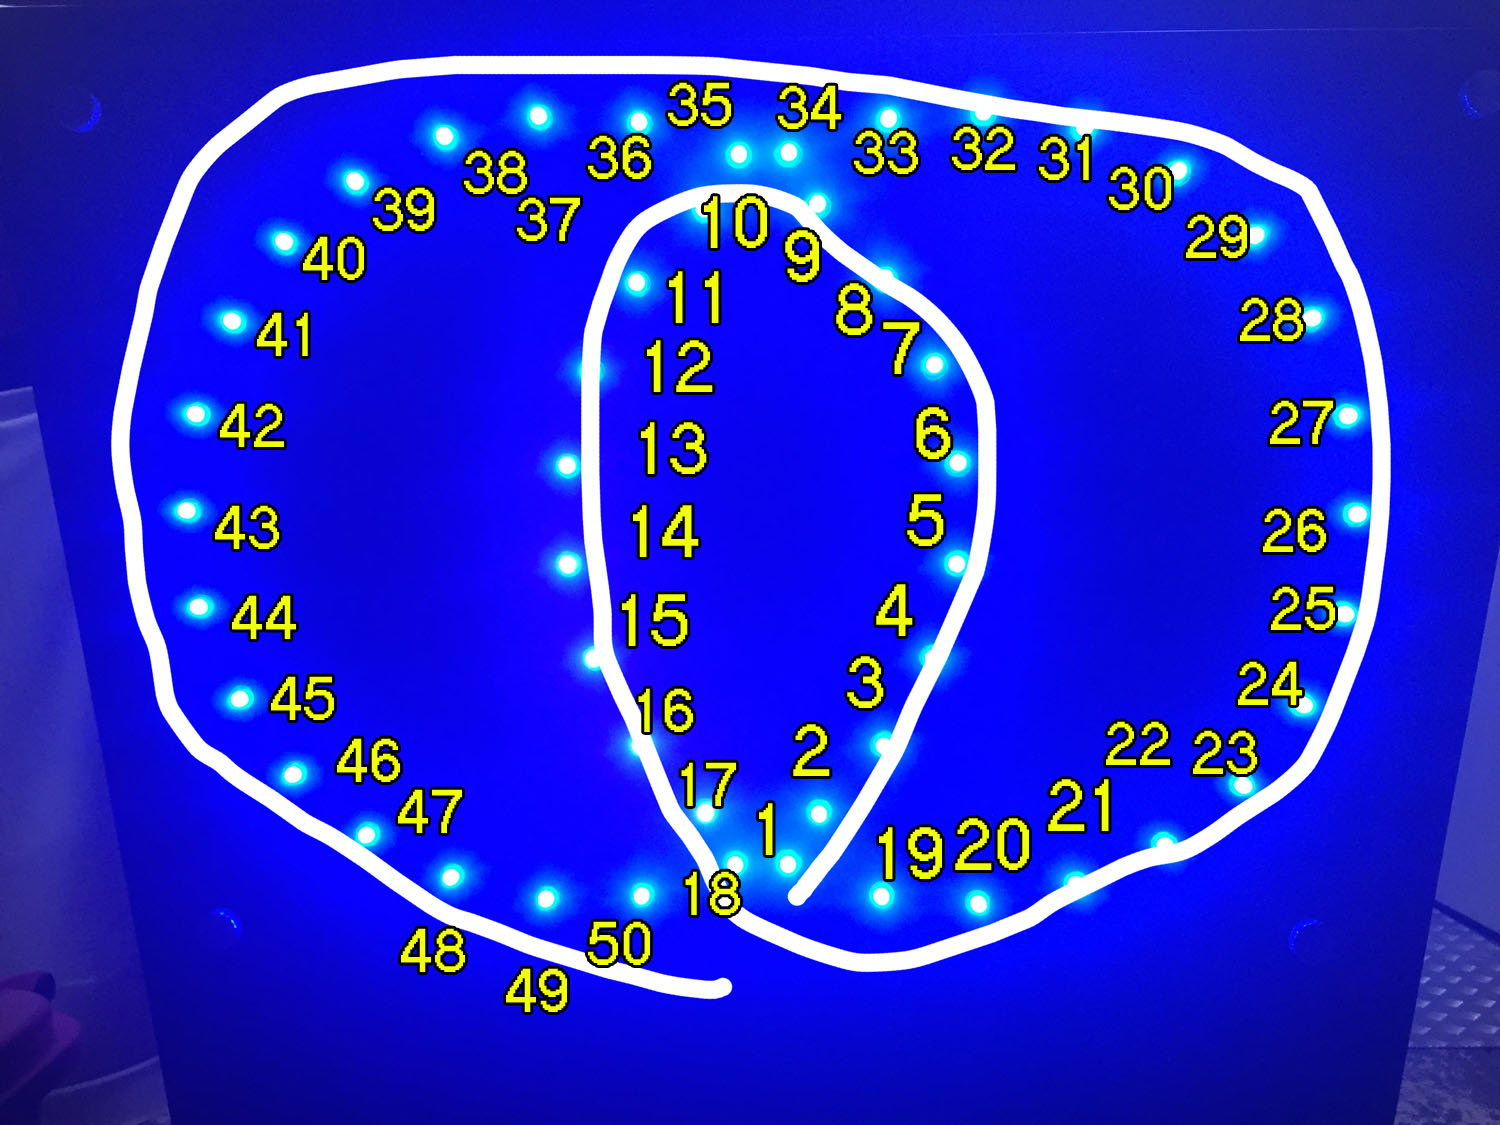
This might get tedious and hard to fix edge cases, so instead you might find it easier to work with an array that does the transform for you, pixel by pixel. The array’s order is such that the first element (array index 0) is whatever we’d like the newIndex to be set to when the physical LED index is zero. I know you’ll need to read that sentence a few times, but look at the code and you’ll see it’s pretty straightforward.

I see that you started your diagram with an LED numbered 1, when usually that’s the LED we refer to as having its index set to 0. So in this example, to keep it consistent with the diagram and code above, we’re going to skip physical index 0.

map = array(pixelCount)
map[ 0] =  0 // I do NOT assume index = 0 is what you labeled as LED #1
map[ 1] = 17
map[ 2] = 16
// etc
map[ 8] = 10
map[ 9] = 35
map[10] = 34
map[11] = 9
// etc

export function render(index) {
  newIndex = map[index]
  v = newIndex == floor(time(0.05) * pixelCount)
  hsv(newIndex / pixelCount, 1, v)
}

You could define map2[], map3[], etc for other flows/orderings. If you’re feeling good with all that (otherwise ignore this, it’s optional), here’s an example of using a third map via a 2D array:

maps = array(3)
maps[3] = array(pixelCount)
maps[3][0] = 0
// etc

newIndex = maps[3][index] // remap using the 3rd map 

Does all this make sense?

2 Likes

Wow thanks for your time and input!!

I have a very beginners knowledge on coding, i have done a tiny bit with another pixel led box, Chromatron, which is kinda python based and nowhere near the capabilities of this great box.

But as i need to get this right i will have to learn!!! I am very experienced in electronics but new to coding.

So does this coding go in each pattern script?

I dont suppose you could suggest a link or the type of coding i should first get my head around?

Thanks heaps!!!

1 Like

Hey!

Yes, the code goes in each pattern.

Honestly, if you wrote some Python, Pixelblaze is MUCH easier.

It’s hard to know where you’re at to suggest stuff, but if you’re starting from scratch, I think Codecademy’s Intro to JavaScript might set you on a decent path, as long as you know what you can ignore (and you can ignore a lot).

You can ignore everything around:

  • Data types, including strings (there’s only numbers in Pixelblaze variables)
  • Objects (these are usually identified by a comma between curly braces, like {property: value}) and their methods and properties (usually identified with a period in the middle, like object.method() or object.property)

Of the intro course, you probably should read:

  • Introduction - just the following sections:
    • Comments and Arithmetic operators
    • Variables (just var - no let or const)
    • Mathematical assignment operators
    • Increment and decrement
  • Conditional Statements - All of this section except switch
  • Functions - all except default parameters and concise body arrow functions
  • Scope
  • Arrays
  • Loops

And skip the rest.

I hope this helps - I promise it’s really approachable and a lovely, simple way to get started with coding.

4 Likes

A post was merged into an existing topic: Learning basic JavaScript syntax