Hi @Cyptic_Wolfe!
We can certainly get you going.
I’ll write you something here that shows very basic control of different channels, then you’re going to want to look at the following patterns that ship with your Pixelblaze (or if you deleted them, find them on the pattern library).
- Spectrum Analyzer 1D/2D shows one way to use different frequencies to control different sections of your LEDs
- Multisegment shows how to run different patterns (very different - like, independent) on different sections
Different Colors on Different Channels
Each pattern tells every individual LED what color to be for the current frame. Each pixel, even the ones across all your various output expander channels, should have a unique index. Even if you had three channels, all the pixels can be thought of as strung together in one long chain.
For example, if you had:
| Channel |
Pixels |
| 0 |
3 |
| 1 |
5 |
| 2 |
2 |
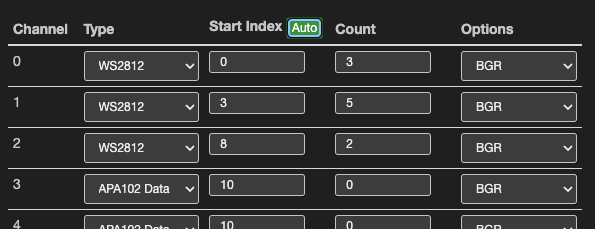
This implies your Settings page should have a section you set up like this for the Output Expander Configuration:
Notice the Start Index column. That means your pixels are indexed like this:
| Pixel index |
Is the __ pixel |
Of channel: |
| 0 |
1st |
0 |
| 1 |
2nd |
0 |
| 2 |
3rd |
0 |
| 3 |
1st |
1 |
| 4 |
2nd |
1 |
| 5 |
3rd |
1 |
| 6 |
4th |
1 |
| 7 |
5th |
1 |
| 8 |
1st |
2 |
| 9 |
2nd |
2 |
To set a different color for the ones on the first channel (pixel index 0 and 1), you could branch your code with an if statement. Inside the export function render(index):
if (index <= 2) {
  hsv(0, 1, 1) // Channel 0's three pixels will be red
} else {
  hsv(0.33, 1, 1) // All other pixels will be green
}
To color the third segment, use an else if
if (index <= 2) {
  hsv(0, 1, 1) // Channel 0's three pixels will be red
} else if (index <= 7) {
  hsv(0.33, 1, 1) // Channel 1's five pixels will be green
} else {
  hsv(0.66, 1, 1) // // Channel 2's two pixels will be blue
}
This is worth understanding, but then you might start to write code that’s slightly more convenient to work with. This does the same thing but scales up a little better:
function getChannelFromIndex(index) {
  if (index <= 1) {
    return 0
  } else if (index <= 7) {
    return 1
  } else {
    return 2
  }
}

function red() { hsv(0, 1, 1) }
function green() { hsv(0.33, 1, 1) }
function blue() { hsv(0.66, 1, 1) }

export function render(index) {
  var channel = getChannelFromIndex(index)

  if (channel == 0) {
     red()
  } else if (channel == 1) {
    green()
  } else {
    blue()
  }
}
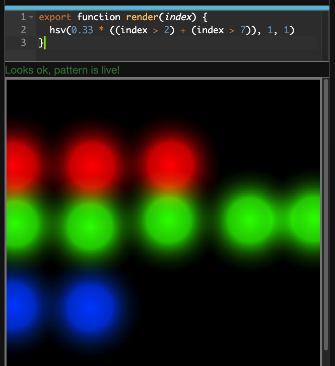
Or you might feel fancy and want to optimize for typing less:
export function render(index) {
  hsv(0.33 * ((index > 2) + (index > 7)), 1, 1)
}
There are lots of different ways, the important thing is you keep messing with the code yourself to grow your skills.
You might have good luck using ChatGPT. I fed it the Pixelblaze code editor docs in chunks and then prompted it:
I want to code different patterns on different sections of the output indices. I call each segment a channel. For example, I might have channel 0 with the first 3 LEDs, channel 1 with indices 3 through 7, and channel 2 with two LEDs that have index 8 and 9. Can you write me a pixelblaze function that will take the channels, expressed as an array of their LED counts like var channelLEDs = [3, 5, 2] in this example, and render a different color on each channel?
The first answer included objects, stuff like:
var channelColors = [
  {h: 0.0, s: 1.0, v: 1.0},  // Red
  {h: 0.33, s: 1.0, v: 1.0}, // Green
  {h: 0.66, s: 1.0, v: 1.0}  // Blue
];
...
hsv(color.h, color.s, color.v);
So I said:
Oops - you might have forgotten that pixelblaze doesn’t have objects. Can it be done without using objects?
And then it produced this working Pixelblaze code that does the same as the examples above, in a more extensible way:
var channelLEDs = [3, 5, 2];
var channelHues = [0.0, 0.33, 0.66];
var channelSats = [1.0, 1.0, 1.0];
var channelVals = [1.0, 1.0, 1.0];

export function render(index) {
  var channelIndex = 0;
  var channelStart = 0;

  // Determine which channel this LED belongs to
  for (var i = 0; i < channelLEDs.length; i++) {
    if (index >= channelStart && index < channelStart + channelLEDs[i]) {
      channelIndex = i;
      break;
    }
    channelStart += channelLEDs[i];
  }

  var hue = channelHues[channelIndex];
  var sat = channelSats[channelIndex];
  var val = channelVals[channelIndex];
  hsv(hue, sat, val);
}
So start from these examples, then dive into the two patterns I linked above. You might even try feeding them to ChatGPT to get some hints. It’ll be easier if you use it as a tutor for each sub-problem on your way there, because then you’ll learn from trying small parts how to recognize code it produces that isn’t valid or working.
Good luck!