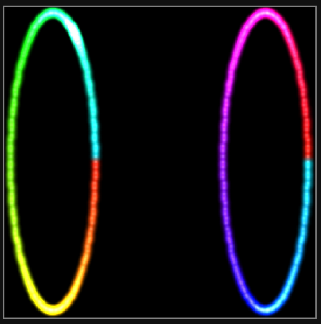
I was hoping someone could help me out with the map for two separate rings. Pixel count 176 per ring for a total of 352.
Start index of first ring is 0 start index of second ring is 176.
Thanks!
Twilight
Sure. So if this is the example code for one ring:
function (pixelCount) {
  var map = [];
  for (i = 0; i < pixelCount; i++) {
    c = i / pixelCount * Math.PI * 2
    map.push([Math.cos(c), Math.sin(c)])
  }
  return map
}
We just need to add some “x” space (I’m guessing it’s a wheelbase for you), and generate a ring for each half:
function (pixelCount) {
  var map = [];
  for (i = 0; i < pixelCount/2; i++) {
    c = i / (pixelCount/2) * Math.PI * 2
    map.push([Math.cos(c), Math.sin(c)])
  }
  var wheelbase = 5
  for (i = 0; i < pixelCount/2; i++) {
    c = i / (pixelCount/2) * Math.PI * 2
    map.push([Math.cos(c) + wheelbase, Math.sin(c)])
  }
  return map
}
As a reminder, all maps get translated to a square 1x1 world unit system. It’ll probably look ok when played across the wheels. If you want no space between them, set wheelbase to 2.
Thanks Man! Trying to learn little by little.
Twilight
The problem with that is that the distance of height is disproportionate to the width, so it’ll look weird, I think on sweeps. Test this via the XY sweep test, or patterns that use an angular sweep.
Fixable in one of three ways: add some horizontal scaling to patterns that needed via the transformation API, wait for @wizard to add scaling options to the map (I believe he said this is coming), or just adjust the total height by adding some fake “buffer pixels” above and below to make the whole map proportions correctly square. Could be as simple as adding (untested)
map.push(0, -(wheelbase+1)/2)
map.push(0, (wheelbase+1)/2)
The wheelbase idea is nice, but I suspect some patterns will behave “weirdly” with a lot of empty space between the two wheels with no LEDS… But that spacing might look good on other patterns: a vertical sweep for example. Then a visual jump from back to front might be “unreal” compared to having a delay before the other wheel lights up. (Making the wheelbase negative would make the front wheel first, BTW)
As they say, YMMV, and I do mean mileage in this case.
1 Like
Sweet thank you yeah I was playing around with it and did figure out about changing the wheelbase number to a negative. Having the spacing looks very cool on certain patterns. Like you said on other ones it seems like one wheel is doing a different part of the pattern then the second wheel. But thank you for giving me some options.
Twilight
This might give you some different results. Basically just splitting the count in half and creating two circles on top of each other. (like the picture in the other thread) Not quite exact but close. Off the top of my head I dont know how to reduce the radius of one of the rings like you have in the picture.
function (pixelCount) {
var map = [];
for (i = 0; i < pixelCount/2; i++) {
c = i / (pixelCount/2) * Math.PI * 2
map.push([Math.cos(c), Math.sin(c)])
}
for (i = pixelCount/2; i < pixelCount; i++) {
c = i / (pixelCount/2) * Math.PI * 2
map.push([Math.cos(c), Math.sin(c)])
}
return map
}
1 Like
Interesting idea… In this case, since the “inside” and “outside” circles aren’t separately wired (they are forked, and also slightly different counts than half on each), it won’t work for a single wheel, but in the case of two wheels, this would map them both similarly, so all of the 2D patterns would be fairly synched and do both wheels at once, while 1d patterns would maintain the led order, so a 1D KITT style pattern would still spin around one wheel, then spin around the other, while a 2D aware KITT would draw a back and forth across both wheels at once, compared to the above example, which would scan across one then the other wheel in 2D.
Thank you everyone! In hindsight I kind of wish I had wired the front wheels to the back wheels would have gave me some more options. At some point I still might go back and do that.
Twilight,
Do you mean just reversing the order? That’s easy enough to do in software. You can always invert 1D index patterns by adding this line to any pattern at the start of render():
index = pixelCount -1 - index
If it’s a 2D pattern,
Either:
just reverse the map so the right most pixels are the lowest values, the left are the highest, But unless you want upside down, don’t invert the top/bottom values. The quick and easy method: just add a negative sign to any X value before it’s mapped, but leave Y value alone… That might be one answer
The other answer:
Set the wheel spacing so the back are before the front or vice versa, whatever you like.
what i meant was instead of having the end of the strips capped off. I should have wired the end of the front wheel ring to the beginning of the rear wheel ring. Making the pixel count 352. That way the pattern would actually begin on the front tire and and on the rear tire.
Twi
1 Like