ok when i run a 2d pattern, i dont see any sign that the map is working. id really like a simple line pattern which would run up all 3 strips to show that the maping is correct…so a 1d pattern would run through the strips pixel by pixel ignoring the map… but a 2d pattern would play over the map… which should show a line of pixels equally on all 3 strips… hope that makes sense…maybe i can find a simple line pattern some where on line.
There is a pattern in the library to do this… But the one I’m thinking of, it’s 3D only
“RGB-XYZ 3D Sweep”
We really should add render2D to that code… And 1D, so it’ll run on anything.
Added… Ah found it, I knew it existed:
Red-Green XY 2D Sweep
That’s the one you want.
Hey! You’re close, but with this code, you’ll know you’re actually using the map once your render2d(index, x, y) pattern code starts using the x and y instead of the index.
I took the code you pasted and adapted it to use y instead of index - have a look at the differences:
1 Like
WOW fuckin coool…
export function beforeRender(delta) {
  t1 = time(4 / 65.536) // From 0…1 every 4 seconds
}

export function render2D(index, x, y) {
  pulsePosition = t1 // In units of 0..1 world units
  distanceFromPulse = abs(pulsePosition - y) // Still in 0..1 world units

  // We need something that’s high when we’re close to the pulse,
  // and low or negative when we’re far from the t1 pulse position.
halfWidth = .05 // percent of y dimension
// When proximityToPulse == .05, we’re right at the pulse, .01 would be the dim edges, <= 0 is off
proximityToPulse = halfWidth - distanceFromPulse
pctCloseToPulse = proximityToPulse / halfWidth // Now from 1 to 0
v = clamp(pctCloseToPulse, 0, 1)
// Or, much more succinctly
// v = max(0, 1 - abs(t1 * pixelCount - y) / 5)
// Or a third way: 10% of strip width, not 5 pixels
// v = triangle(clamp((y/pixelCount - t1) / 0.2 + 0.5, 0, 1))
hsv((t1 / 0.1)* 0.2, 1, v * v)
}
THIS WORKS USING MY MAP PROPERLY WOOOOHOOOOOOOOOO
Thankyou… great long way to go still, but thankyou this makes me soooo happy…
2 Likes
Please format code you post. Use the code button on the text input (next to the ", labeled </>). Or add 4(?) Spaces before the code.
@Vortexfractal ,
Nice!!! BTW I fixed your posts with the formatting @Scruffynerf was talking about. We’ve been working in code so long it hurts to see code without monospace and syntax highlighting 
One tip: it looks like you want a 2D cylinder map of your piece (sick laser work btw!). In Pixelblaze, many things cycle or wrap around 0-1, so e.g. a wave(x) would complete a full cycle of the wave from 0-1, where 0 and 1 are the same. If you mapped that to hue, you’d see something like this circle:
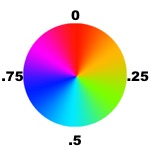
So 0 and 1 are actually the same, and would both be red if shown as hue. This circular wrapping is used for most patterns in Pixelblaze, and works on stuff like wave(), triangle(), square(), hue, and more.
When your pixel map gets converted to “world units” of 0-1, your left side strip and right side strip are going to be near each other on that cylinder, with the left side at 0, and the right side at (effectively) 1. However, on your piece, these are spaced apart at the same distance as the left and middle, etc.
One way to get them to be equally spaced apart is to add a fake pixel at the very end of your pixel map that would be to the right of the right strip. Since that pixel doesn’t exist, it wont render, but it will change how your coordinates are spaced apart.
I can’t tell exactly since I don’t have your map code, but it looks like your left side starts around 3600 and the right side is about 5840. Half the distance from left to right would be 1120. So I would add another map point for
[6960, 15445]
That would put a fake pixel on the top right of your map and then all 3 should be evenly spaced around 3 points on a cylinder.
2 Likes
Oh, I like that trick… have to remember it.
Thanks for the compliment and the help…ok so can you give me an example of how i would use wave(x) in the hue. im not entirely sure what you mean about a 2d cylinder map…however i like the idea of cycling or looping so that start and end are the same…im currently playing with the pattern i posted…which i like the simplicity of it… however one issue is that it abrutly starts and stops…as in the pattern does not complete thru all pixels…i think this is because the pattern is generated from the
pulsePosition in either direction…so the starting position then is several pixels in from the beginning of the pixel strips and the end several pixels from the end of the strips… causing it to just flash off and flash in…ideally this pattern would start slightly off the pixel map then come into it and same on the end… or cycle from begining to end…ok so that said, ive made a little more progress and added a slider to adjust the time of the pattern, also very cool and exciting for this nooob 

A cylinder map is like the printing on a soda can. A 2D plane wrapped around a cylinder so that the edges meet up. Like curling a piece of paper up into a tube, or wrapping it around a can.
In your case the x coordinate ends up representing which arm the pixel is on. The 3 arms “wrap” around the center in a cylindrical way (if a bit curvy). The y coordinate would be the position along that arm from top to bottom.
Your 2D pixel map is visualized like if you “unwrapped” your arms and laid them out next to each other in a row.
This pattern should show a different color on each arm, 1/3rd of the spectrum apart:
export function render2D(index, x, y) {
  hsv(x + time(.1),1,1)
}
This works because x is a number between 0-1 (world units), which is the same scale as hue that hsv() takes. Adding time(.1) will offset that over time, rotating that hue color wheel.
Now wave(x) may not make a distinguishable hue, but it will make a good value:
export function render2D(index, x, y) {
  hsv(0,1,wave(x + time(.05)))
}
This will make a wave gradient that spins around the center. Using y instead should cause waves of light to go along the arms’ height instead of rotate around.
export function render2D(index, x, y) {
  hsv(0,1,wave(y + time(.05)))
}
2 Likes
I think people misunderstand the relationship between wave and time().
Time is what makes motion.
Wave just shapes things.
Someone doing wave(x) isn’t going to see what they might expect to see.
I highly recommend @jeff 's video on this:

1 Like
@Vortexfractal ,
Part 2…
So your pattern is getting close! The “wrapping” stuff is hard to wrap your head around So the key thing is that if you were going to animate using anything like index/pixelCount instead use x and y to take advantage of the pixel map. Since both of those result in a value between 0 and 1, and represent a linear scale, you can swap in x and y without any extra changes.
Here’s using y:
export function beforeRender(delta) {
 t1 = time(4 / 65.536) // From 0..1 every 4 seconds
}

export function render2D(index, x, y) {
  v = triangle(clamp((y - t1) / 0.2 + 0.5, 0, 1))
  hsv((t1 / 0.1)* 0.2, 1, v * v)
}
So the clamp() with triangle, I see you are trying to shape it, but perhaps it’s easier to shape the output? Clamp will get in the way of the wrapping behavior triangle normally will do.
One way to shorten the distance a triangle waveform will cover is to subtract some value from it (shifting it down), then multiply the peak back up to a range of 0-1. e.g. (triangle(n) - .8) * 5 would be 1/5th the width, but just as steep and still triangle shaped. The rest of the triangle is negative, so clamping that before squaring (or just cube it instead to preserve sign) will hide it.
This is a different way of writing that same effect, but keeping the input to triangle unclamped opens the door for more fun things later.
export function beforeRender(delta) {
 t1 = time(4 / 65.536) // From 0..1 every 4 seconds
}

export function render2D(index, x, y) {
  v = clamp((triangle(y - t1 + 0.5) - .8) * 5, 0, 1)
  hsv((t1 / 0.1)* 0.2, 1, v * v)
}
We can add x, which offsets each wave based on the arm position, and take advantage of the auto wrapping behavior of triangle().
export function beforeRender(delta) {
 t1 = time(4 / 65.536) // From 0..1 every 4 seconds
}

export function render2D(index, x, y) {
  v = clamp((triangle(x + y - t1 + 0.5) - .8) * 5, 0, 1)
  hsv((t1 / 0.1)* 0.2, 1, v * v)
}
2 Likes

Great really super helpful…making me even more happy, and feel the progress.
i added some sliders probably not fully correct but it works…yay for small achievements… 3 sliders one for speed one for length of the triangle and another for brightness…
var time1 = 0.5
export function slidertime1(v) {
time1 = v * 5
}
var size1 = 0.9
export function slidersize1(v) {
    size1 = v *0.99
}
var bright = 22
export function sliderbright(v) {
    bright = v *v *5
}

export function beforeRender(delta) {
  t1 = time((time1) / 65.536) // From 0…1 every 4 seconds

}

export function render2D(index, x, y) {
  v = clamp((triangle(y - t1 + 0.5) - size1) * bright, 0, 1)
  hsv((t1 / 0.1)* 0.2, 1, v * v)
}
so my next question is how to introduce 2 or more triangle patterns to play with interference waves…
ok maybe thats not clear…
ok basically at the moment i have 1 triangle wave pattern.. and id like to introdcue a second which would be a different colour and over lay and interfere with the first…hopes that makes sense ![]()