I’m building a non-copyright infringing “magic sword”. Nope. Definitely not a lightsaber. Will update it as I go.
My goal is to make something that I can use for LARPing, assuming that in-person play will resume at some point. It needs to be mostly impervious to the elements, and to stand up to light to moderate contact. It will also amuse my martial arts friends (who will all want one), and annoy my SCA friends (who sadly, do not admit the existence of magic into their universe).
I’m still working on batteries. After the CPU and blade mount, the handle still has room for something about the size of 2 “C” cells, so I’ve got some flexibility there.
Here’s the blade assembly with one spacer shown, and the CPU cage assembly (helpful assistant shown for scale):
Here’s super slo-mo video of my impact test – me smacking a piece of the blade material with my white oak bokken, which I’ve used for serious sparring for many years. After this test, the PEX had a small scuff mark.
Just for the sake of completeness, here’s the GIF from the first test run again.
Nice! I like the PEX, probably more impact-resistant than my acrylic!
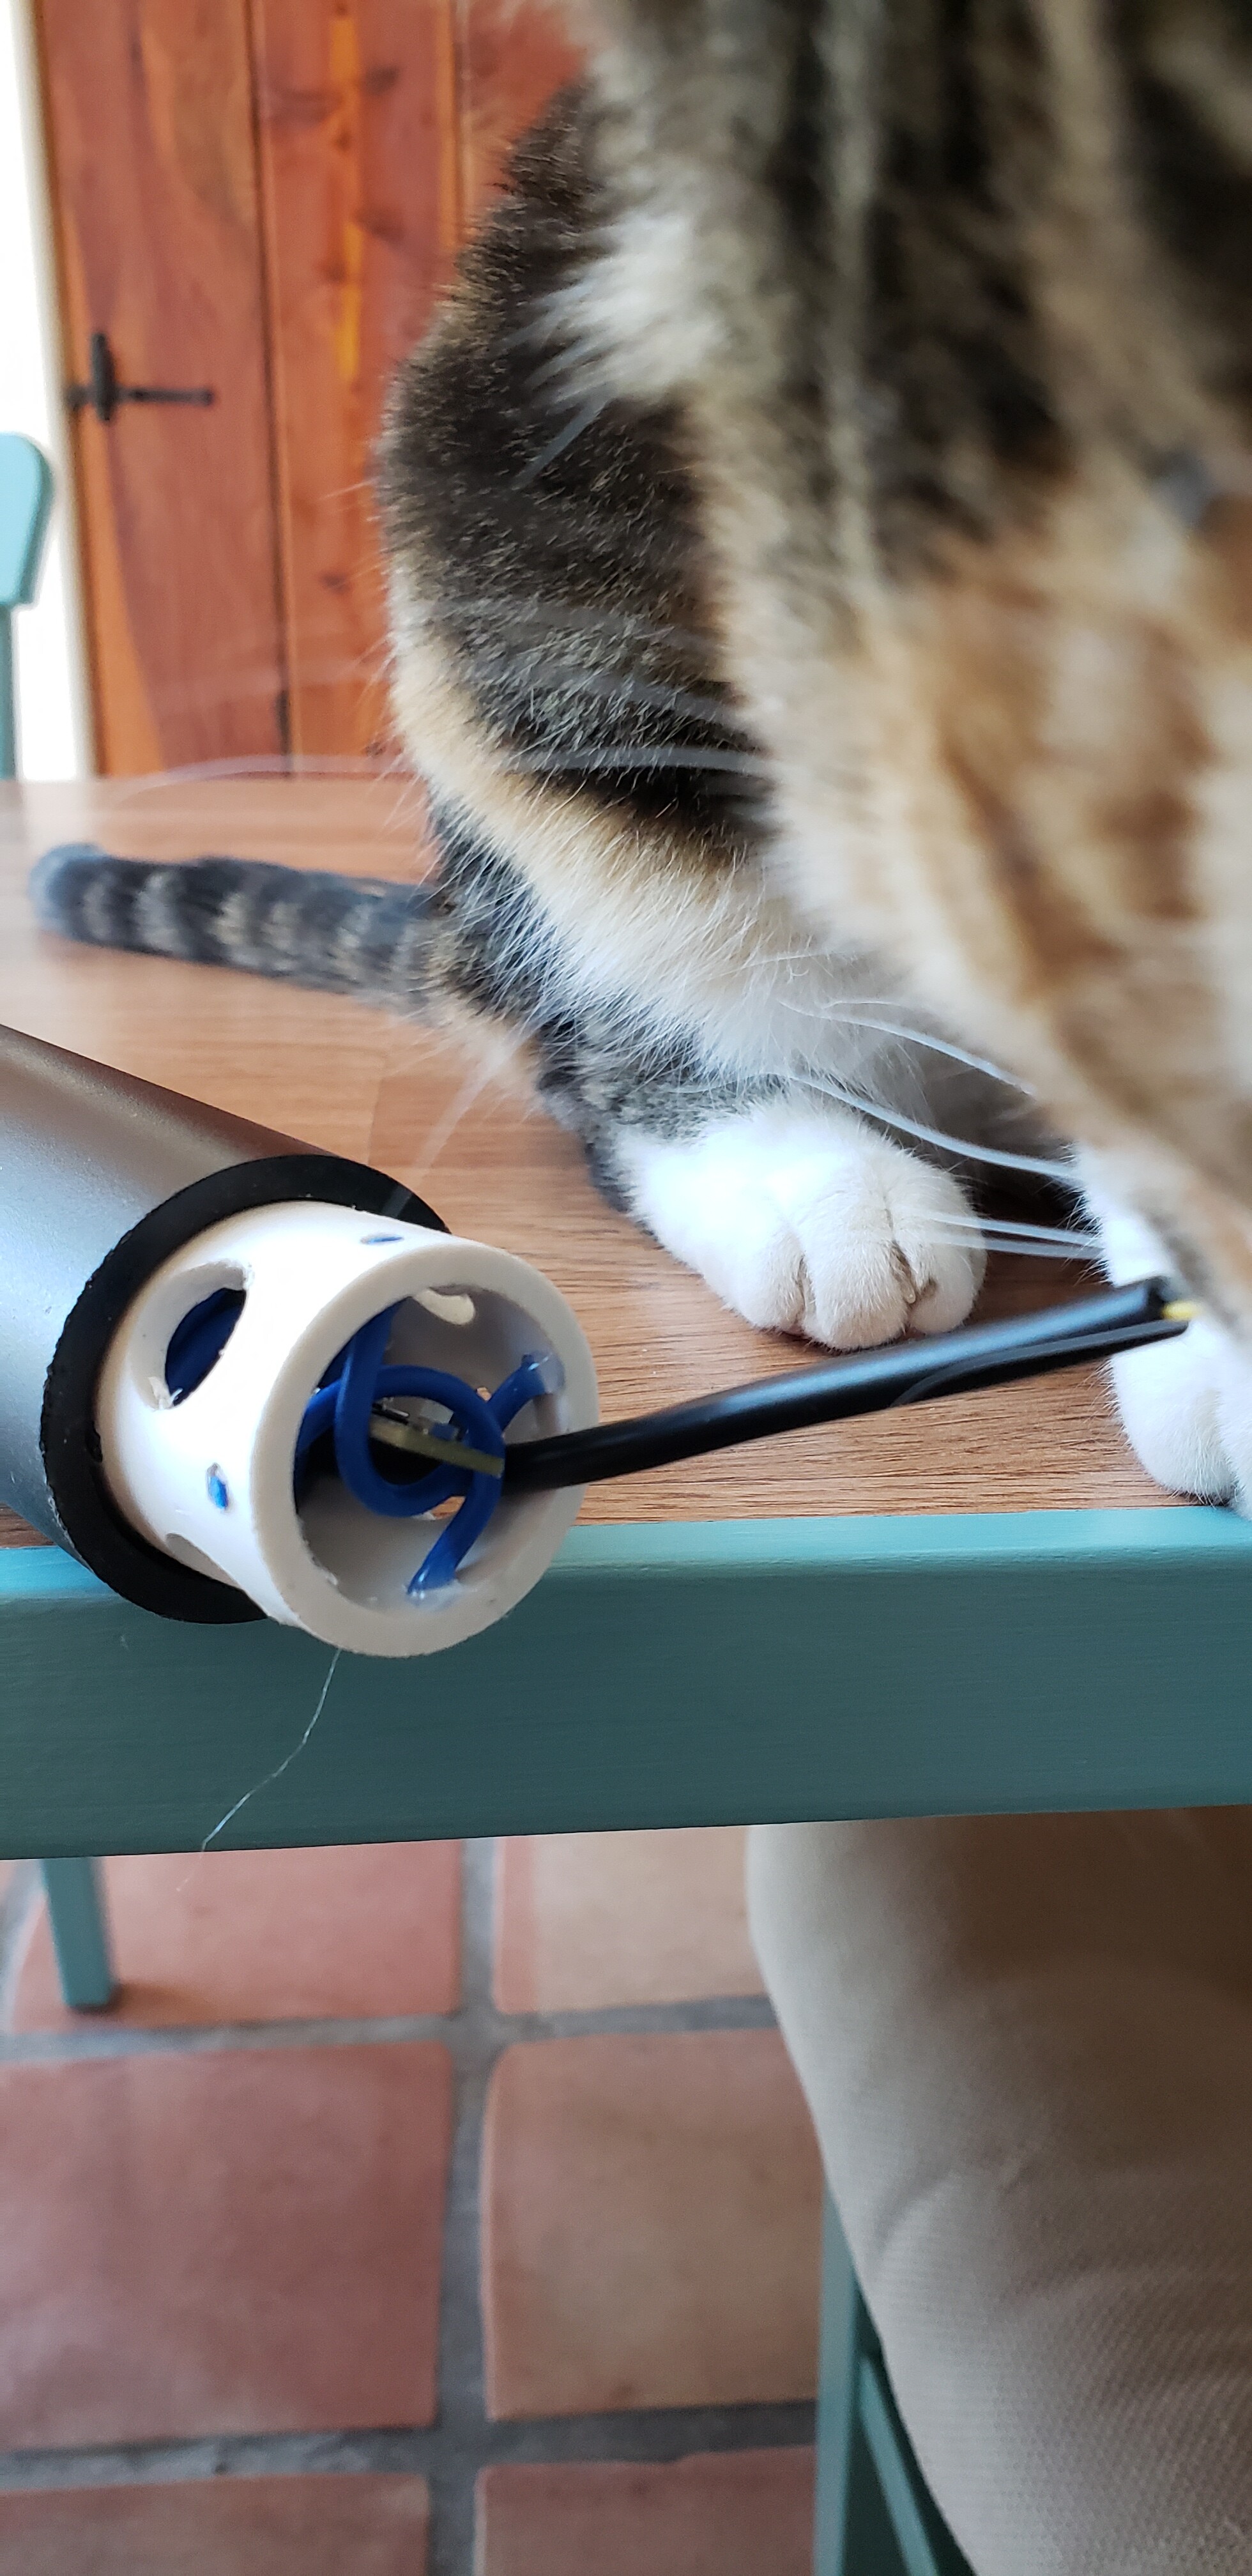
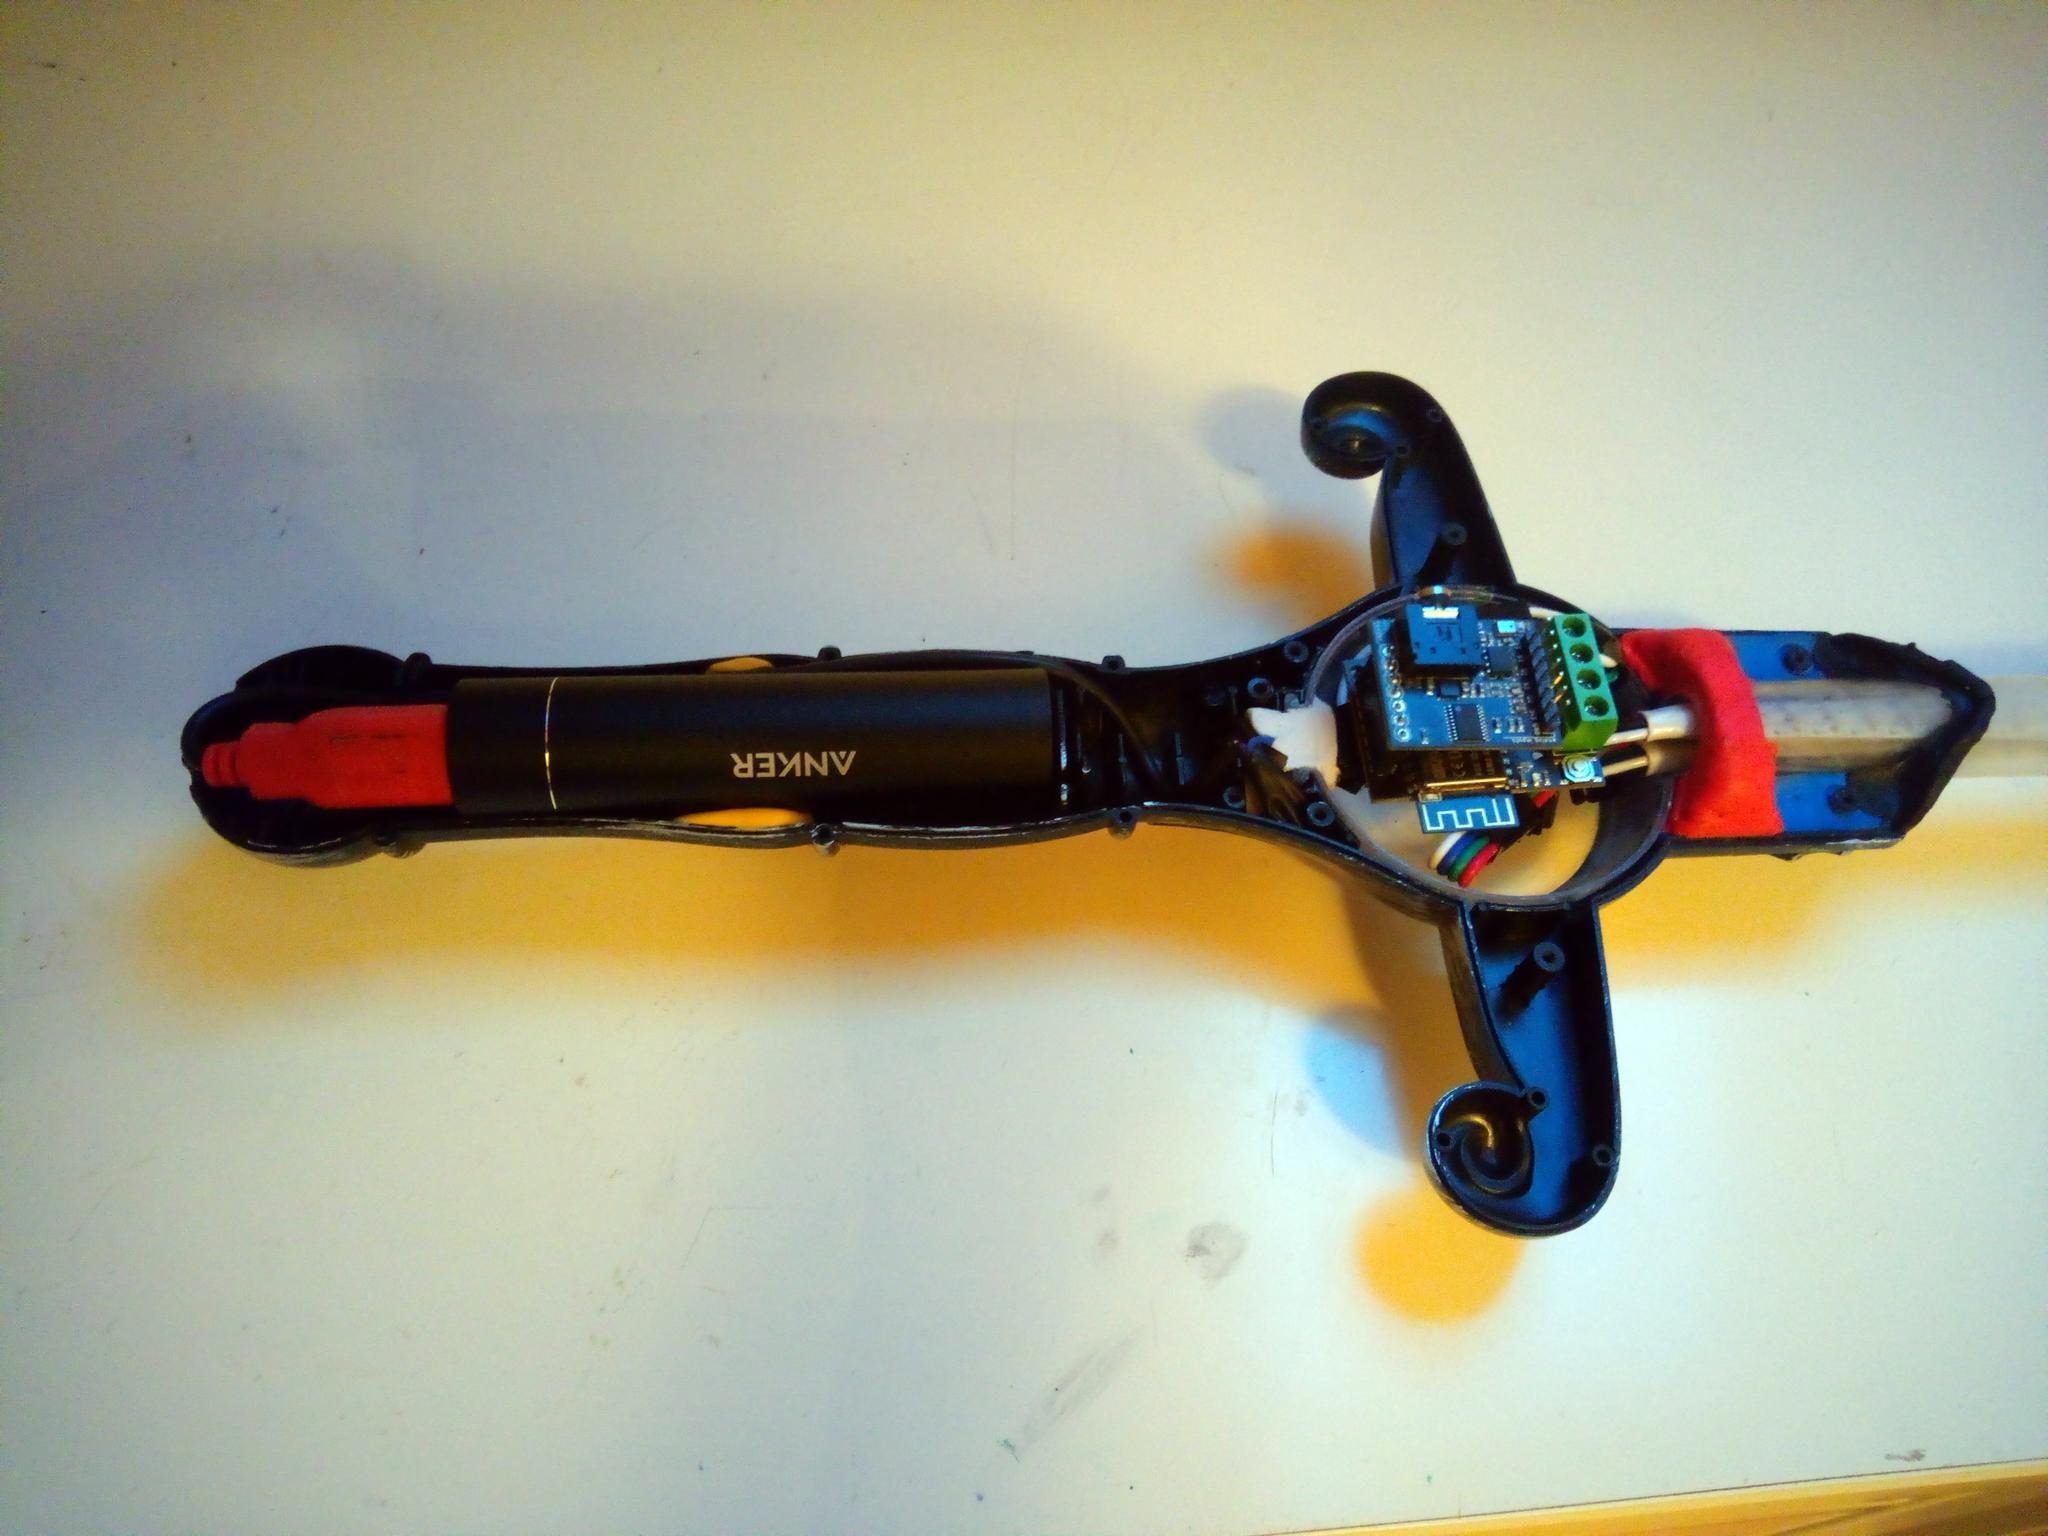
Here’s mine … first, the innards. I gutted the previous 3x AA battery bay with a Dremel, which made just enough space for the Anker 3350mAh mini powerbank (which come to think of it is around the size of 2 “C” cells!). That feeds to a microswitch button (seen in next pic) and then to… I think it’s 2 pairs of a 4-wire connector, since that’s what I had lyring around from connecting the two strips. I avoided cutting wires, including the unused ‘output’ from the strips, so things are cramped in the sphere. The top of the hilt and the area around the battery are packed with Sugru … I expect it to snap a bit above or below the sphere if I swing it too hard.
Assembled, and from the other side. The red button is good for power cycling, but the powerbank turns itself off when unloaded for a few seconds, so I still need to make a way to push its ON button, and an extension to its micro USB charging port so I don’t have to take it apart to recharge it.
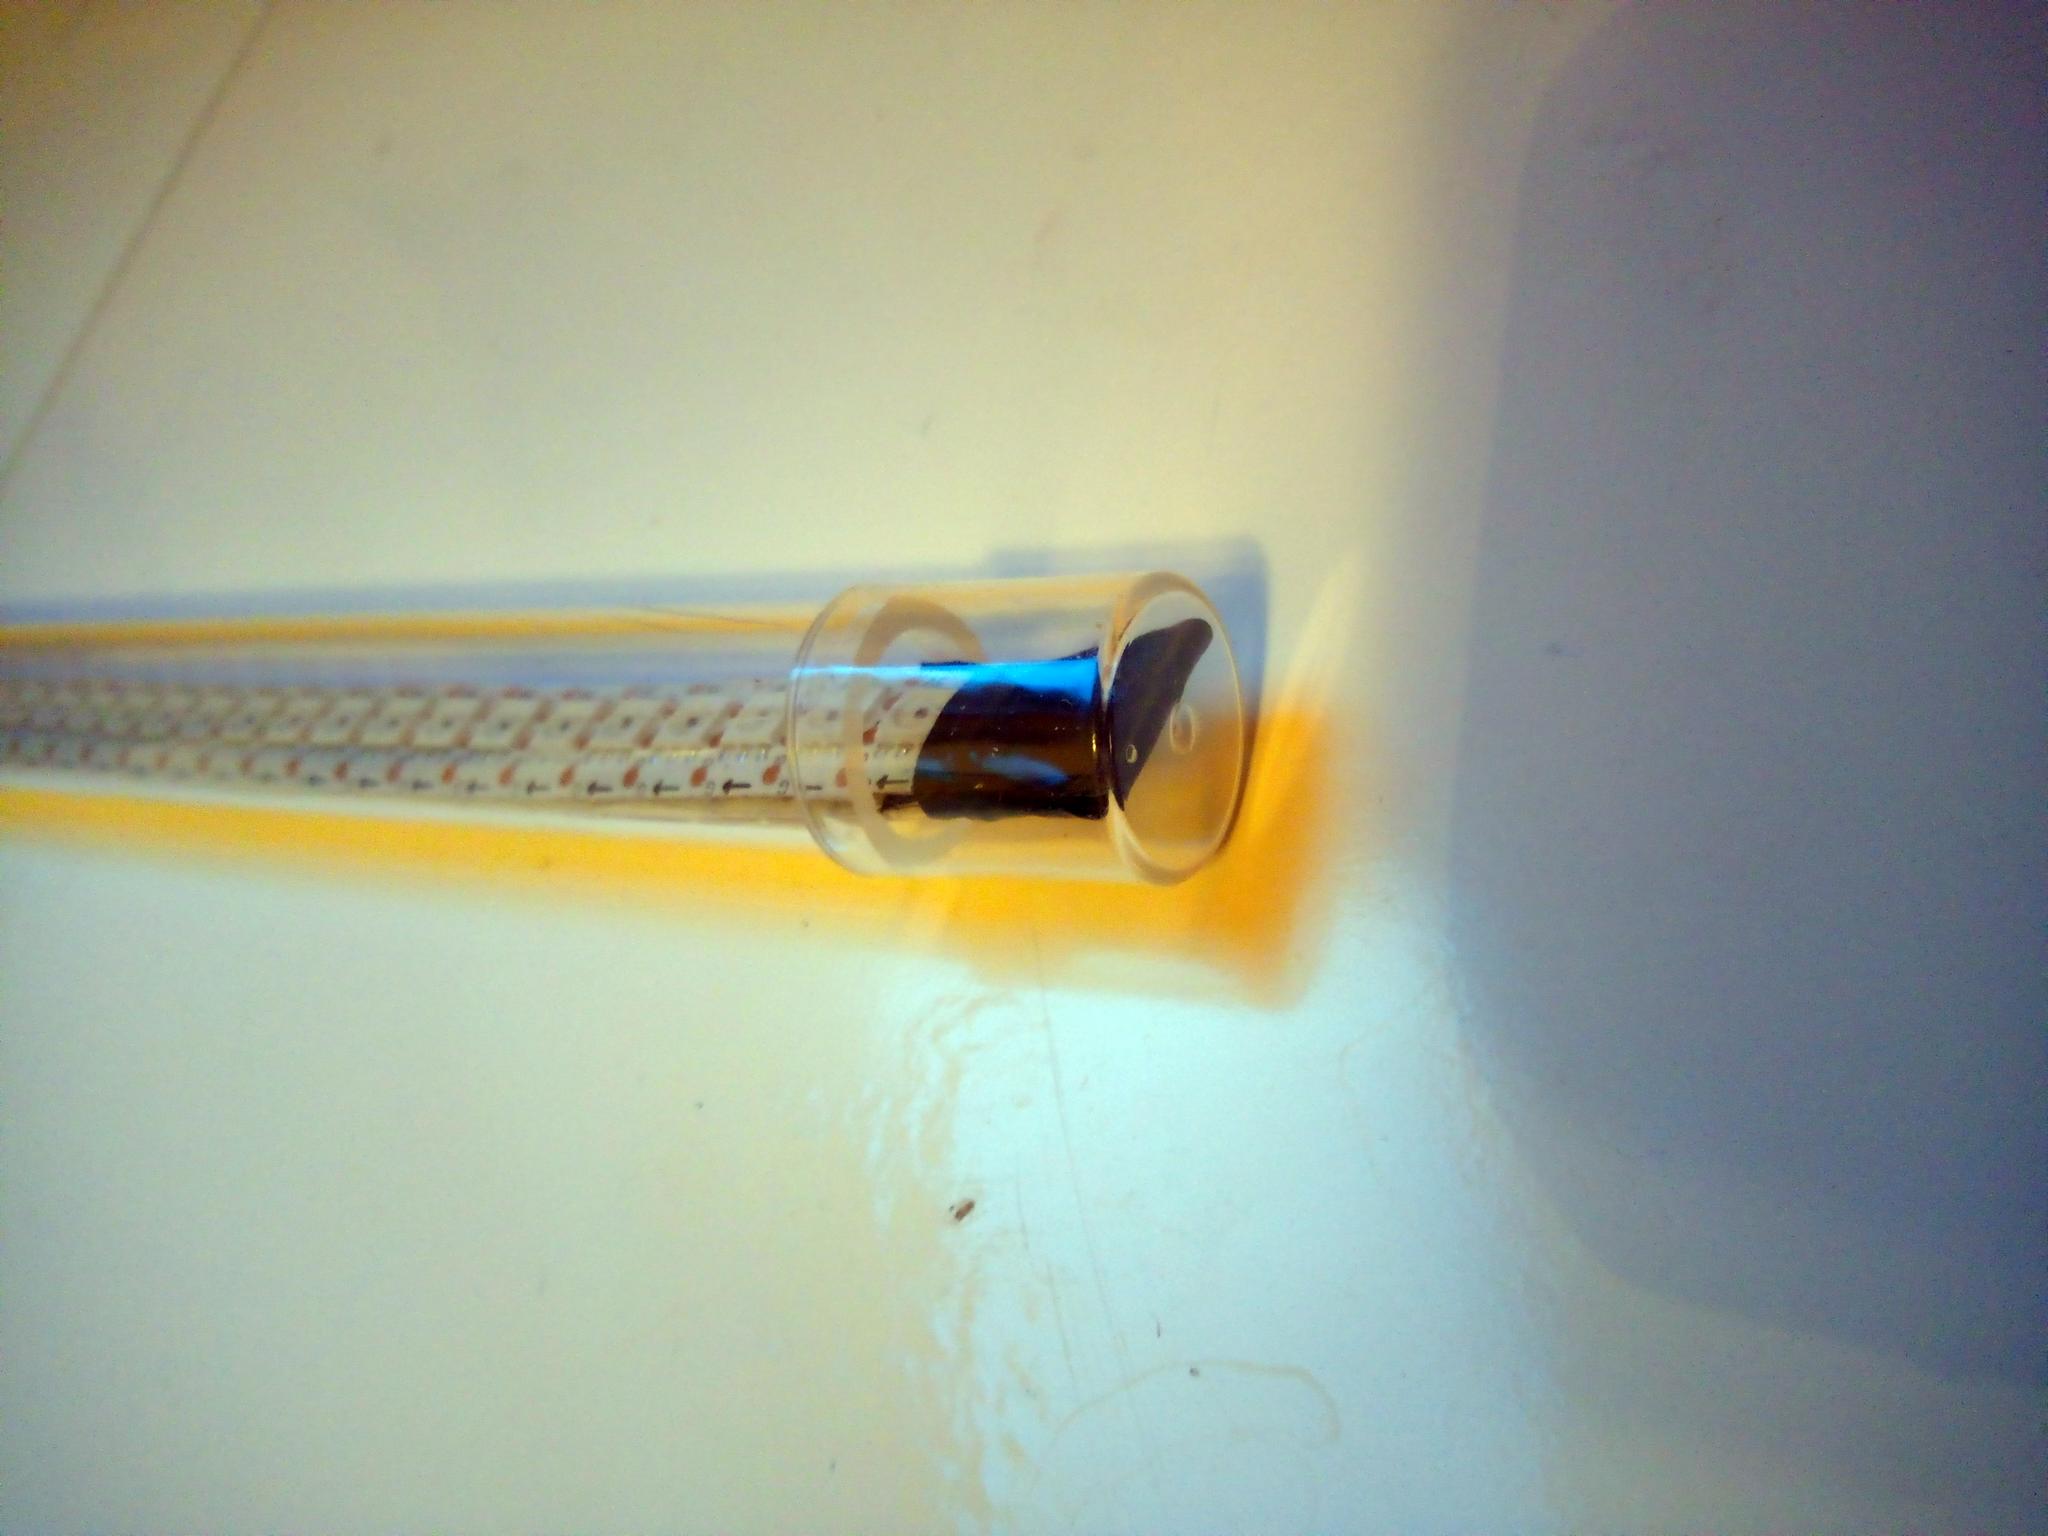
Here’s the tip. I left a bit of wire and soldered them together since I was reluctant to mess with the pads. The cap is from a deodorant spray bottle. Fits perfectly!
You’ll notice that on this side there is a disc magnet over the ‘e’ logo (still wondering what that logo is). I glued a smaller disc magnet inside and … well, I’m not sure what to do with it, but it feels cool to slide it around under your thumb.
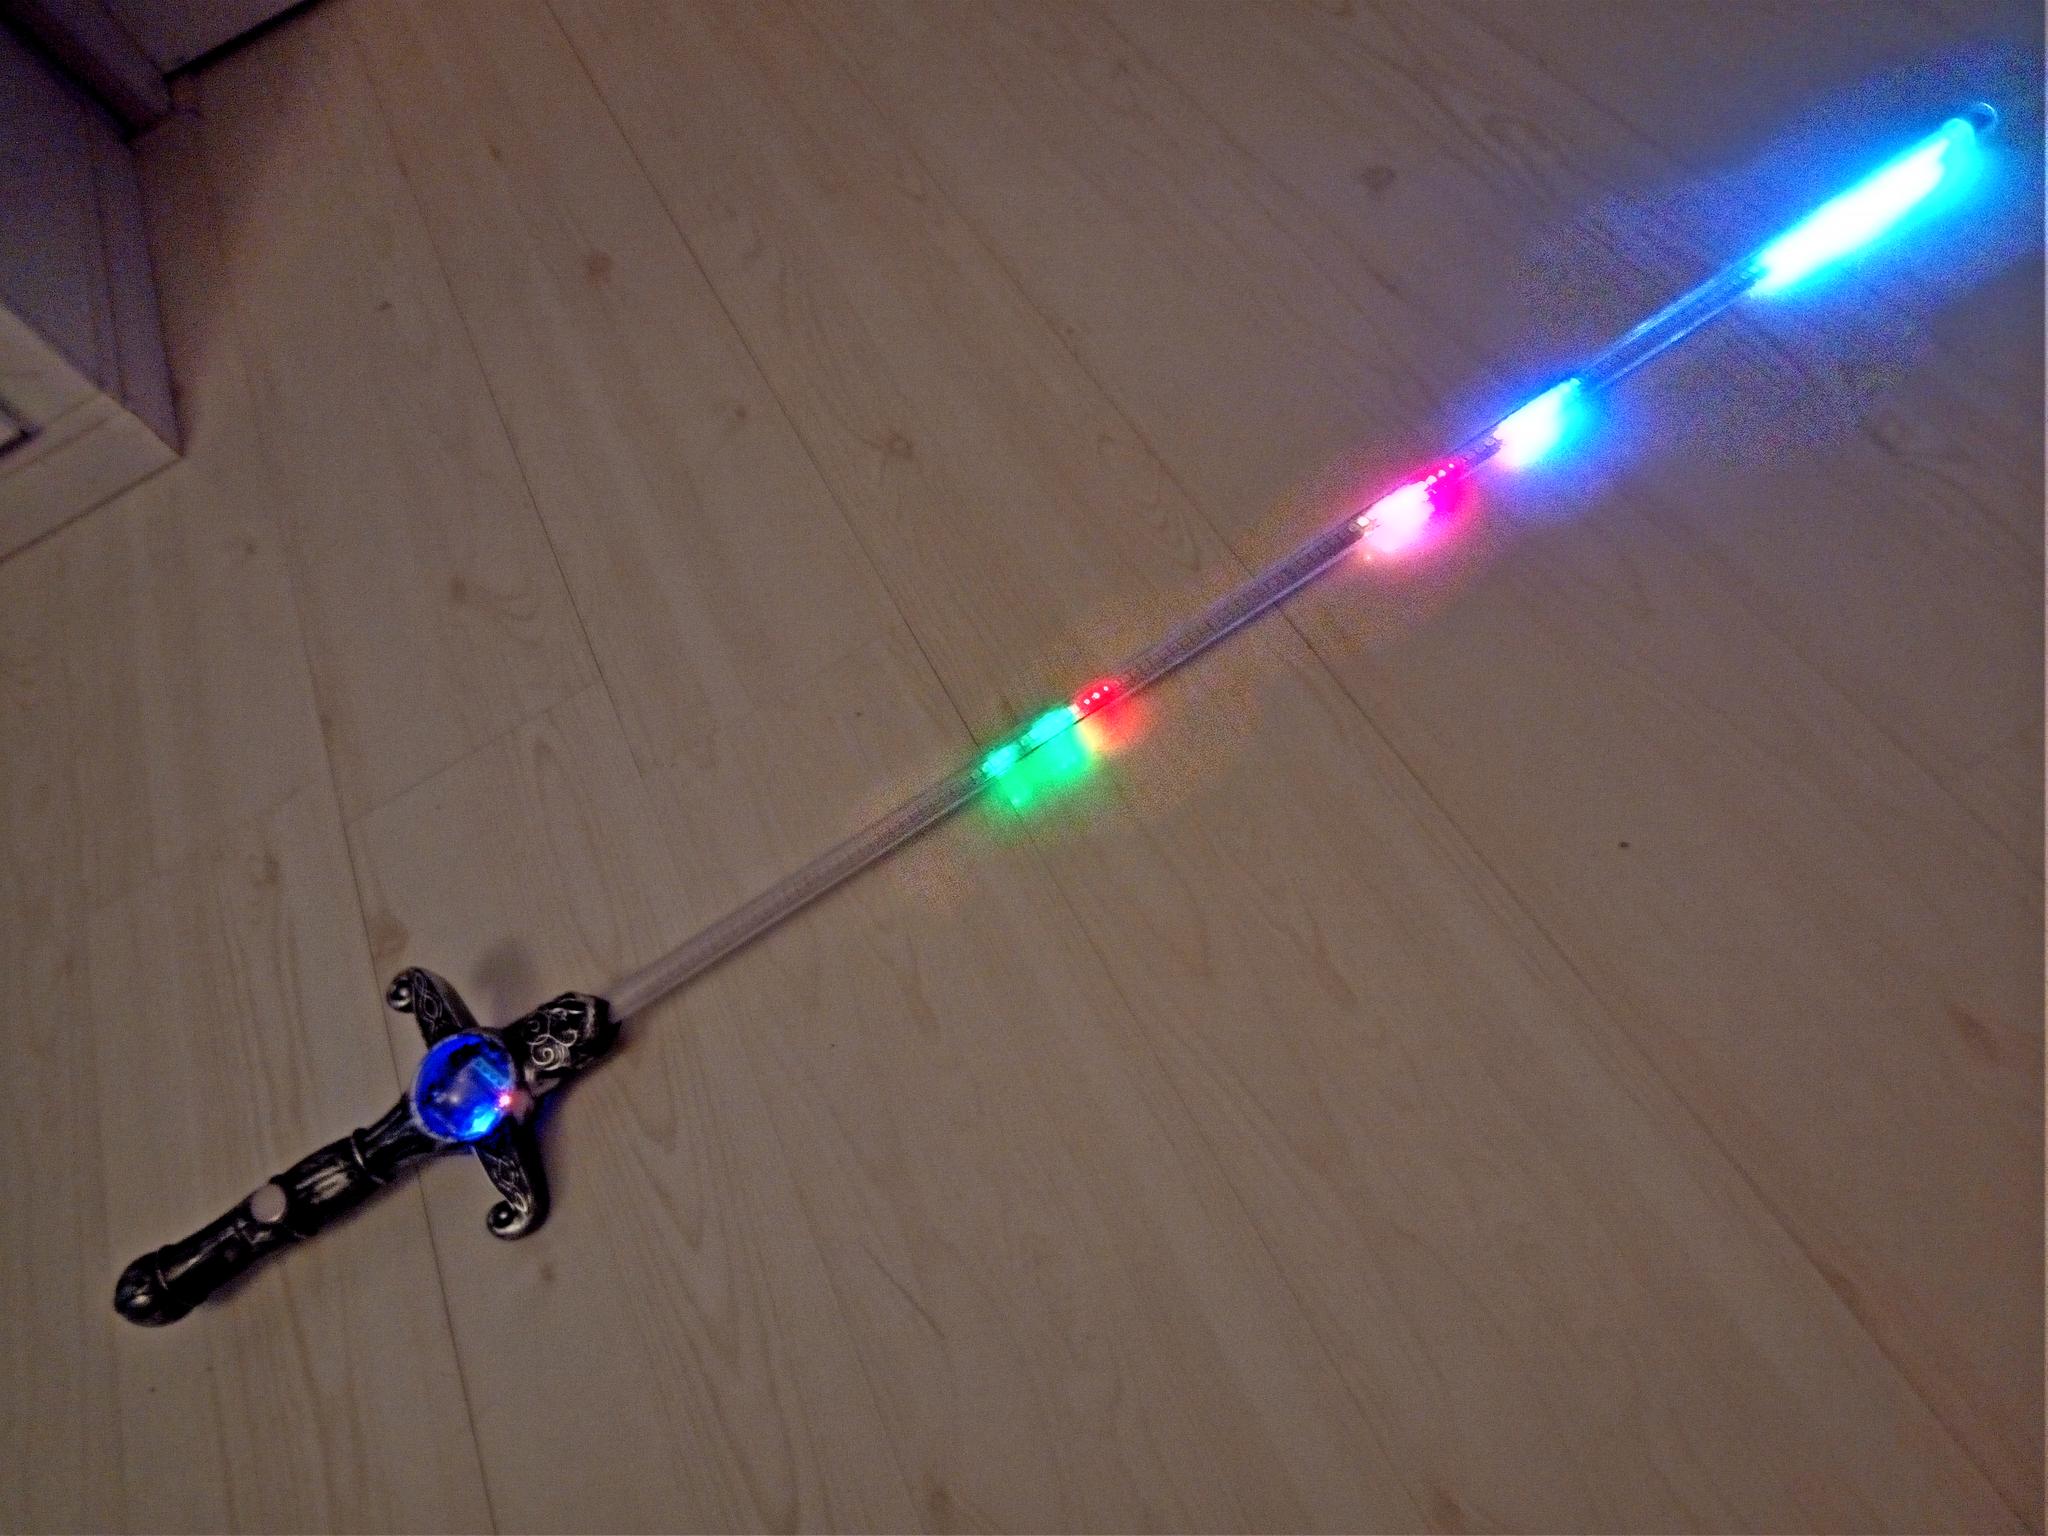
Despite my comment about a hitting version of Rock-Paper-Scissors in the other thread, I was intending this to be more of a performance sword, inspired by the early v3 sk9822 POV pics.
I’ll make some videos once I sort out the aforementioned access to the battery, and can screw and zip-tie the thing shut!
One question: I wired the power into both the ‘IN’ end of the first strip and the ‘OUT’ end of the second strip, since I found in other cases that the power dropped off for LEDs far from the power source, but in this case I didn’t seem to need a power tap. Is there anything wrong with that? Do I need a capacitor anywhere? I am good with volts and amps but not so good with farads!
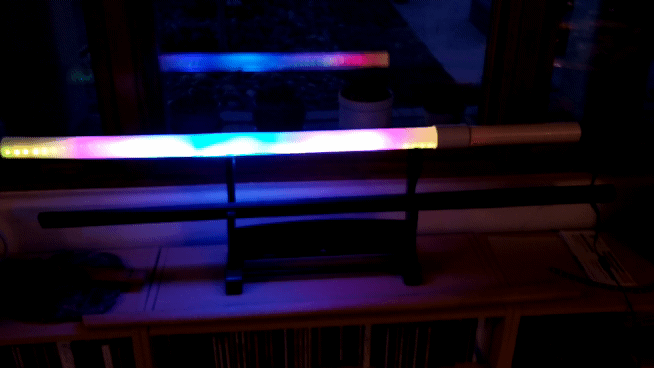
That is quite a beautiful effect. Plasma-magik! I could see it cutting through or outlining many things.
PEX is incredible stuff. Not really a thermoplastic anymore more like spiderwebbed carbon. Very strong. When I was running builds, my crew installed literally miles of the stuff.
Regarding batteries, I have several thousand of these high capacity Li-SOCl2 batteries in hand. 3.6 V, 2.6 Ah. Plenty of life left. If it would make sense to send some along @zranger1 or anyone else for that matter, please let me know, I have a bunch.
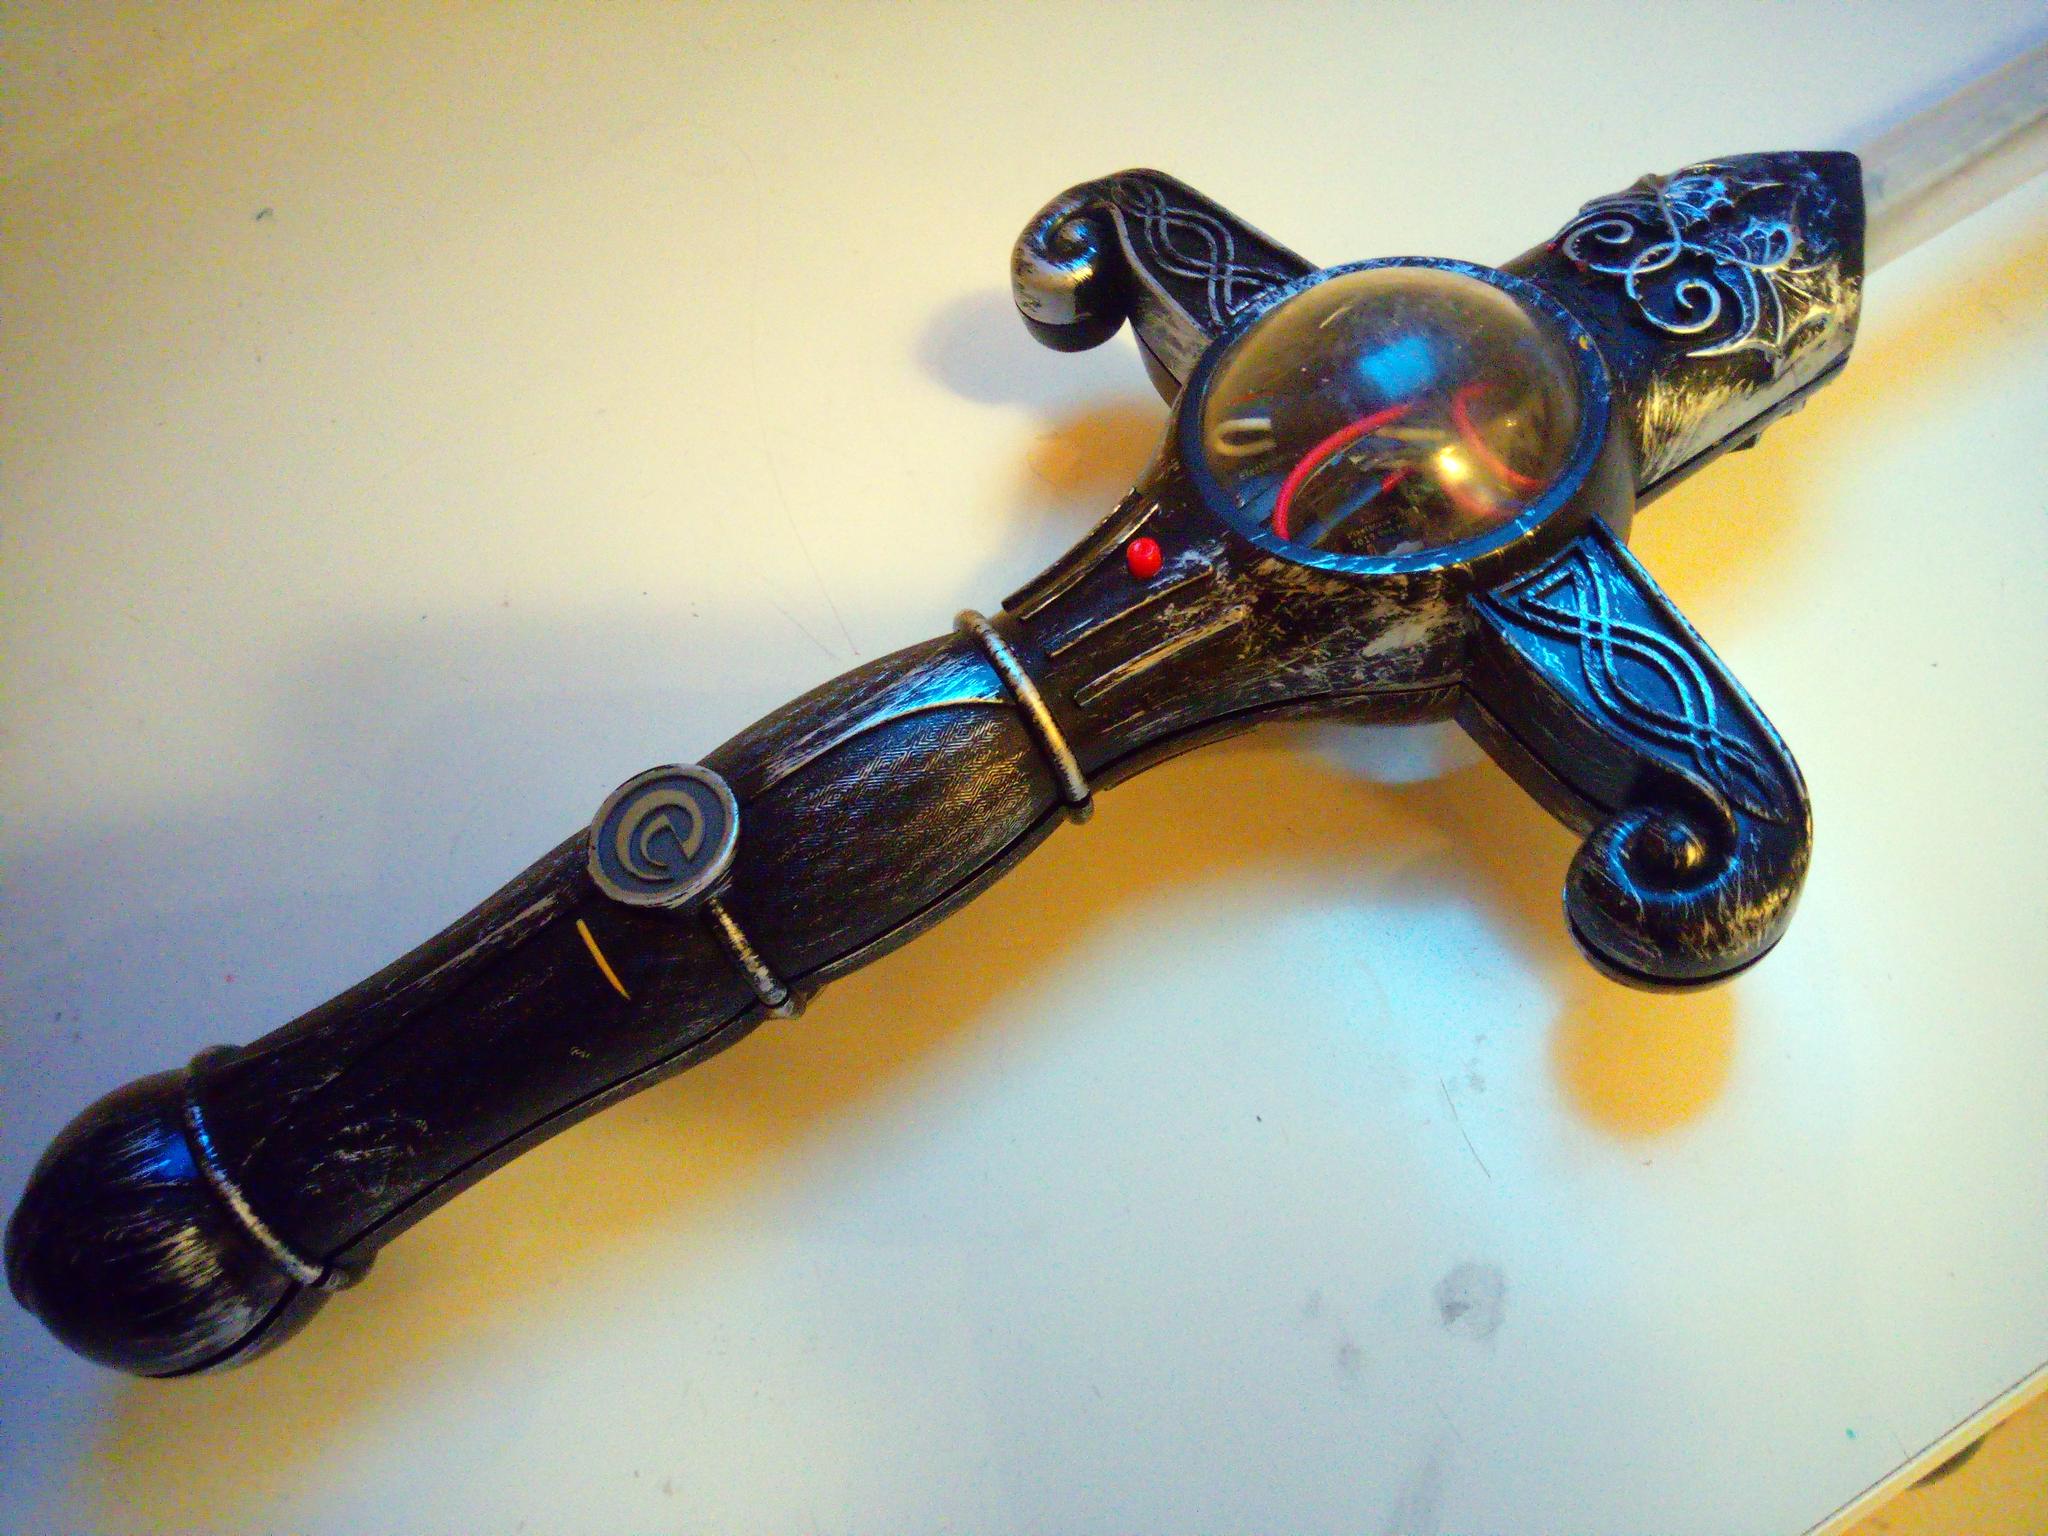
Also, I should add, your sabre @sorceror looks great! You may know, but polycarbonate is substantially less brittle than acrylic, if that does become and issue… It is even available on Amazon. Cheers.
@sorceror ,
I think that effectively is a power tap, right at the end of the strip. Nothing wrong with feeding power (from the same source) to both ends.
Capacitors are just volts and amps over time! A 1 Farad capacitor will change 1V over 1 second with 1A of current (charging or discharging).
When used across LED power, adding one can help reduce small fluctuations in voltage during times of high current draw. It some cases it can help with flickering issues if power is “dirty” and fluctuates a lot. 100-1000uF would be pretty good value ranges for helping out an LED strip.
For various reasons, you almost always want double or more for the voltage rating than what you are actually working with. So e.g. for 5V power I wouldn’t use less than a 10V rated capacitor, opting for 16V, 25V or 50V even better.
Some are polarized, that is they have a negative (-) side, often marked with a band, and a positive side. Reversing them can cause rapid unscheduled disassembly of the capacitor!
Sword update: I finally got a moment to work on this and got the batteries set up. I wound up using 3 NiMH D Cells – 4.8v out and a theoretical 10000maH. Since the PEX “blade” is fairly heavy, the battery weight really improved balance.
I fully expect to break this sword, fix it, break it again… and eventually learn a lot about how to make robust swords and staves for outdoor use. So far, the things that have gone horribly wrong are:
The 5v pad cracked and broke right off the strip as I was soldering it. That was a surprise, but since it was power, I just attached that wire to the next pad up and kept going.
Initially, batteries were retained in the handle by friction and a small spring clip. The first time I took it outside and made a couple of fast cuts, well… batteries went flying everywhere. Glad I didn’t try that in the house! Now the battery assembly has a plastic end cap with small screws.
Next up, impact sensors, better switches and a few more patterns. Right now, the aspiring Jedi or Sith must use their phone or computer for sword control, in addition to the Force.
Here’s a short video of me whirling it around to see if it flies apart, while the dog, who is totally used to this sort of thing, basically ignores the proceedings. (spoiler: it does not fly apart at this time!)
Both sides are indeed independent. It’s mapped as a 52x2 matrix. I cut the strip at the end point and soldered in very short wires for the bend.
There’s space for a sensor board, but it’s not in yet. Now that I’ve got the basic structure done and I’m (slightly) less worried about breaking expensive hardware, it’s time to figure out the fun features!
Sword update: after adding a bunch more Sugru, a piece of Lego, and a bunch of atrociously soldered chopped-up USB cables, I put my sword back together, and thanks to CHDK took a few long exposures. I was holding the camera in this case but next time I’ll put it on a tripod.
The only things remaining are to align the XYZ axes instead of having the PB loose in the case, and add an external button so I don’t need another device to change patterns. Hmm, I guess some physical knobs would help too, so I could even tune the pattern parameters without another device!
looks awesome. from the video it seems that the leds are on constant. one thing we see a lot in certain settings is led toys like hulahoops and poi, which are strobed in a way that is pretty psychedelic, if you’ve ever seen tracers.


 this post gave me so much joy…