Rainbows are great, but what if you want to limit something to a color range with in the spectrum?
Color Ranges
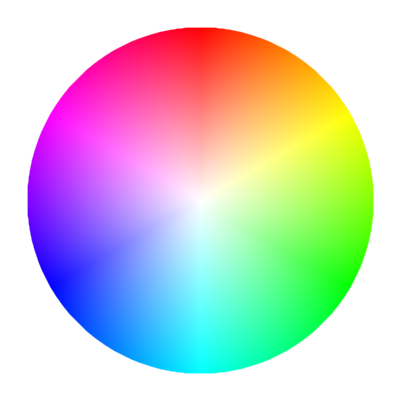
To limit something to a hue within a range, first I find the boundary colors I’m looking for. You can picture the hue as a color wheel like this:
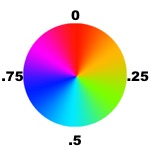
Red, green, and blue happen at thirds of the wheel, with red at 0, green at 1/3, and blue and 2/3.
To fix a number within a range that represents a hue range, you have to scale and offset it accordingly. You could do this with any number, and “wrap” it back to the starting value with modulus. Feeding it into wave or triangle will cause it to transition smoothly between the two. To use those, you’d have to scale the range to 0-1, then scale and offset the result.
For example, let’s say we only want hues between green and blue.
Green to blue in hue terms is starting from 1/3 going up to 2/3. Our range is 1/3 of the color wheel (2/3 - 1/3 = 1/3).
For these examples, let’s just call this cyanify.
First we want to “wrap” inputs to keep them repeating over a range of 1/3. Then offset by 1/3.
var ONETHIRD = 1/3
function cyanify(v) {
  return (v % ONETHIRD) + ONETHIRD
}
This will make a choppy sawtooth looking gradient as the hue snaps back to the starting hue to wrap. It will repeat at a rate equal to its portion of the hue circle, in this case 3 times over an input of 0-1.
If we want to make it smooth, we can transition from green to blue and back again using either wave() or triangle(). We have to scale the result, and offset it. Triangle is linear, and will repeat smoothly. :
var ONETHIRD = 1/3
function cyanify(v) {
  return triangle(v) * ONETHIRD + ONETHIRD
}
Wave also works, though it offsets things a quarter phase. It will ease-in and ease-out of the start/destination.
var ONETHIRD = 1/3
function cyanify(v) {
  return wave(v) * ONETHIRD + ONETHIRD
}
Blending
Implementing HSV in pattern code and RGB blending functions is slow, or at least slower than functions built in to Pixelblaze. Until those APIs exist, here are some tips and tricks that can be used.
Using the the blue-green example above, you can shift between them like this, directly creating the gradient in RGB
var r, g, b
function cyanify (v) {
  r = 0
  g = v
  b = 1-v
}

export function render(index) {
  cyanify(index/pixelCount)
  rgb(r,g,b)
}
You can use triangle() to wrap it as well (if not already wrapped)
function cyanify (v) {
  v = triangle(v)
  r = 0
  g = v
  b = 1-v
}
If you need to blend 2 hues with different brightnesses, you can combine them directly:
function cyanify2 (h1, b1, h2, b2) {
  r = 0
  g = (h1 * b1) + (h2 * b2)
  b = ((1-h1) * b1) + ((1-h2) * b2)
}
Here’s what it would look like if plugged into a double-fast pusle:
You can also do this with pure hue, by blending (weighted averaging) between the two hues and adding their brightness. This is not a true color blend, as blending colors also affects saturation. Its more of a tug-of-war around the color wheel.
v = v1+v2
h = (h1 * v1 + h2 * v2) / v
Since that is very little code math, it’s pretty fast.
NOTE There’s a nuance particular to Pixelblaze in the above math. In other languages you should guard division by zero when v==0, in Pixelblaze this harmlessly results in 0. In this pattern you’d get a hue of 0 (red), but it would only happen when the total brightness was also 0, so it’s invisible.
If the hues are numerically far apart (more than 0.5), you get some pretty rainbows in between and it might not be what you expect. You can fix this by shifting either by a full circle to be closer numerically, but still the same color. For example, for a blend of red (0) and purple (0.7), either rotate red by +1 so that it is blending 1 and 0.7, or purple by -1 so that it is blending 0 and -0.3. Remember that hue wraps, so 0.7 and -0.3 are equally purple.
var h, v
function blendHue(h1, v1, h2, v2) {
  v = v1+v2
  //rotate hues so that they are closer numerically
  if (h2 - h1 > .5)
    h2 -= 1
  if (h1 - h2 > .5)
    h1 -= 1
  //average the hues, weighted by brightness
  h = (h1 * v1 + h2 * v2) / v
}
Note that if your hues are moving around they may “snap” to a different color direction on the wheel. Imagine you had to go from 0 to 0.45 on the color wheel:
It will follow the path on the right side of the wheel, going through orange and green.
But if it were to go from 0 to 0.55, it will travel the left, through purple and blue instead.
If this were blending colors as light does, the true path from red to cyan is through white and needs a different method.