Oh, and don’t worry about any of this if you don’t have time or don’t feel like it. I could go on troubleshooting and debugging for days, long past the point when it’s actually a good idea – just me being vexed when my wonderous inventions don’t behave as they’re supposed to.
2 Likes
Got this working on Windows 10. Very cool, and thank you!
2 Likes
I saw this after i had an idea for a 3d led cube with PB. I saw cylinder , cube and sphere on your video…so its possible a led cube like auracube kit or other similar kit to work with PB? Or needed to cut a led strip smds one by one and make strips conected zigzag 8x8x8 but then programing this will be difficult to play patterns like a cube… or let it act like simple zigzag strip…
This is amazing! My collaborator and I are both getting stuck at a single red pixel after we do the following:
- Wire up the Com board as described above, and plug it in
- Fire up the latest PixelTeleporter Server for Windows
- Set the pixelblaze to “Output Expander”
- Load any of the examples from Processing with the “127.0.0.1:8082” modification you can see in the video below:
https://www.youtube.com/watch?v=zatGpibALPM&ab_channel=JoeGood
In the long term, we’re hoping this will be a good solution for large-scale projects which use an array of PixelBlazes. Please let me know if I can provide any clarification.
1 Like
Hi!,
Thanks for the very helpful video. I think you’ve almost got it – a couple of things jump out.
- First, if you’re using ports 8081 and 8082, you actually don’t need to specify the port number at all in the PixelTeleporter constructor. This ought to work.
new PixelTeleporter(this,"127.0.0.1")
If you do specify the port number, it’s best to specify both ports, like this:
new PixelTeleporter(this,"127.0.0.1",8081,8082)
(incoming port first, followed by outgoing data port) - In the Output Expander Settings on the Pixelblaze Settings page, you’ll need to set the color order for each channel you’re using to ‘RGB’. I see that you set it in the main settings, but the expansion board lets you set order per channel, and the Processing client only speaks RGB.
Let me know if this gets your setup working. You’ve also convinced me to post the latest version (1.1.2) a few days earlier than I was planning. Download it when you get the chance, if you like. Among other new features, it has improved diagnostics…
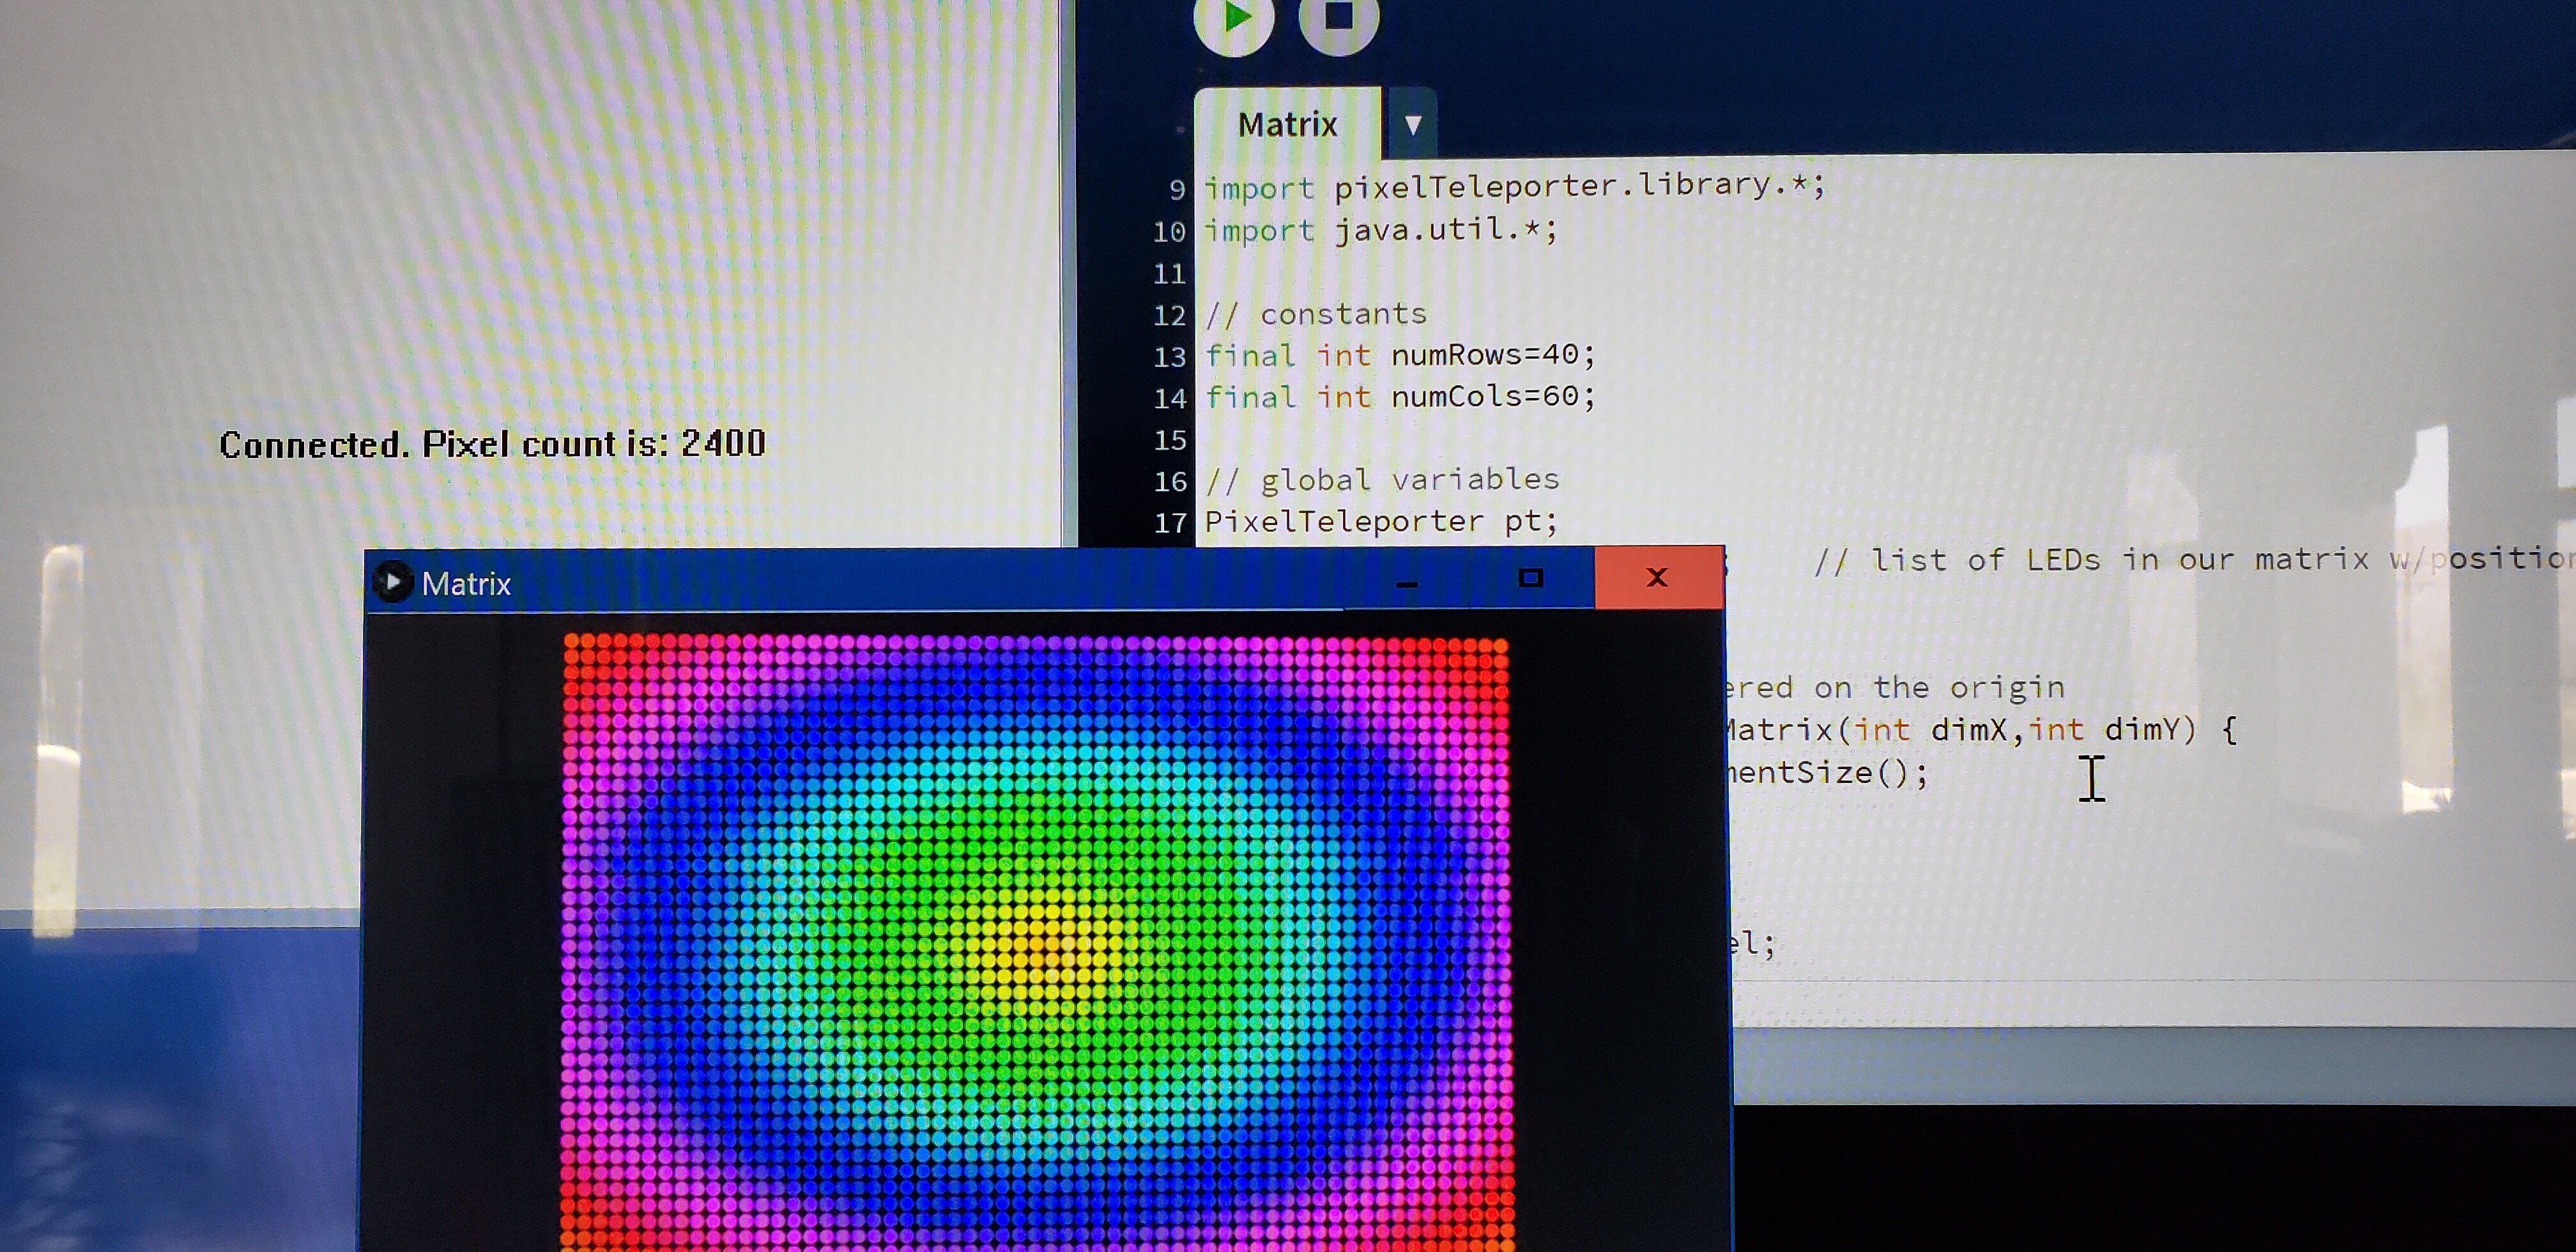
Windows pbxTeleporter 1.1.2 displays its connection status and the number of pixels received in its main Window, and the Processing library now pulses pixels between black and grey to indicate a disconnect.
1 Like
Just updated the repository to PixelTeleporter 1.1.2. This release is mostly about improved usability and quality of life. New features are:
- You can now translate (pan) objects by right-dragging with the mouse.
- Object rotation with the mouse is generally smoother and more responsive.
- Holding down the alt key allows you to rotate your object around the Z axis.
- added setBackgroundImage() method to Pixelteleporter object. Supported image formats are:
(.gif, .jpg, .tga, and .png). (Call this from your sketch’s setup() function. If you use setBackgroundImage, you can remove calls to background() from your sketches.) - Hold down the shift key while dragging to pan your background image
- Hold down the shift key with the mouse wheel to zoom your background image
- Connection status feedback! When not receiving data from the pixelblaze, Pixelteleporter will now pulse slowly between between black and grey. Normal display will resume when the connection is reestablished
- More connection status feedback! pbxTeleporter for Windows now displays connection status and LED count in its main window.
- Many other small fixes and improvements
3 Likes
It’s alive! We have more exploration to do, but now the connection is working! Verified on the older version, as well as latest Windows server 
3 Likes
Amazing! I got this random FTDI USB adapter, wired it up, installed the latest Processing (Linux-x86_64) and wired it up and … nothing!
… until I changed the hardcoded IP in the example from 192.168.1.42 to 127.0.0.1 … 
Wouldn’t it be neat if the PixelBlaze could output its data like this on its own USB port?
Anyways, kudos @zranger1 ! This will come in handy!
2 Likes
Is there a hardware reason why this can only simulate up to 240 leds per strand on the expander port?
1 Like
Thanks, @sorceror! I’m glad you can use it. A server detector/enumerator is on the roadmap too, so eventually it’ll get a little simpler to connect pbxTeleporter to the processing client.
@spazzle, good question! The answer is that, as long as you stay under the 2048 pixel hard limit, you can put as many pixels on a channel as the Pixelblaze will allow. The 256 pixel-per-channel limit exists only in the documentation.
(It was in the initial prototype because the oldest expansion boards worked that way. I documented it and then forgot to change it when I changed the software later. I’ve made a note to fix the docs in the next release.)
1 Like
2048 pixel limit? Where does that come from?
Here is my explicit use case. I have 300 pixel strips, and one of each of those on each of the 8 output expander channels, ie 2400 pixels.
@spazzle, it’s based on two things: a conservative estimate of how much data I could get an ESP8266 to read from the Pixelblaze and shovel to the client over UDP at a reasonable frame rate, and the number of pixels beyond which the Pixelblaze’s output frame rate starts dropping a lot due to communications overhead. It’s not pixel computation bound, so PB3 isn’t really better. It’s the 2Mbit speed with which the PB talks to the expansion board.
Not hard to make this user configurable though. Give me a couple of days and I’ll build client and server that let you set the buffer size.
Ok… just updated PixelTeleporter, both client and servers to v1.1.3. Files are here.
This bumps the maximum LED count to 4096 on the server side for the Linux, Pi and Windows servers, and 4096 LEDs per PixelTeleporter object on the client side. (The ESP8266 server still supports a maximum 2048 pixels for the time being.)
Here’s a 60x40, 2400 pixel matrix. It runs this simple circular rainbow pattern at around 20fps on a PB3, and actually looks pretty smooth.
3 Likes
I used an online javascript interpreter to create my pixel map previously, but it seems to not be working now. Is there a way to just extract the pixel map from the pixelblaze page directly?
This is hideous, but it works…
If you’e got a working javascript mapping function, and you have the developer tools for the web browser you’re using, turn the dev console on in the browser and add the statement:
console.log(map)
to your javascript before it returns the map. Then you should be able to copy the map array out of the dev console to your clipboard, and from there to whereever you want to save it. It’ll be the non-normalized version, and in Firefox at least, it comes out formatted with a newline between every item.
1 Like
In chrome it spits out all the coordinates as a continuous comma separated list
ie 10,0,0,11,0,0,12,0,0,13,0,0,14,0,0,15,0,0…
as opposed to
[[10, 0, 0],
[11, 0, 0],
[12, 0, 0],
[13, 0, 0],
[14, 0, 0],
[15, 0, 0],
[16, 0, 0],
[17, 0, 0],
[18, 0, 0],
[19, 0, 0],
[20, 0, 0],
[21, 0, 0],…
I originally used this page with slight modifications of the mapping function to generate the map for teleporter (Online JavaScript Interpreter) but it seems to have stopped working. I’m at a bit of a loss of what to do besides maybe code something up in python.
You can also do it in Java – use Processing and PixelTeleporter to build your object, then call PixelTeleporter’s exportPixelblazeMap() method to save the JSON map to a file in a form that you can paste into Pixelblaze’s mapper window. Here’s the API doc – there are more details in the repository’s javadoc, and there’s the MapIO example, which shows how to read a JSON map. Writing one is similar.
exportPixelblazeMap
public boolean exportPixelblazeMap(java.util.LinkedList<ScreenLED> obj, java.lang.String fileName, float scale, boolean is3D)
Convert a list of ScreenLEDs to a Pixelblaze compatible JSON pixel map and write it to the specified file.
Parameters:
obj - Linked list of ScreenLEDs representing a displayable object
fileName - Name of file to write
scale - Coordinate multiplier for scaling final output
is3D - true for 3D (xyz), false for 2D (xy)
Returns:
true if successful, false otherwiseJust posted v1.1.4, which adds initial support for polygonal shapes and solid geometry. See the Pentagonal Icositetrahedron thread for a screenshot. This should be useful for modeling 3D printed objects that act as diffusers.
Not coincidentally, it comes with a pentagonal icositetrahedron example too. (Also, I’m sure I mistyped that in the repo at least once – I’ll fix it and add more examples over the next few days!)
1 Like
PixelTeleporter is great and should save me lots of fiddling around, as well as allow me to play with patterns while on the road with a laptop. Thanks @zranger1!
For anyone considering using USB-TTL hardware using something other than authentic FTDI chipset, hopefully by sharing my experience with that I can save others some time and trouble:
I tried using PixelTeleporter on Windows 10 with a few different cheap USB-TTL modules I had lying around from AliExpress and I didn’t have any luck with any of them. I wrote a little test app using local loopback to try and figure out the problem and it turned out none of them could handle the 2,000,000 baud rate required.
The CH430 module worked until about 1,700,000 baud (but actual throughput struggled to get much over 1,000,000). Above that it would still accept the connection but started dropping bytes.
The PL2303 (clone) module could reliably handle up to around 1,900,000 baud (using these drivers), but frustratingly would cause a bluescreen(!) if I pushed it above that. I also tried some older drivers that were a bit worse and that also bluescreened at high baud rates. Maybe this module would have worked OK with different drivers (or on Linux?), but I couldn’t find anything that would make it work on Windows.
The CP2102 module refused to allow the baud rate to be set above 1,000,000, so it was a non-starter with PixelTeleporter. Loopback worked reliably up to 1,000,000 baud though.
So in a nutshell, whatever USB-TTL adapter you use, it will need to work reliably at 2,000,000 baud. Most of the cheap USB-TTL modules on AliExpress, eBay etc can’t handle that, so they won’t work with PixelTeleporter.
Given my lack of success with the above, I bought an authentic FT232 module similar to the one already mentioned earlier in this thread. Windows detected it automatically but I installed these drivers anyway (they were only released yesterday and I like shiny things  ). Everything worked fine first time.
As a result of my testing I also have bit of feedback on some problems I noticed with pbxTeleporter.exe. None are showstoppers, but hopefully you find this helpful. It tends to hang a fair bit when the serial port connection is unreliable (i.e. with the cheap modules) including on startup before the application’s window is displayed, requiring me to force-kill it via Task Manager. Maybe something like the serialOpen() call is hanging/blocking on the event thread? Also, there is often tearing visible on the processing.exe output when patterns are being updated at high frame rates. My guess is that this is because there’s no synchronisation of the pixel_buffer between the serialReadThread and udpThread? There’s possibly other race conditions due to the lack of synchronisation too, maybe that’s what causes the crashes @spazzle mentioned? I’d have had a go at fixing some of the above but it has been more years than I care to think about since I touched C++ and don’t have a dev env set up for it, so humblest apologies for not providing any pull requests!
3 Likes