I wanted to share a project I just finished for a party this weekend to provide folks here with some inspiration and a mini tutorial.
First, a “in productIon” video:
The PixelBlaze v3 and sensor expansion board are wired into the inside breast pocket of the jacket, through a small hole cut into the pocket. The whole coat is powered off USB power routed directly through the PB (USB battery pack → Micro USB into the PB → out to the LEDs) with a cheap / small USB cell phone battery. There’s an in-line USB on/off switch to turn it on and off. I used https://www.amazon.com/gp/product/B07CG2VGWG for the switch and Amazon.com for the power. Note: this only works if you’re quite careful of your power budget, but is really great for this use case.
There’s 189 pixels, wired in offset lines (and not done particularly carefully) and hot glued between the outside of the coat and the inner lining (glued to back of the outside of the coat). (I had 200 total pixels available, but 189 happened to be the number that “fit” when I laid out all the wires, and clipped the rest).
I used the helper web mapper application, after taking two photos (of the left and right side) of the coat (with the inner lining lifted out of the way; it was later re-attached at the bottom), and carefully photoshopping out the distortion and fixing alignment issues. See this photo:
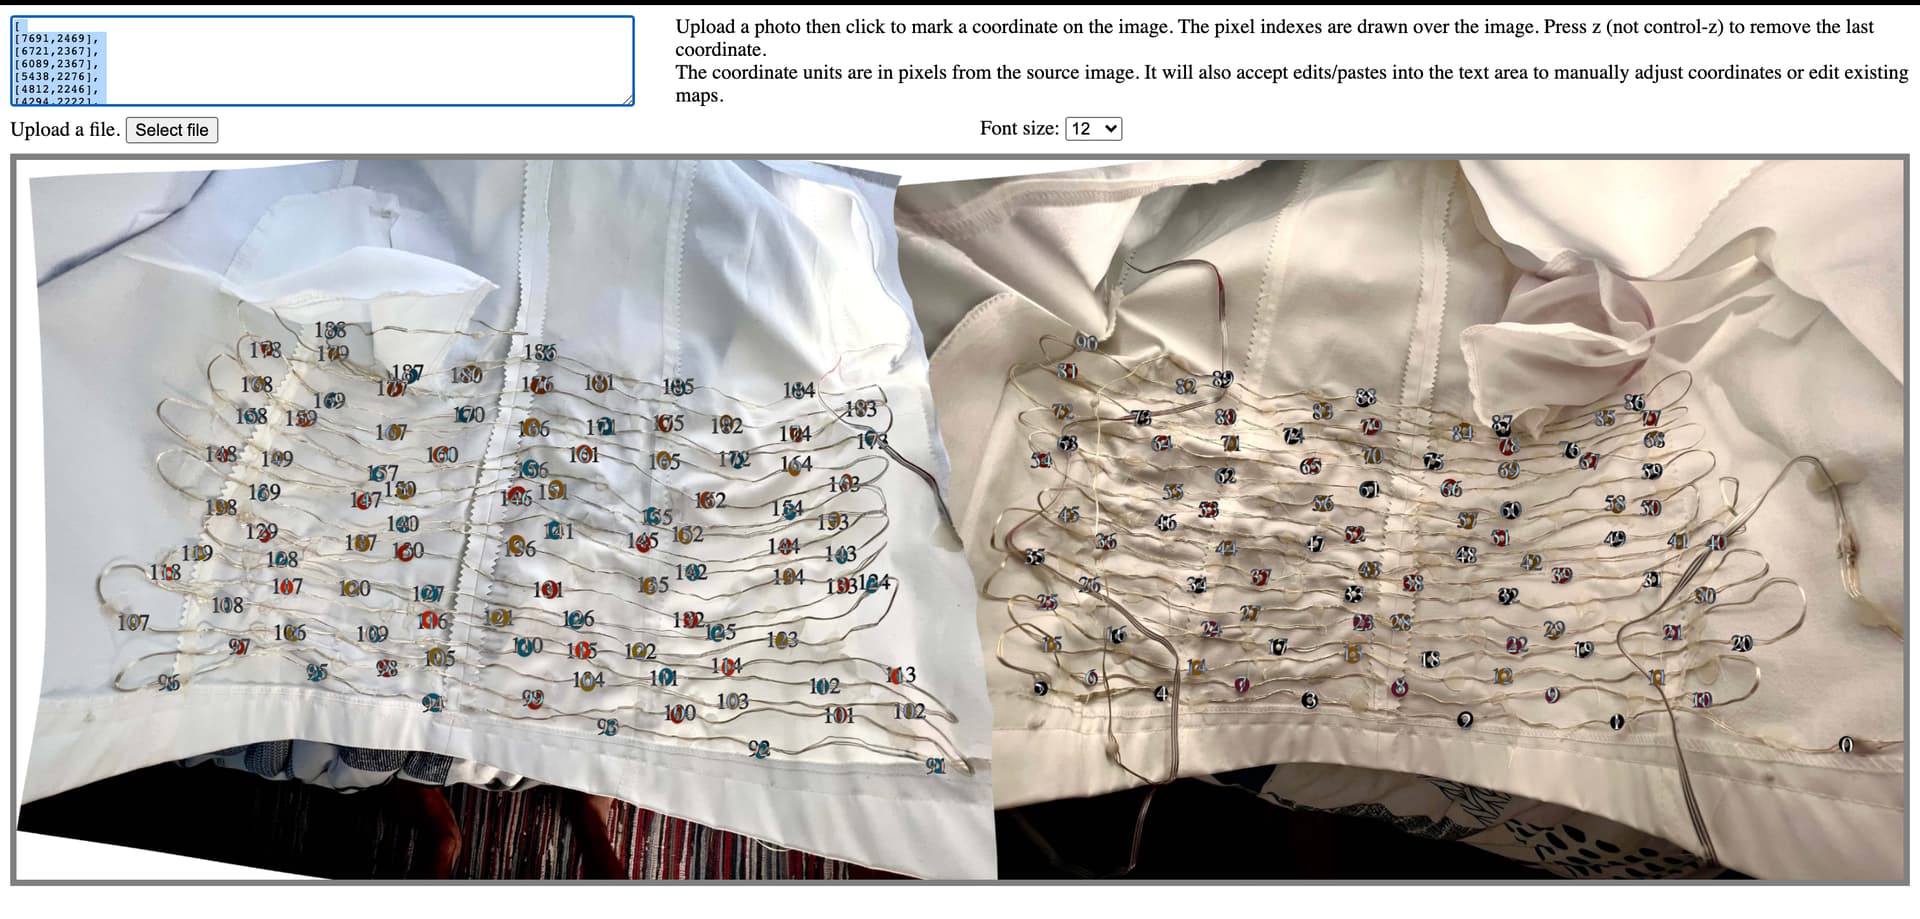
Per the help provided by this forum here. Can the 2D mapper function be used for a multi-column wiring? (See photo)
I had planned for needing to inject power (it’s 20m of wires), but didn’t see an issues without doing so. There’s a jacket vent going up vertically between the two sides of the coat and I have wires going up and around the vent to connect the left and right side.
The coat uses a 3d printed housing for the PB and Sensor Expansion board, also provided by the community, but I had issues with the fit of the print and had to use a Dremel to get the holes to line up correctly, so I’m not linking to the file I used.
LEDs used are these: https://www.aliexpress.com/item/1005001670784973.html which are a really interesting product – they’re just standard addressable LEDs, with a really cheap / bad driver board, with a USB power on one end and a remote control for some built in patterns. (the whole controller thing is horrifically bad; but at the price, I was just buying for the wired LEDs). I clipped off the remote and wired a PixelBlaze on instead.
I used the pattern mapper to rotate (with the Playlist feature) through four different patterns – a custom version of each of Sparkfire (shown in the first video), Oasis, Cube Fire 3D, Spiral Twist 2D. I then set it to be able to switch to a variant on Sound - spectromatrix 2D/3D for dance floors. (Custom = changing color and speed variables, mainly; for example, with Sparkfire, I wanted to the sparks to start yellow, not white).
Power was kept to a cap of 10% max, not just to keep my power budget modest, but because the coat really didn’t “need” to be any brighter in this environment.
This gave a power headroom of, well, a lot – I should go back and measure, but I’m sure I was running in the low “couple hundred milliamp” range.
Advice and lessons learned:
- The helper mapping tool was a godsend. This project would have been very tricky if I needed formulaic X-Y mapping.
- We badly need a better search and filter function for the Pattern library, but there’s a lot of gold in there if you’re willing to dig around and do very minor code modifications.
- There’s a ton of amazing pre-wired LED options out there right now, and it pays to explore both AliExpress as well as traditional domestic options if you need something specific.
- Diffusion is key; I specifically looked for a coat that would work well in this use.
- You can drive a LOT of pixels off a single USB, if you’re careful about your colors and brightness. Check Overview | Sipping Power With NeoPixels | Adafruit Learning System for a tutorial about how to do this.
- On-off switches are key, especially big tactile ones.
- The PixelBlaze mobile UX is so simple that you can use it to switch patterns in the middle of a crowded dance floor (thank you!), but wiring in a button to shift modes would be a really nice idea for v2.
- If I could have found a set of these same wires with 2x the LED density (aka every 2" instead of every 4", and gotten closer to 400 LEDs in the same space, it would have looked better. If anyone has found a product like that, please reply in the comments. It’d have made power management harder, but still feasible.
- The Playlist feature coupled with the on-off switch was really handy, because it “reset” the pattern to the pattern of my choice on power-cycle, which let me get out of sound-reactive pattern mode back into my ambient patterns without getting out my phone.
- Feature request: When connecting to the PixelBlaze’s wifi network, it’d be really handy to automatically go into the PixelBlaze’s application, as a modal popup to “connect” to the wifi network, the same way that WLED does.
A few extra photos and videos for good luck:
This video is a demo of the sound-reactive pattern, through the back of the coat.
This video shows the patterns would render just fine in DAYLIGHT at 10% power and was a proof of concept to test my power budget. I could have gone up to 30% or 50% and still run this whole thing off USB.
Glad to take any questions! This is a fairly simple project in terms of both wiring and coding, which is why I hope it will inspire folks to build more PixelBlaze wearables. Thanks to everyone in this forum who’s given me assists in the past.